RevoHR

    Documentation

    How to use RevoHR

    Seventeen chapters, in the order you would actually do them: set the company up, run the rota, teach and answer, then see what your workers see. Every chapter has the screens, the steps, and β€” where there is a screen to record β€” a short silent video of the real interface.

    17 chapters Β· 16 videos Β· screenshots from the live platform

    Chapters

    Set up

    01

    Find your way around

    RevoHR has two sides. You work in this web application; your workers never see it β€” they interact entirely through WhatsApp, in their own language, with nothing to install.
    1:298 stepsEnglishSilent β€” the captions carry the narration.
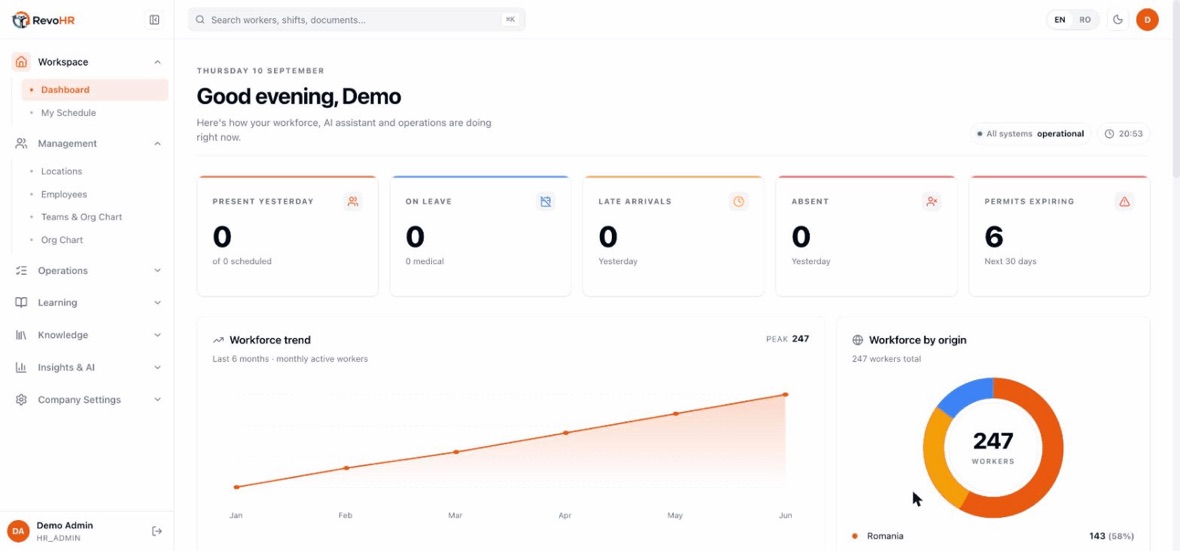
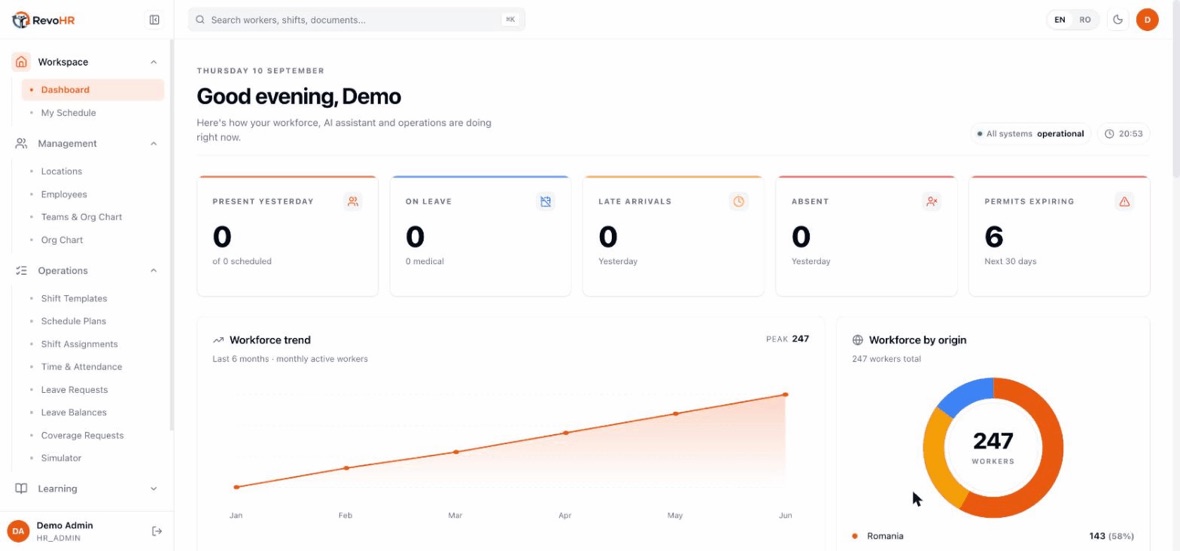
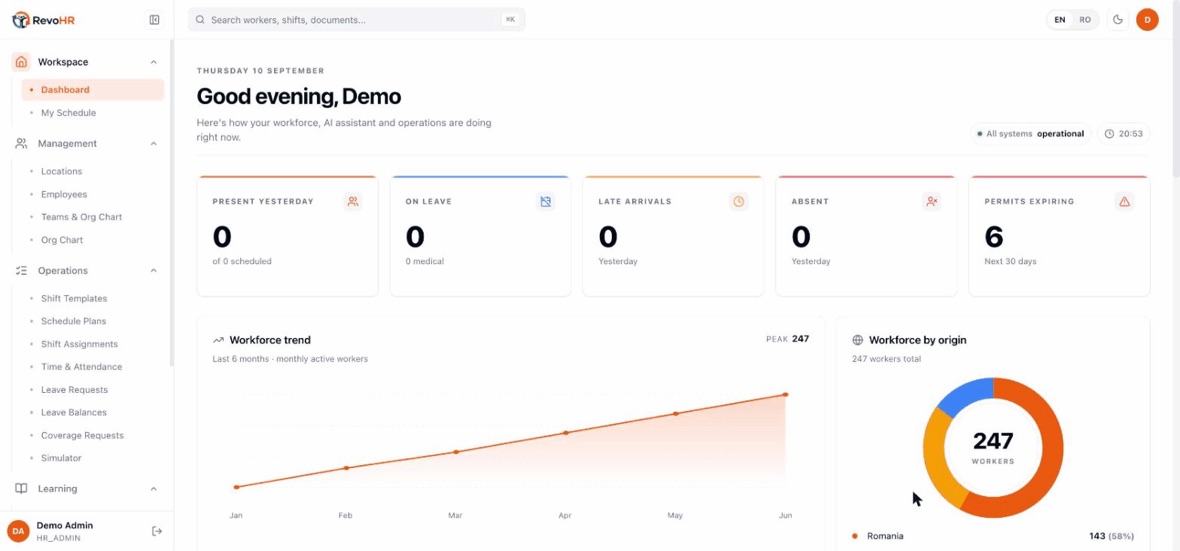
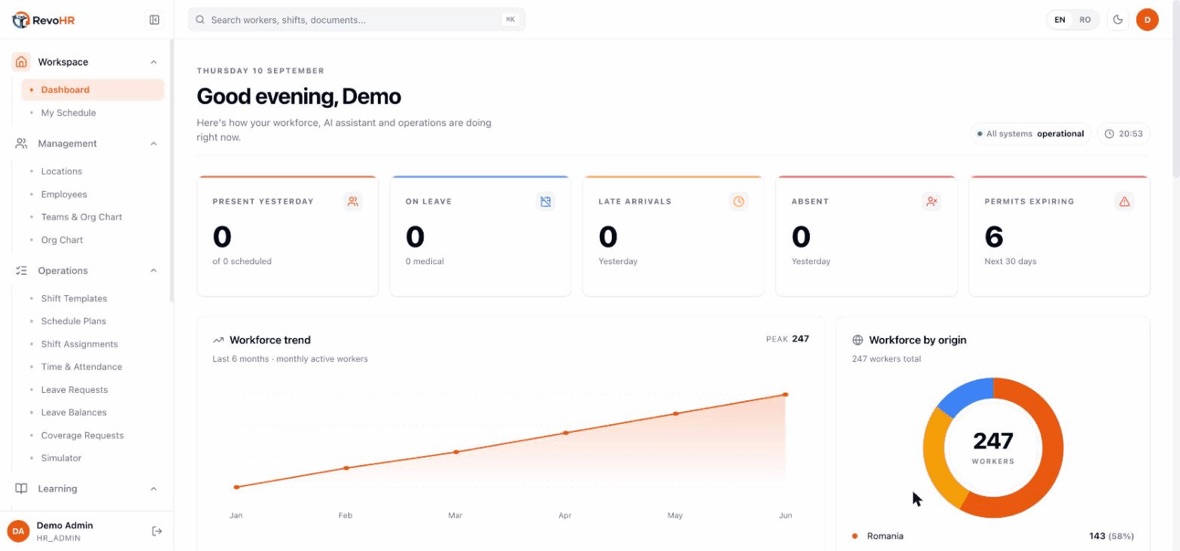
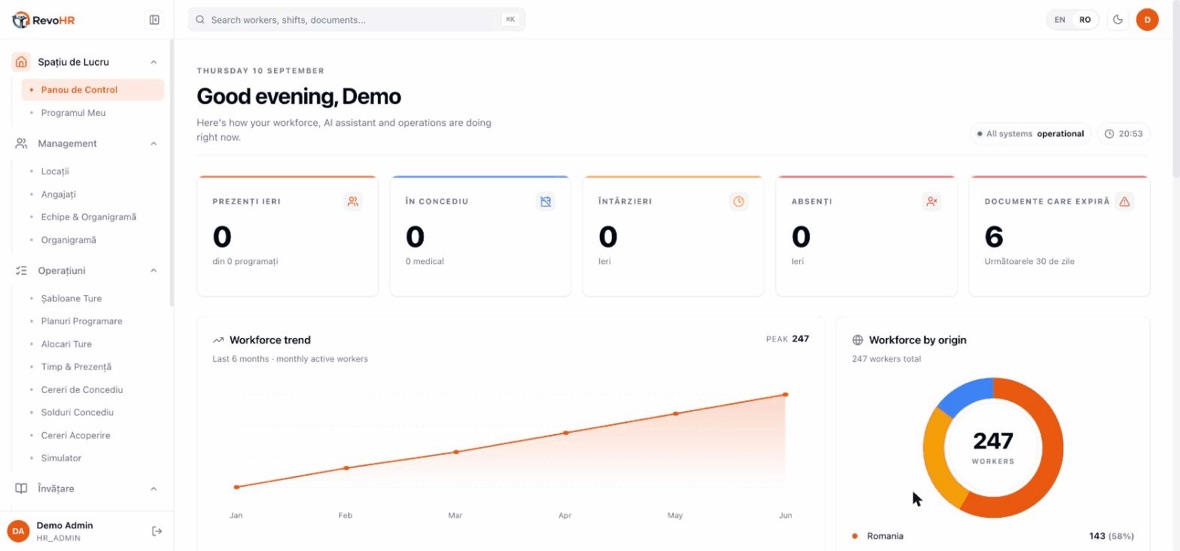
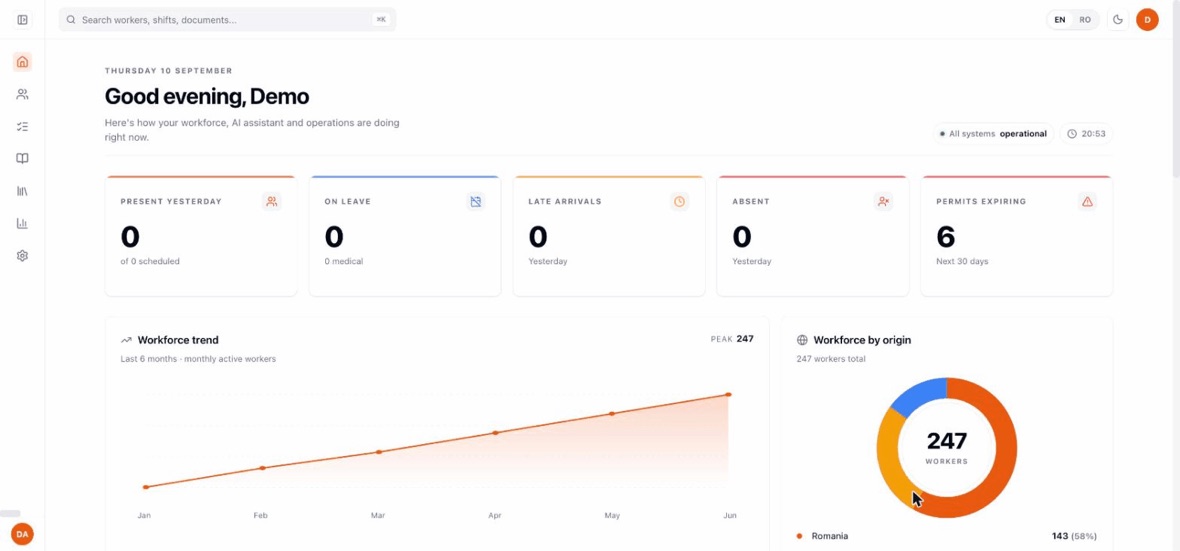
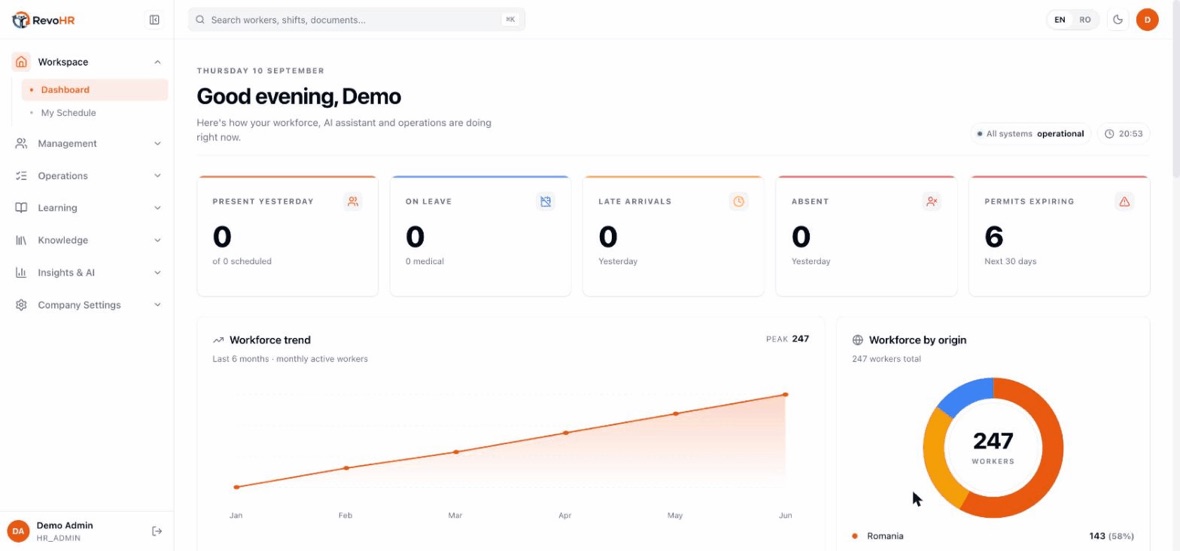
    RevoHR has two sides. You work in this web application; your workers never open it β€” they use WhatsApp. The sidebar is the whole map, and it groups screens by what you are doing, not by feature name.
    Management is who and where: your locations, your employees, your teams and the org chart. This is the group you fill in first, because everything else points at it.
    Operations is the daily work: shift templates, schedule plans, shift assignments, attendance, leave and coverage requests. If you are wondering where a day-to-day task lives, it lives here.
    Learning holds the trainings catalogue, the AI video generator and the assignments. Knowledge holds the documents your WhatsApp assistant answers from.
    Insights & AI is where you configure the assistant and read your usage. Company Settings is the company profile, the leave policies, the credentials and your subscription.
    The EN / RO switch changes your own interface and nothing else. It does not change the language a worker receives β€” that is set on the worker's own record, one person at a time.
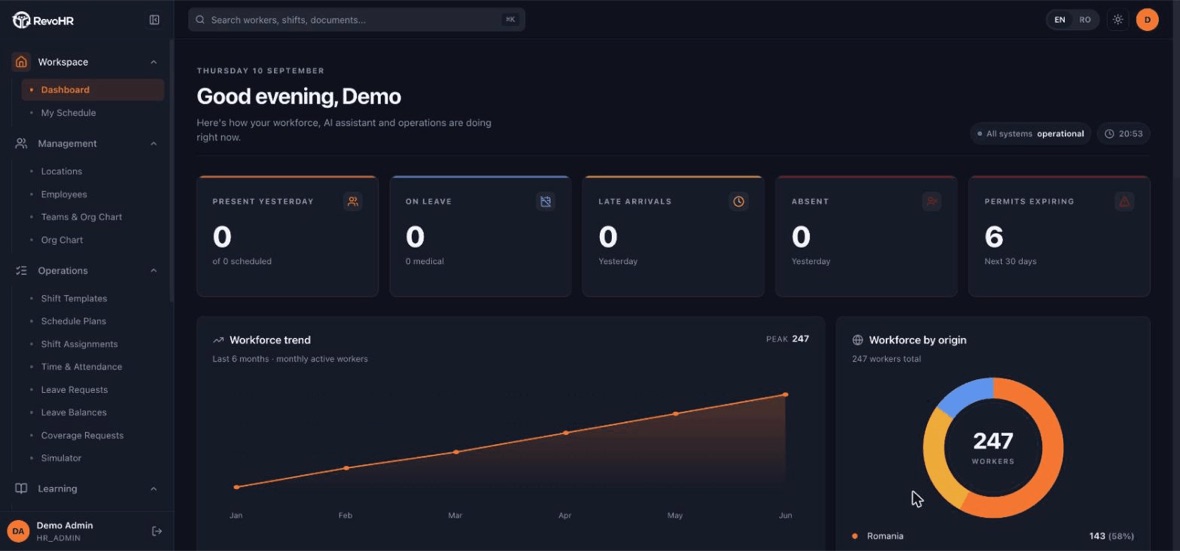
    The theme toggle switches light and dark. Like the language switch, it is yours alone β€” nobody else sees the change.
    At the bottom of the sidebar: who you are signed in as and what role you hold. The role decides which of these groups you can see at all.
    1. Sign in at platform.revohr.com. If RevoHR set you up, you never received a password β€” you received a link to choose your own.
    2. Understand the EN / RO switch: it changes your interface only. What language a worker receives is set on that person's own record.
    3. Read the sidebar by activity, not by feature name. Management holds locations, employees and teams; Operations holds shifts, attendance and leave.

    Watch out

    If a menu item is missing, it is almost always your package rather than a fault: Company Settings β†’ Subscription lists exactly what your plan includes, so check there first. To find anything, navigate from the sidebar and use each screen's own filters β€” every list has them.
    Back to chapters

    02

    Set up your company

    Two screens configure the company itself rather than the people in it. Do them first β€” and the WhatsApp credentials before anything else, because without them RevoHR cannot send a single message.

    1:146 stepsEnglishSilent β€” the captions carry the narration.
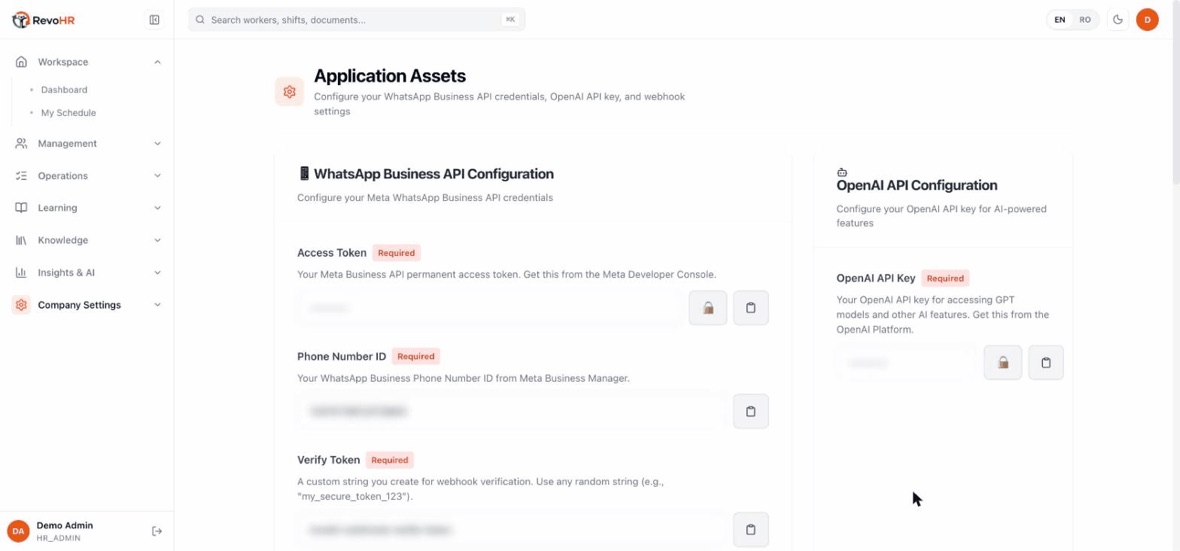
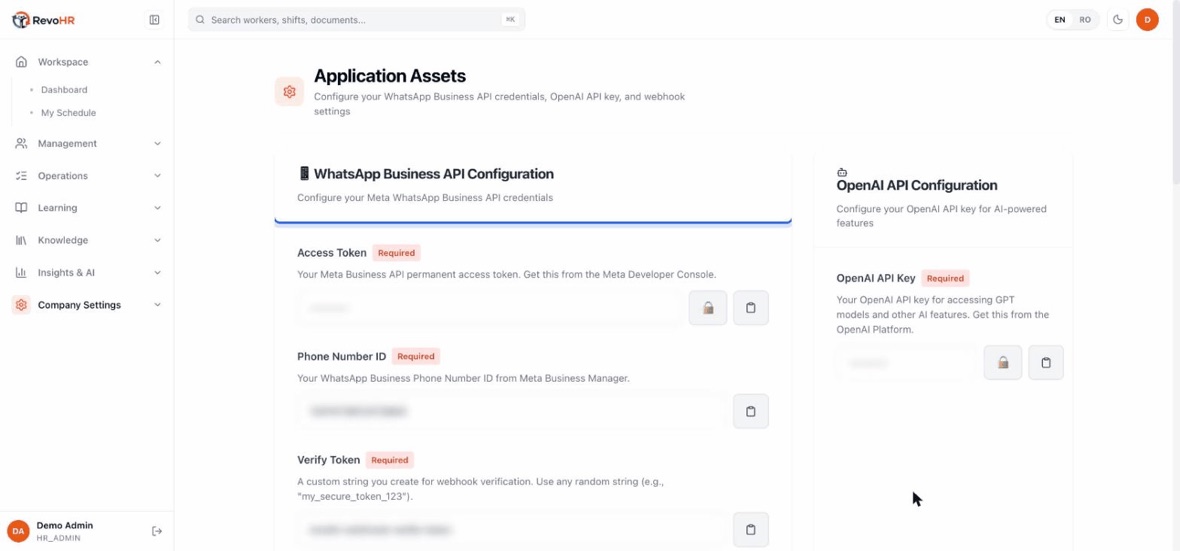
    Company Settings β†’ Settings. Do this screen before anything else. Without WhatsApp credentials, five things silently do nothing: the welcome message, shift notifications, training notifications, the chat on the employee page, and the whole assistant.
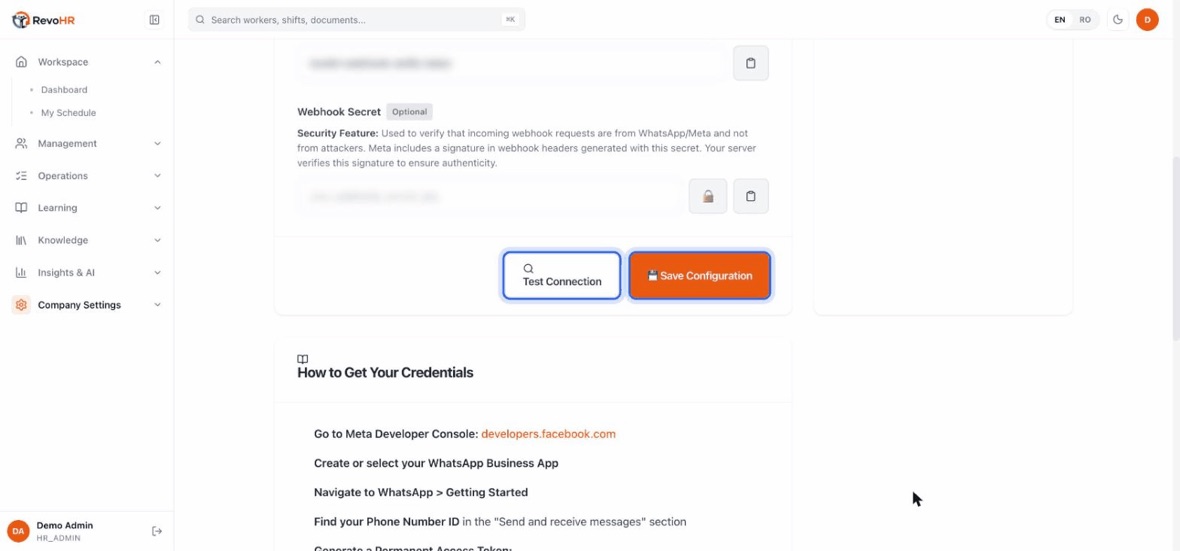
    The WhatsApp Business API block: access token, phone number ID, verify token, webhook secret. These come from your Meta Business account β€” the page lists the exact steps under the form.
    Test Connection before Save Configuration, every time. A wrong credential does not announce itself later β€” it just means nothing ever arrives, and nothing errors while it happens.
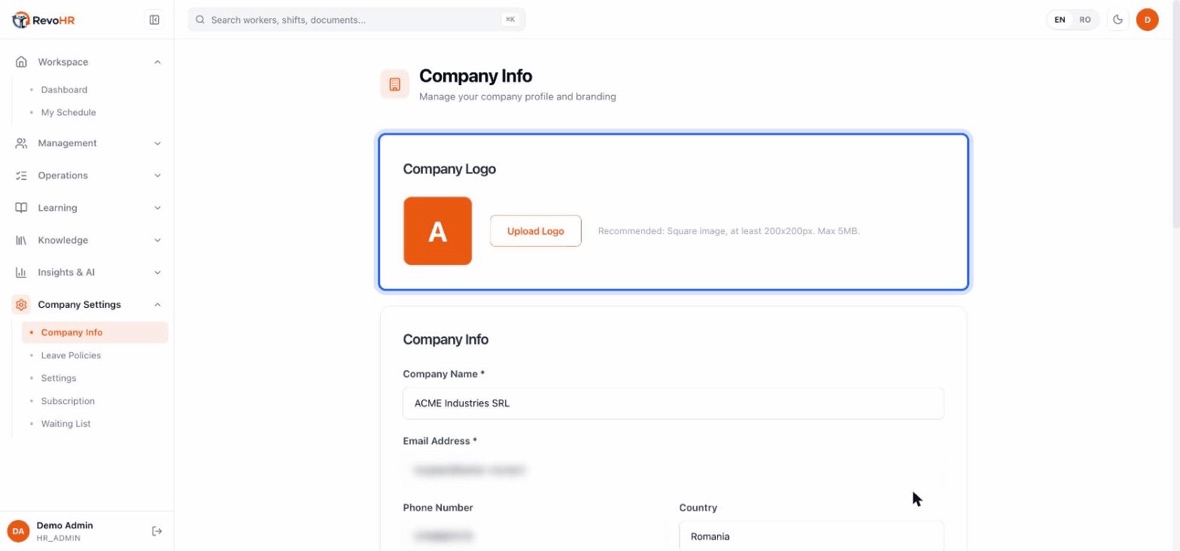
    Company Settings β†’ Company Info. The logo uploads the moment you choose the file β€” there is no separate save for it, unlike everything below.
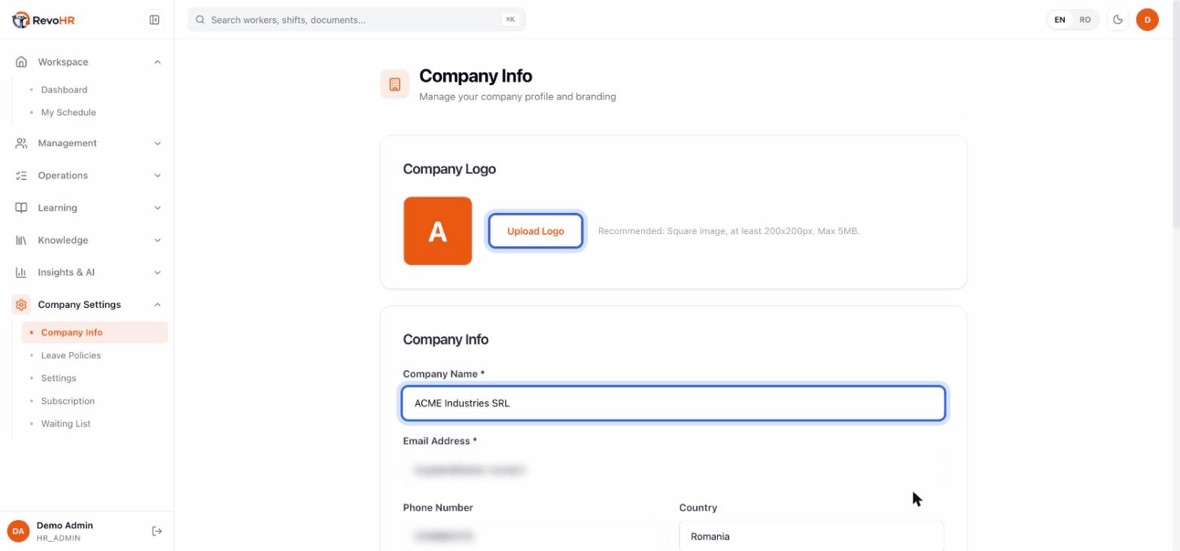
    Only two fields are required: the company name and a valid contact email. The rest β€” phone, country, address β€” is yours to fill or leave.
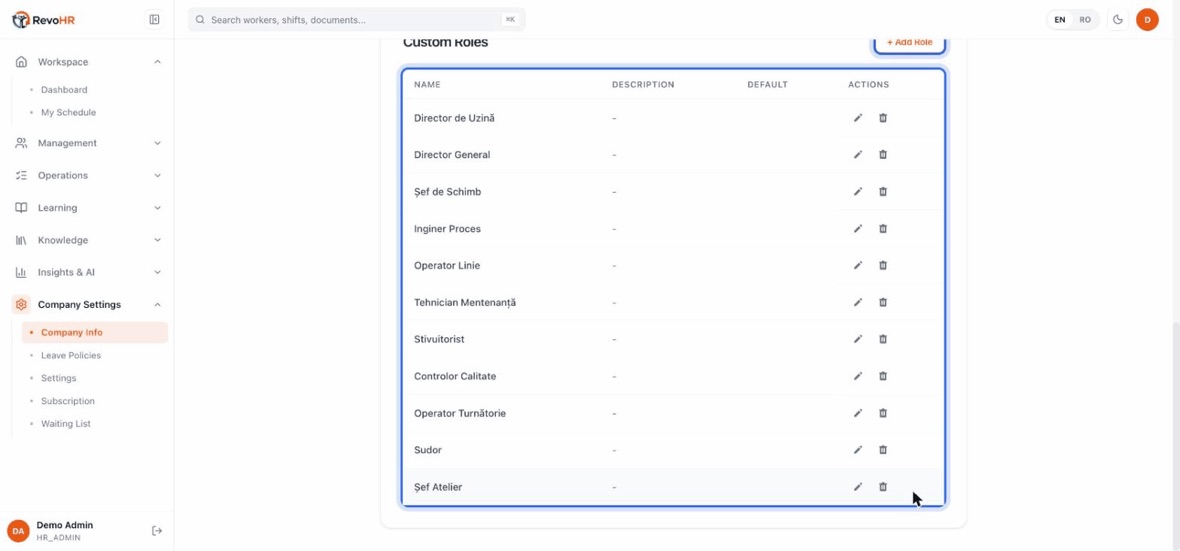
    Further down the same page: Custom Roles. These fill the Role dropdown on the employee form, and they are job titles, not permissions. Add them before you add anybody β€” an empty list means every new person gets the default role and you edit them all later.
    1. Fill the WhatsApp and OpenAI credentials on the Settings screen, then press Test connection. If RevoHR set your account up these are usually already filled from a shared number β€” check rather than assume.
    2. Fill the company profile: name and contact email are required, the rest is optional.
    3. Add your Custom Roles before you add any employees. The Role dropdown is filled from this list, so an empty list means every new person gets the default role and you edit them all later.

    Watch out

    Without WhatsApp credentials, five things silently do nothing: the welcome message, shift notifications, training notifications, the chat on the employee page, and the whole assistant. Nothing errors loudly β€” it simply never arrives.

    Back to chapters

    03

    Add a location

    A location is a physical site. It does more than label an address: it carries the geofence and the timing rules that decide whether a check-in counts, and it is required before you can build a rota.

    1:489 stepsEnglishSilent β€” the captions carry the narration.
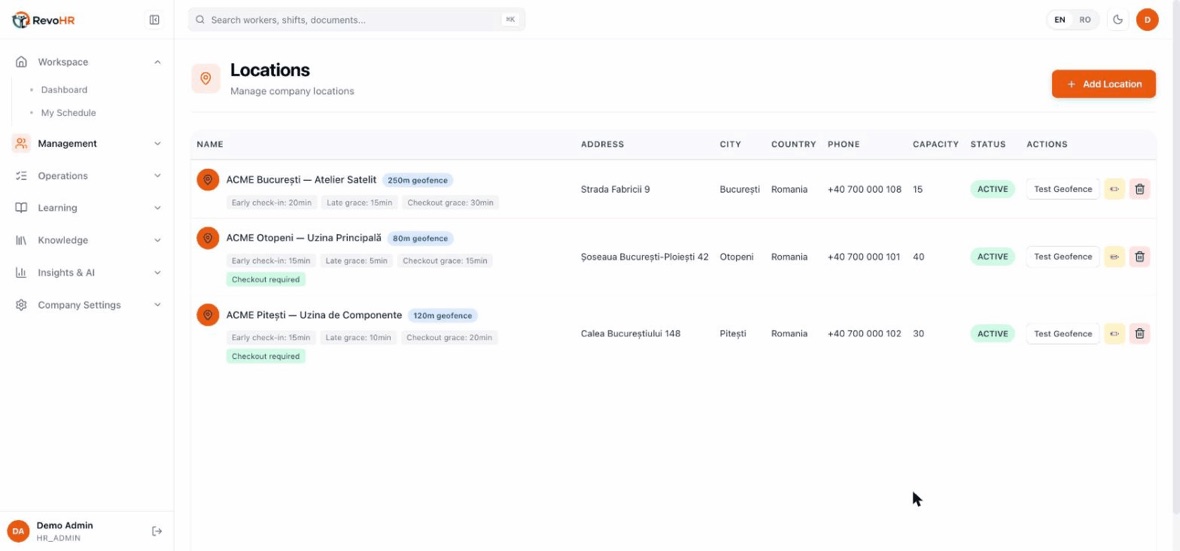
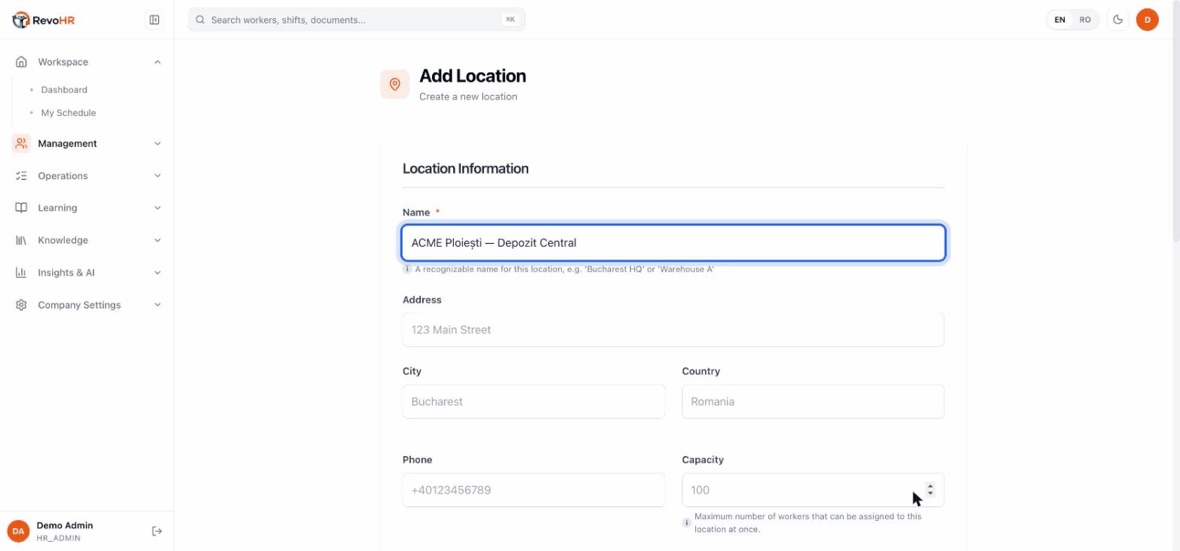
    Management β†’ Locations. A location is a physical site, and it does more than label an address: it carries the rules that decide whether a check-in counts. You need one before you can build a rota.
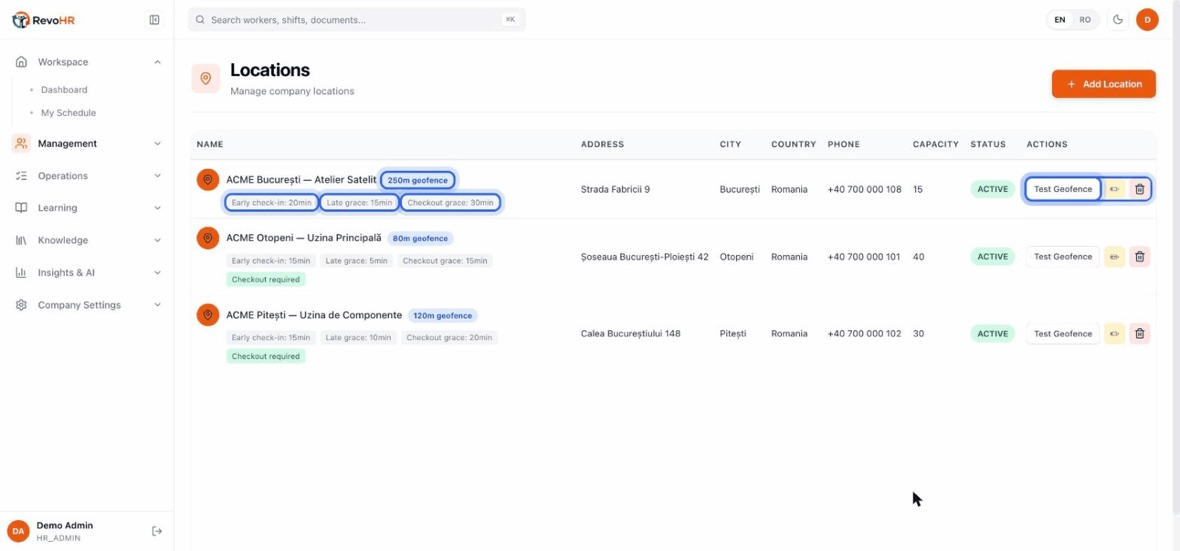
    Each site shows its rules as badges β€” geofence radius, early check-in, late grace, checkout grace β€” so you can compare two sites at a glance instead of opening both.
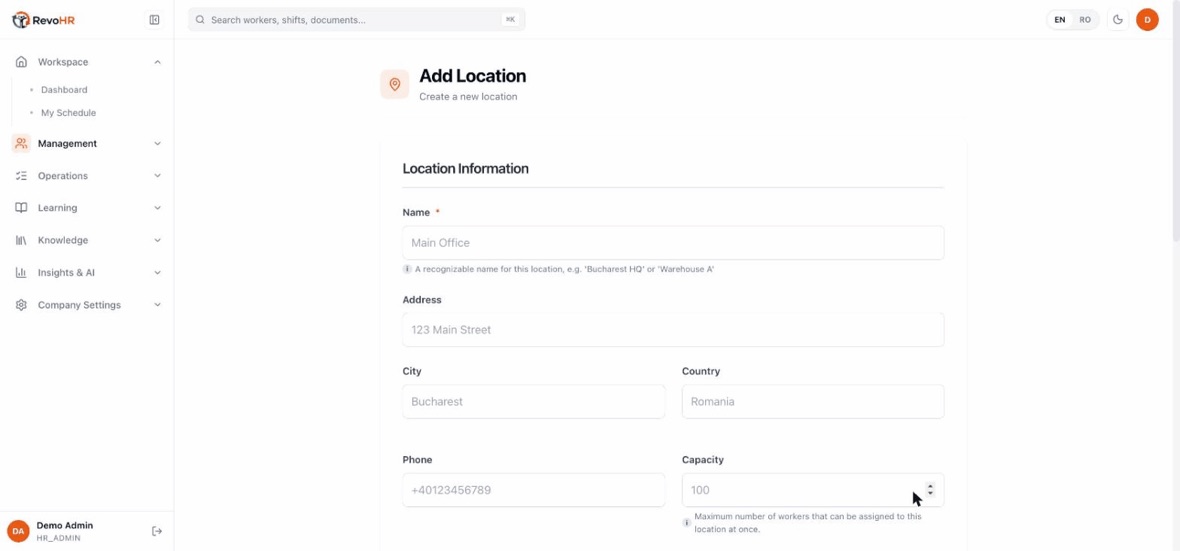
    Add Location is one page. Of everything on it, only the name is required.
    Name it the way the people who work there call it. This name shows up in the rota, in the shift assignment and in the worker's WhatsApp message β€” "Warehouse A" beats "Site 2".
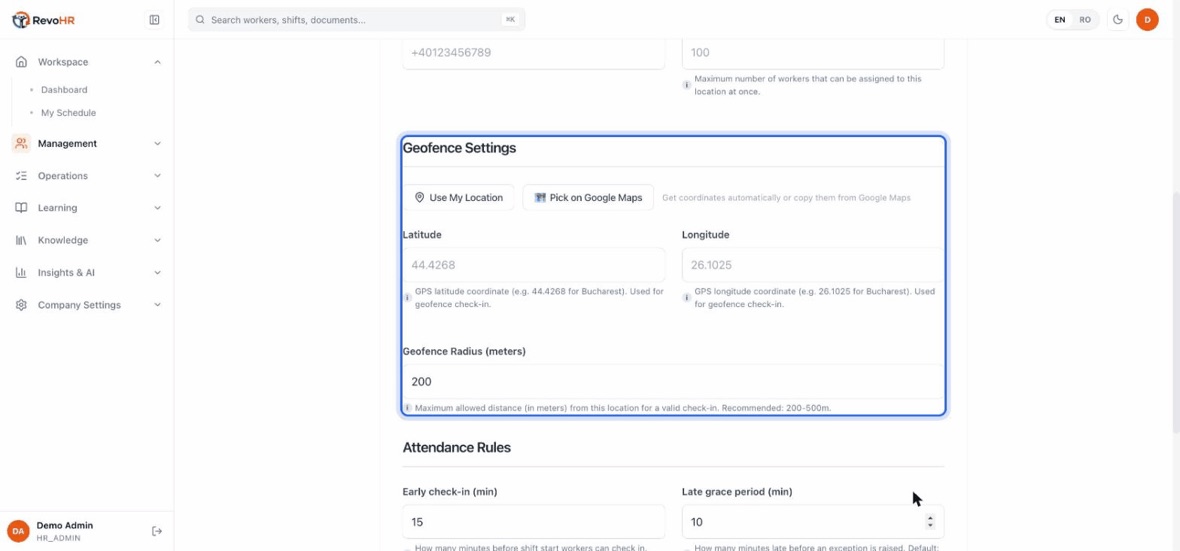
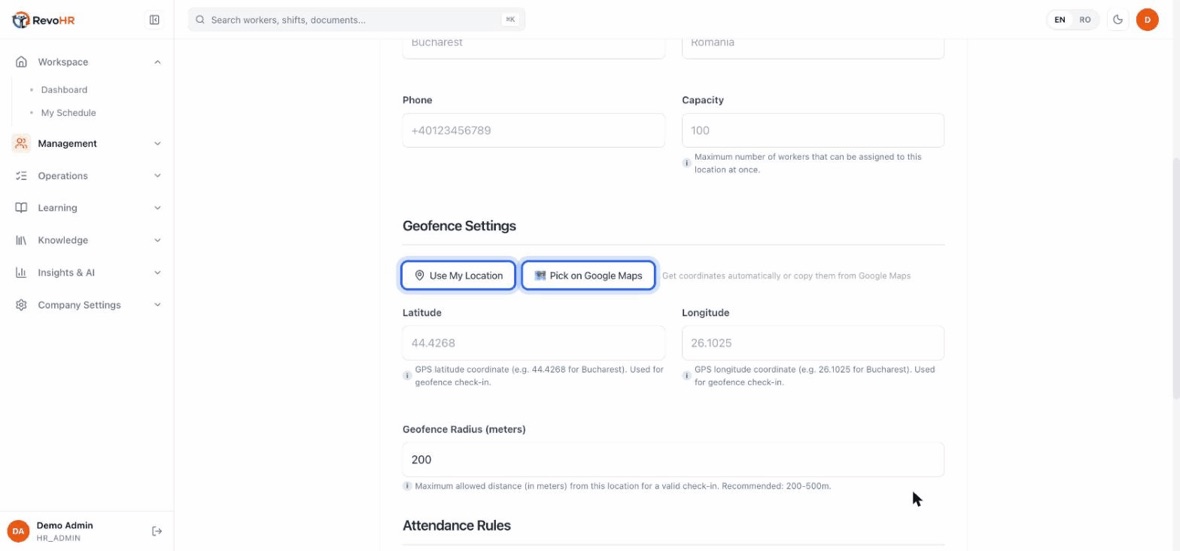
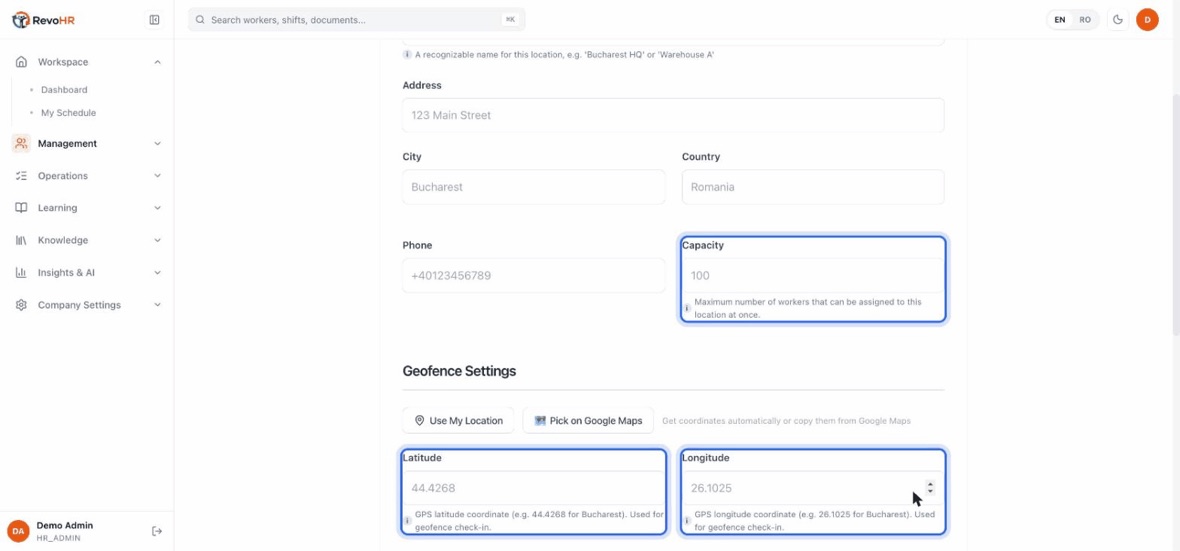
    Geofence Settings is where the site becomes real. Coordinates are optional to save the record, but required for geofencing to mean anything β€” without them there is nothing to measure a worker's distance against.
    Two helpers. Use My Location fills the fields from your browser while you are standing at the site β€” that is the accurate way. Pick on Google Maps opens a map, but copies nothing back; you read the numbers off and type them.
    Then the radius. Pick one that fits the site: 200 m suits a building; a yard, port or campus needs 500–1000 m. Too tight and honest workers are flagged every morning; too loose and the check means nothing.
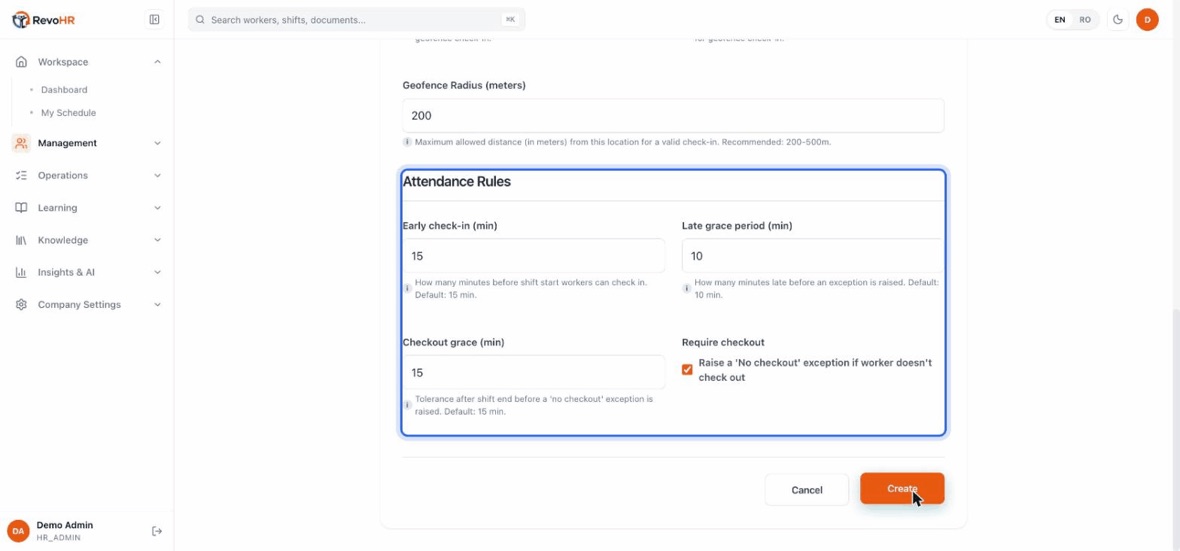
    Attendance Rules are the three tolerances: how early someone may check in, how late before it counts as late, and how long after the shift before a missing checkout is flagged. Defaults are 15, 10 and 15 minutes.
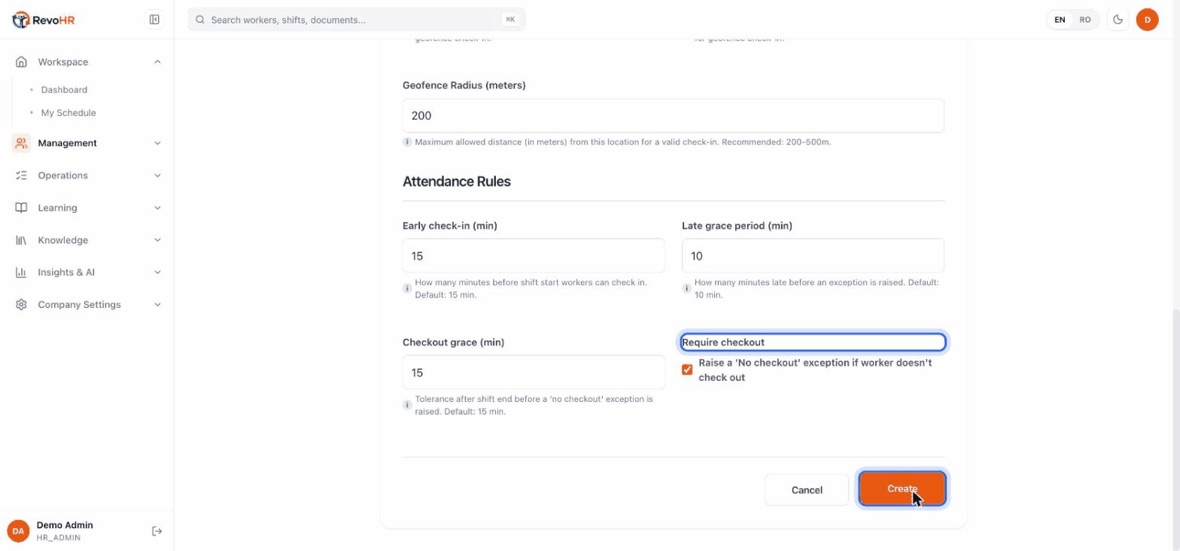
    Require checkout decides whether a forgotten check-out raises an exception at all. And the rule worth remembering: a check-in outside the geofence is never rejected β€” RevoHR records it, notes the distance, and leaves the judgement to you. Nobody is ever stuck at the gate because of a GPS reading.
    1. Give the location a name β€” that is the only required field.
    2. Set latitude and longitude. They are optional to save the record but required for geofencing to mean anything: without them there is nothing to measure a worker's distance against.
    3. Tune the four attendance rules: geofence radius (200 m by default), early check-in 15 min, late grace 10 min, checkout grace 15 min.
    4. Pick a radius that fits the site. 200 m suits a building; a yard, port or campus needs 500–1000 m. Too tight and honest workers are flagged constantly; too loose and the check means nothing.

    Watch out

    A check-in outside the geofence is never rejected. RevoHR records it, notes how far away the worker was, and leaves the judgement to you. Nobody is ever left unable to start their shift because of a GPS reading β€” your job is to review the flagged ones.

    Back to chapters

    04

    Add an employee

    The employee record is the centre of RevoHR. One thing is worth understanding first: workers have no account. A worker is identified by their phone number, and that number is how everything reaches them.
    2:2512 stepsEnglishSilent β€” the captions carry the narration.
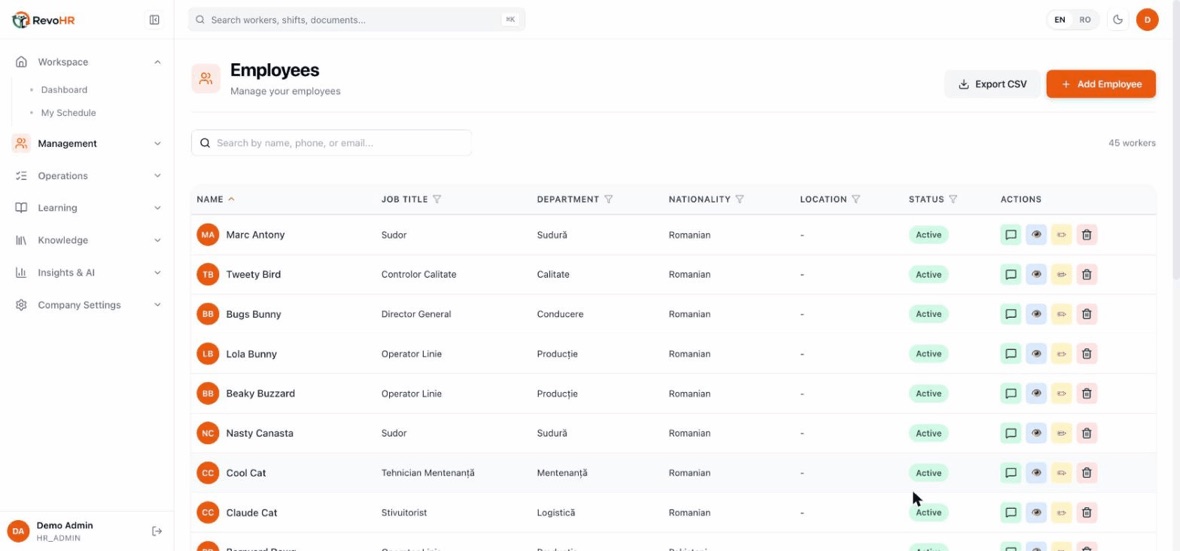
    Management β†’ Employees. The employee record is the centre of RevoHR β€” the rota, attendance, leave and training all hang off it.
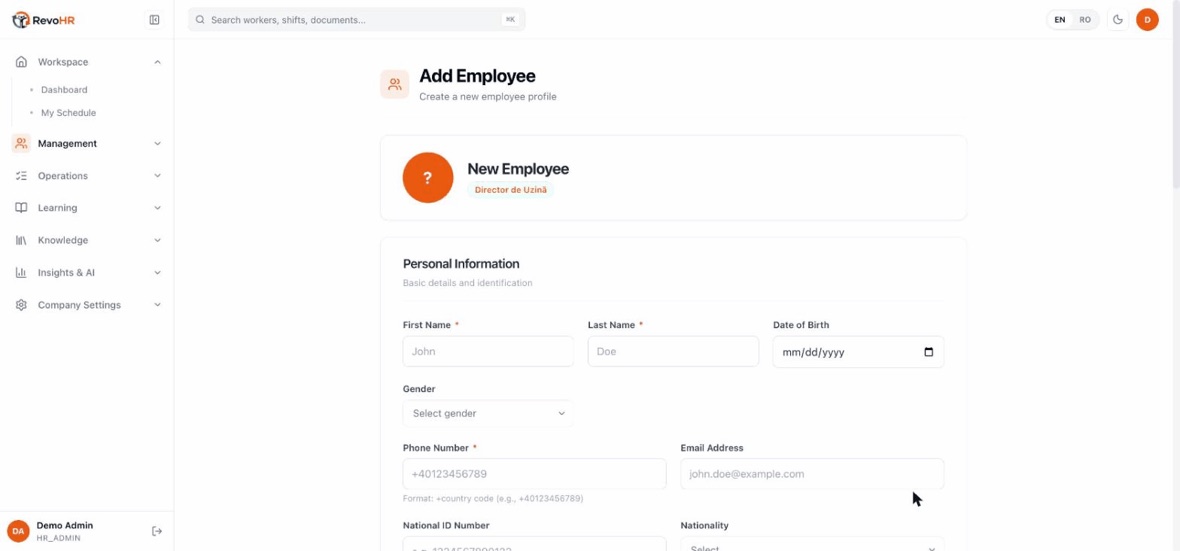
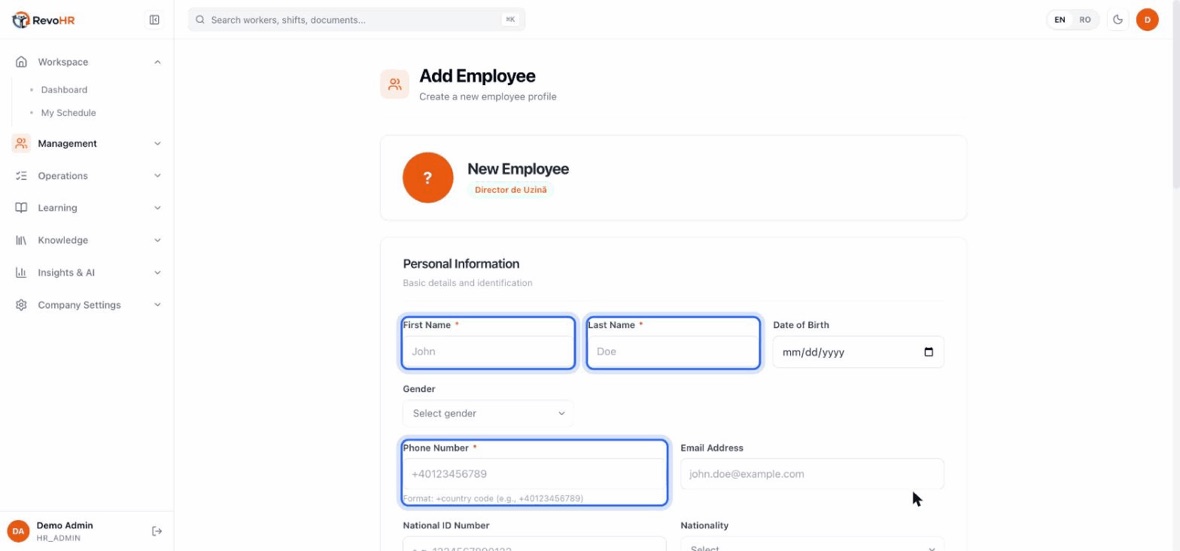
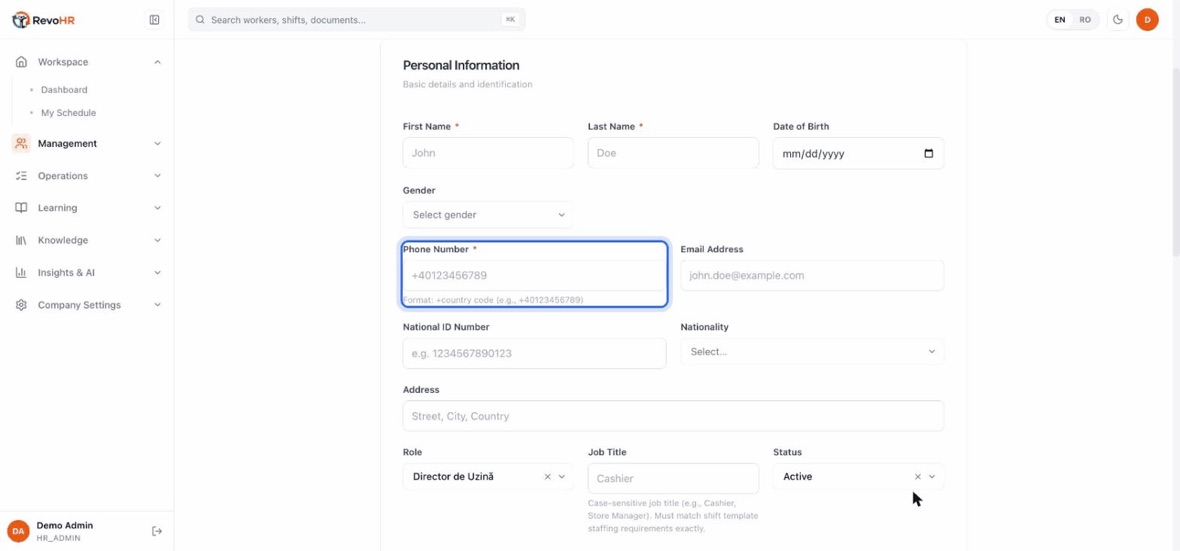
    Add Employee is one page, no wizard. It looks long, but understand one thing first: workers have no account. There is no password and no app to install.
    Out of the whole form, four fields are required: first name, last name, phone number and preferred language. Everything else you can fill in later.
    The phone number is not a contact detail β€” it is the person's address. Everything reaches them through it, so it has to be in international format, with the country code.
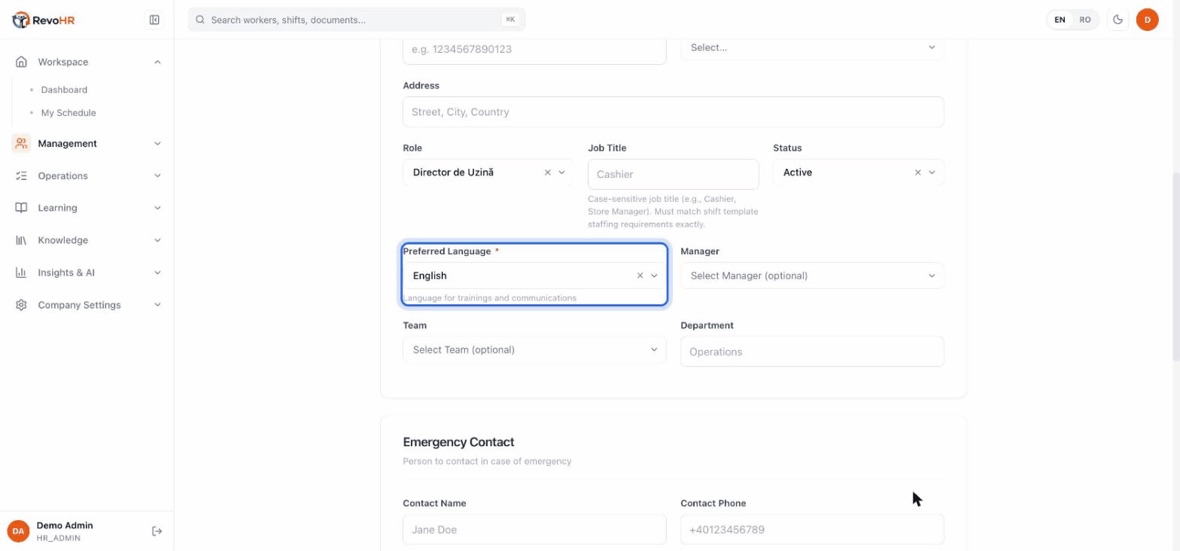
    Preferred language is a property of the person, not a display setting. It decides the language of their shift notifications, their trainings, their attendance prompts and every reply the assistant gives them. English is the default until you change it.
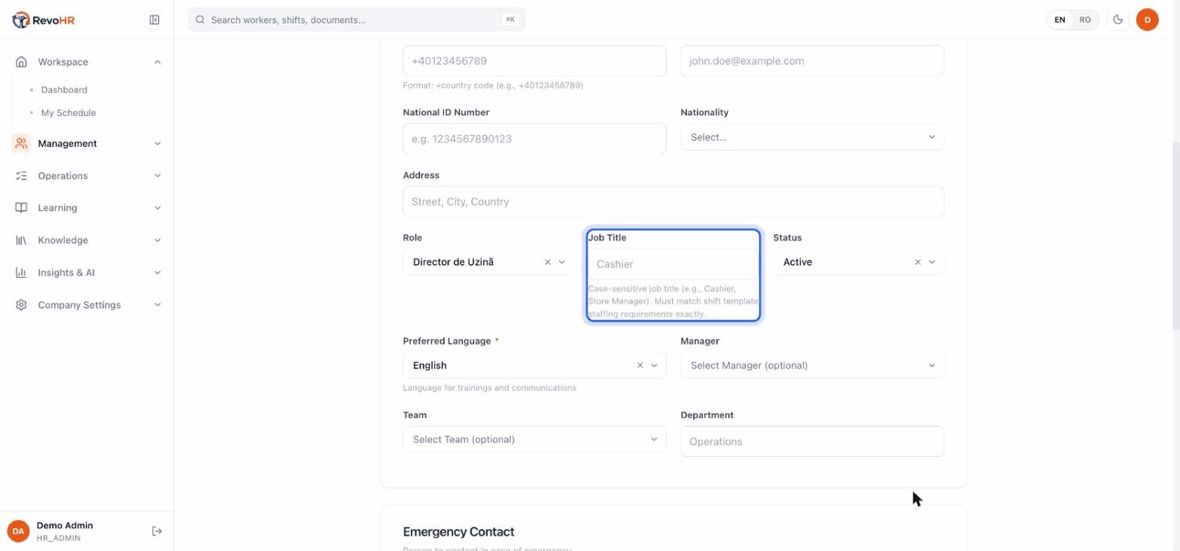
    Job title is the one that trips people up. Shift staffing requirements match on job title β€” exactly, and case-sensitively. Not on the role, not on the team. A typo here is a shift that never fills.
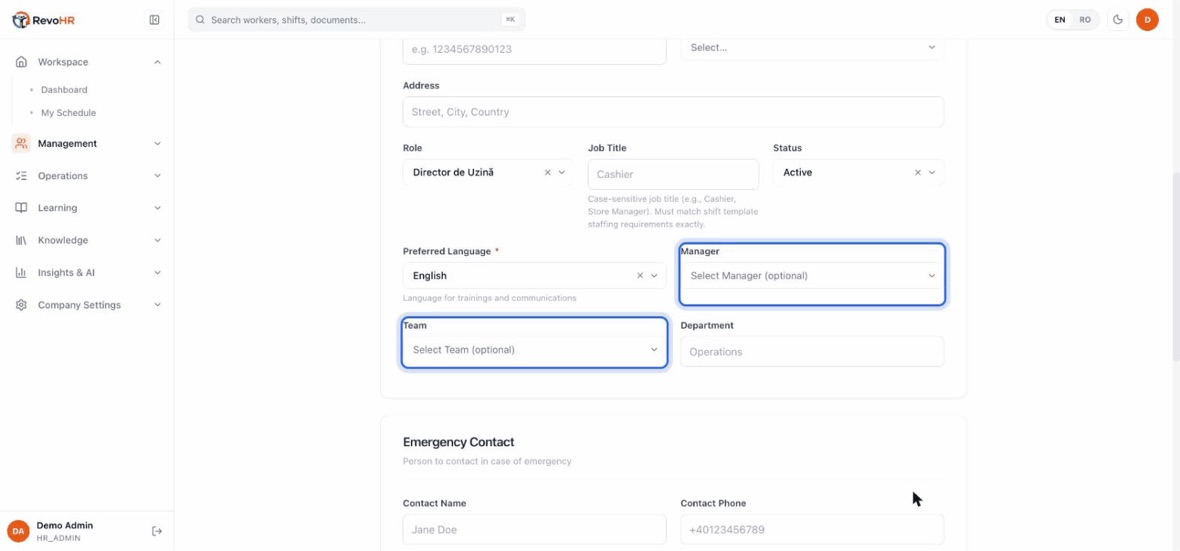
    Manager is the approval chain: this person's leave requests, shift-change requests and late notifications all go to whoever you put here. Team is optional β€” it is the shortcut for putting a whole crew on a shift at once.
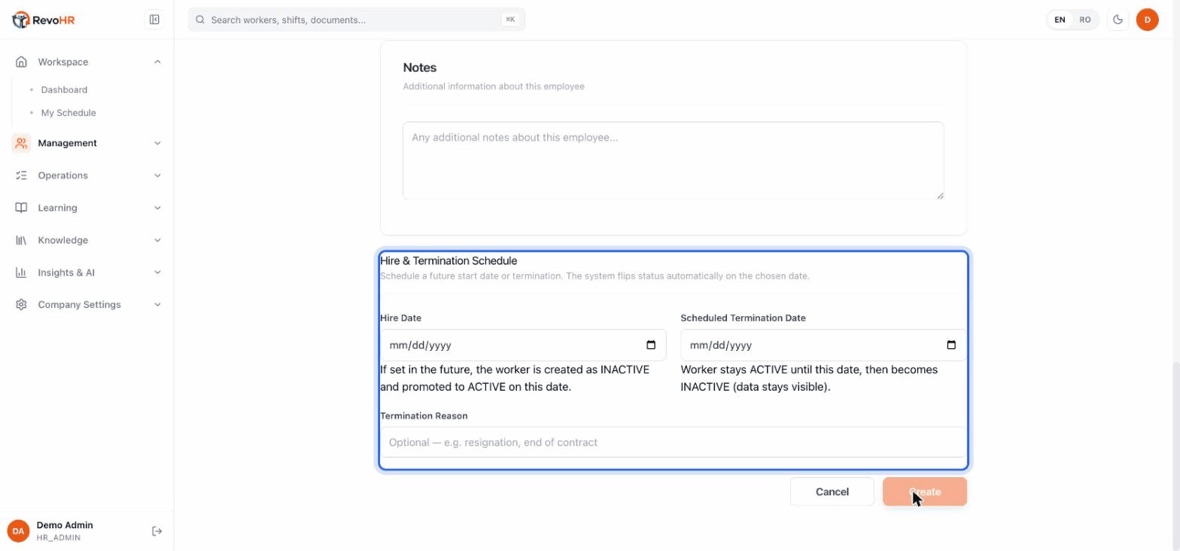
    At the bottom, hire and termination dates you can set in advance. The status flips itself on the day, so a new hire stays inactive until they actually start.
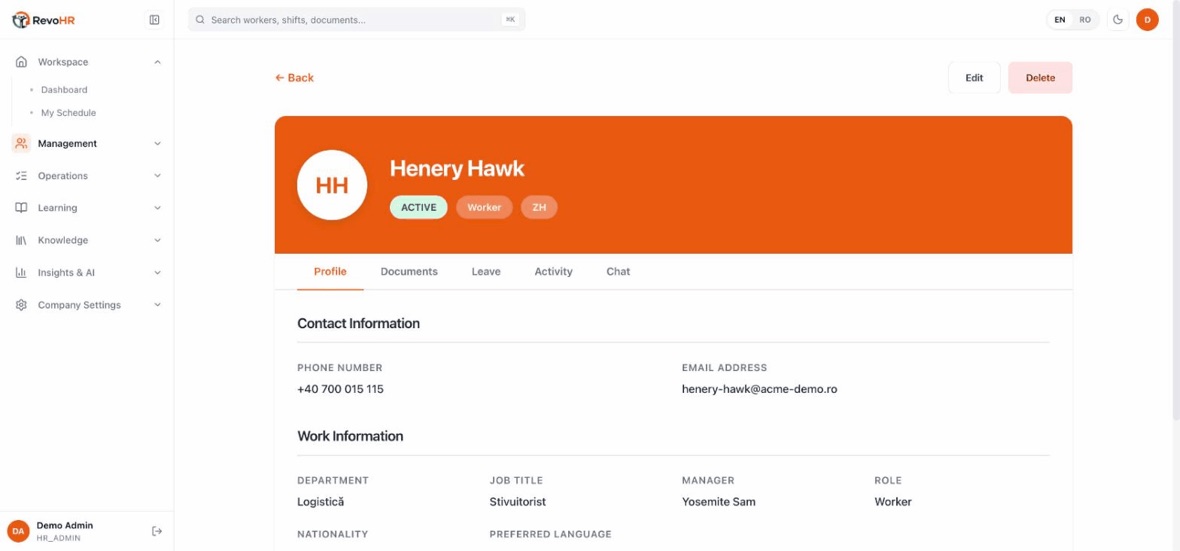
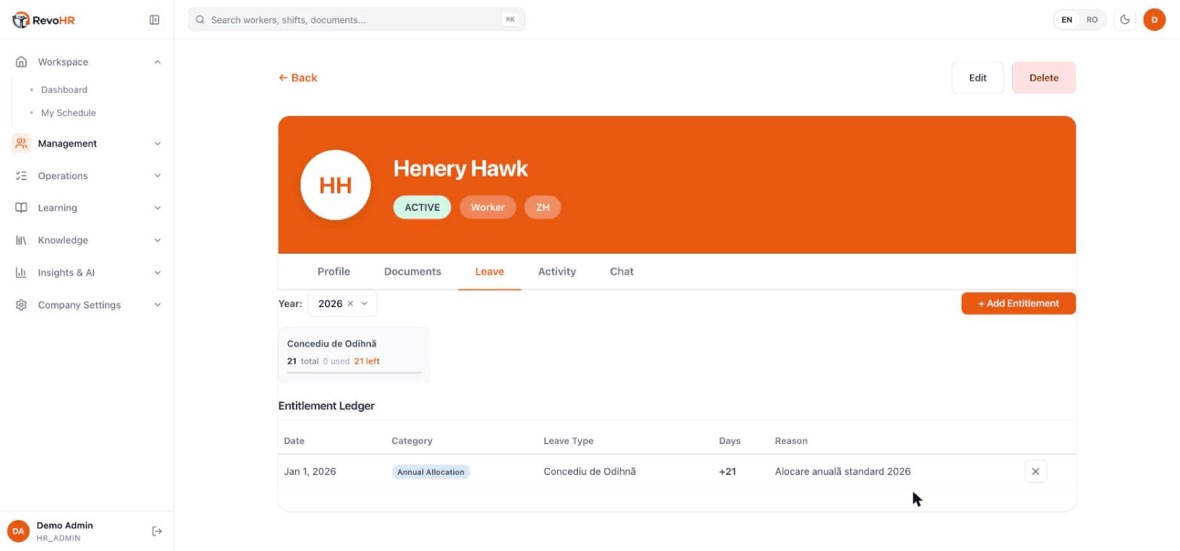
    Saved, the person has a record. Everything you set is here to read: phone, department, job title, manager and preferred language β€” this one is Chinese, so this worker gets everything in Chinese without asking.
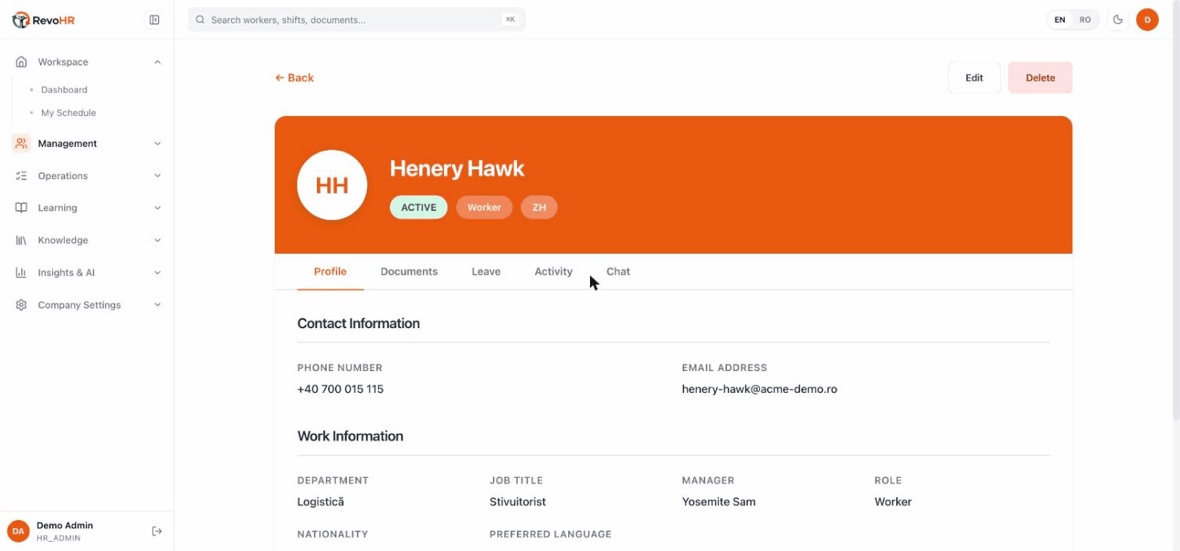
    Five tabs on every record: Profile, Documents, Leave, Activity and Chat. Chat is the WhatsApp conversation with that person, read from your side.
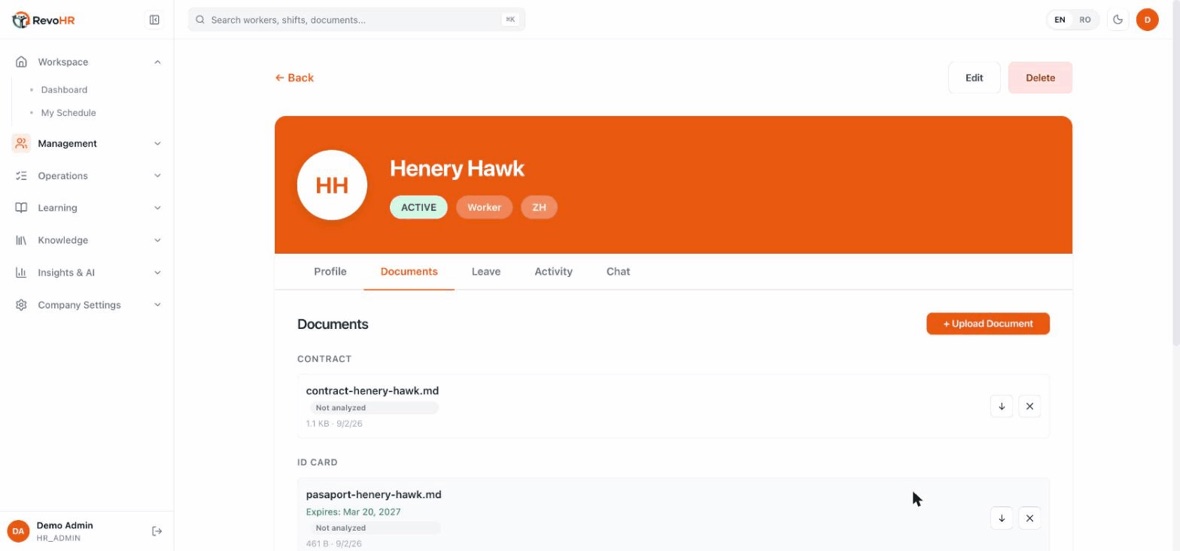
    Documents is where certifications live, and they bring their own expiry date: RevoHR reads the file and proposes what it found β€” Expires: Mar 20, 2027 β€” and nothing is saved without your confirmation.
    Leave shows this person's entitlement and the ledger behind it: what they were allocated, what they used, what is left. The ledger is why a balance can always be explained.
    1. Fill the four required fields: first name, last name, phone in international format, and preferred language.
    2. Set the preferred language deliberately. It is a property of the person, not a display setting β€” it decides the language of their assistant replies, their training, their shift notifications and their attendance prompts. English is the default until you change it.
    3. Set the manager. The manager receives this person's leave requests, shift-change requests and late notifications, so the whole approval chain runs through it.
    4. Set the job title if you use staffing rules. Shift staffing requirements match on job title, not on the role and not on the team.
    5. Upload documents on the Documents tab and let the AI read them. A file moves Pending β†’ Processing β†’ Suggested, then a panel appears pre-filled with the expiry date it found. Nothing is saved without your confirmation.
    Watch out

    Two surprises. If the phone number already belongs to an active worker at another company, RevoHR creates the record but leaves it inactive and tells you. And the Chat composer greys out more than 24 hours after the worker's last message β€” that is WhatsApp's rule for every business on the platform, and you must send a pre-approved template instead.

    Back to chapters

    05

    Build teams and the org chart

    A team is a named group of workers with a leader β€” a scheduling shortcut, not an org structure. The org chart is a separate thing entirely, built from one field.

    1:197 stepsEnglishSilent β€” the captions carry the narration.
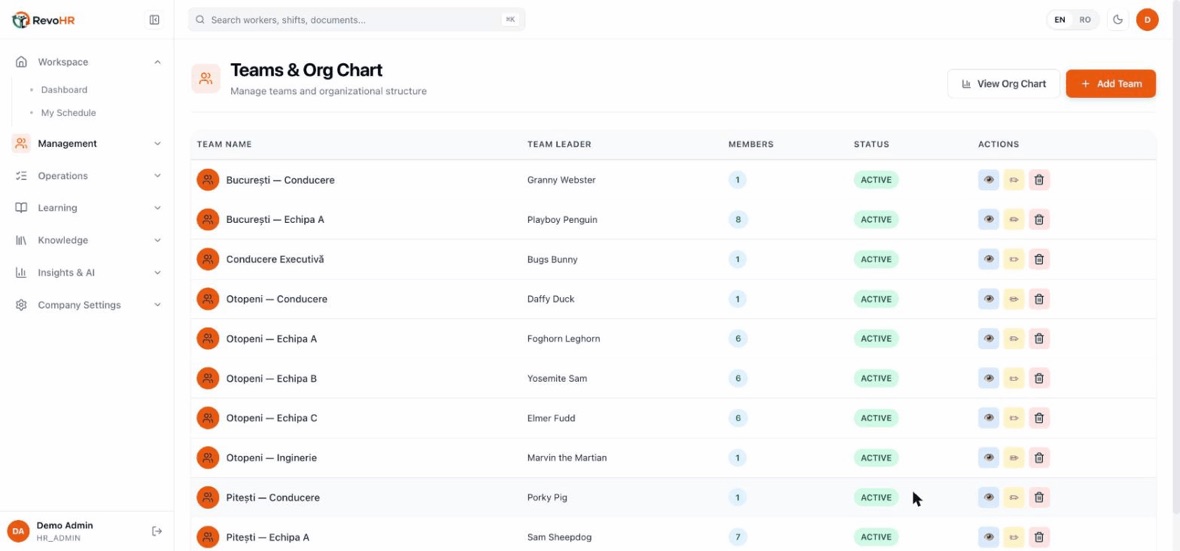
    Management β†’ Teams & Org Chart. A team is a named group of people you can act on at once β€” put a whole crew on a shift instead of ticking six names.
    Each team carries a leader and a member count. Notice what a team does not carry: a location. A team is a group of people, not a place β€” the same crew can work at more than one site.
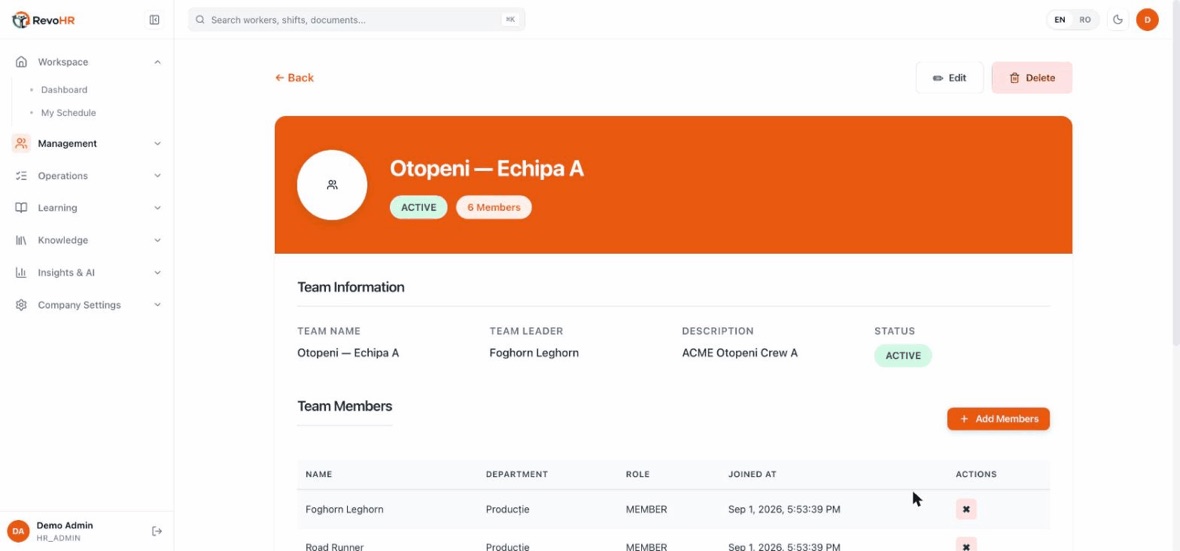
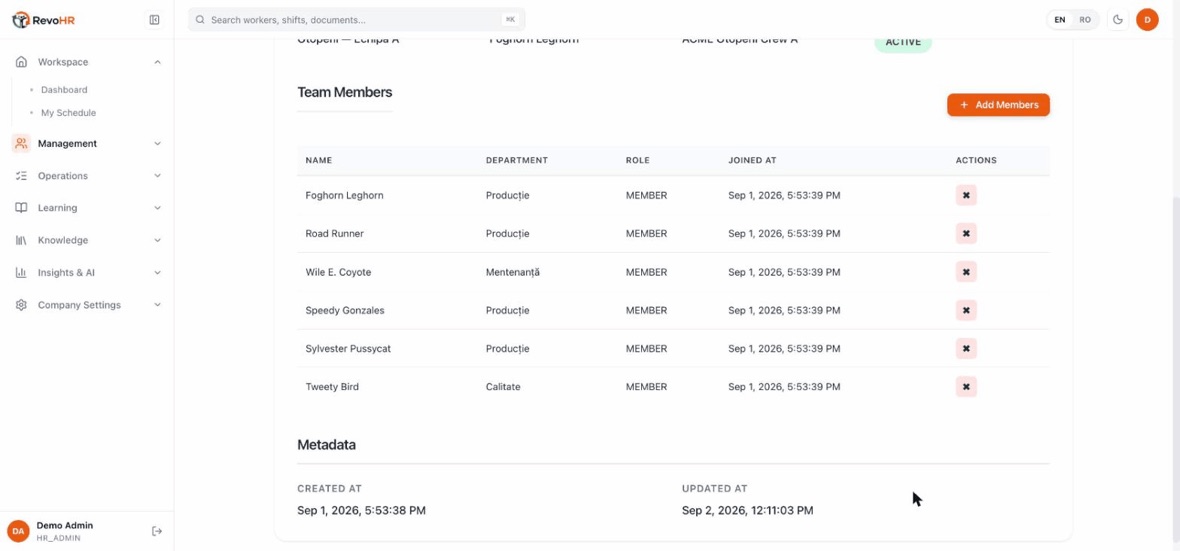
    Open a team and you get its people, with the department and role each one holds, and when they joined it. Add Members and the βœ– on each row are how the group changes.
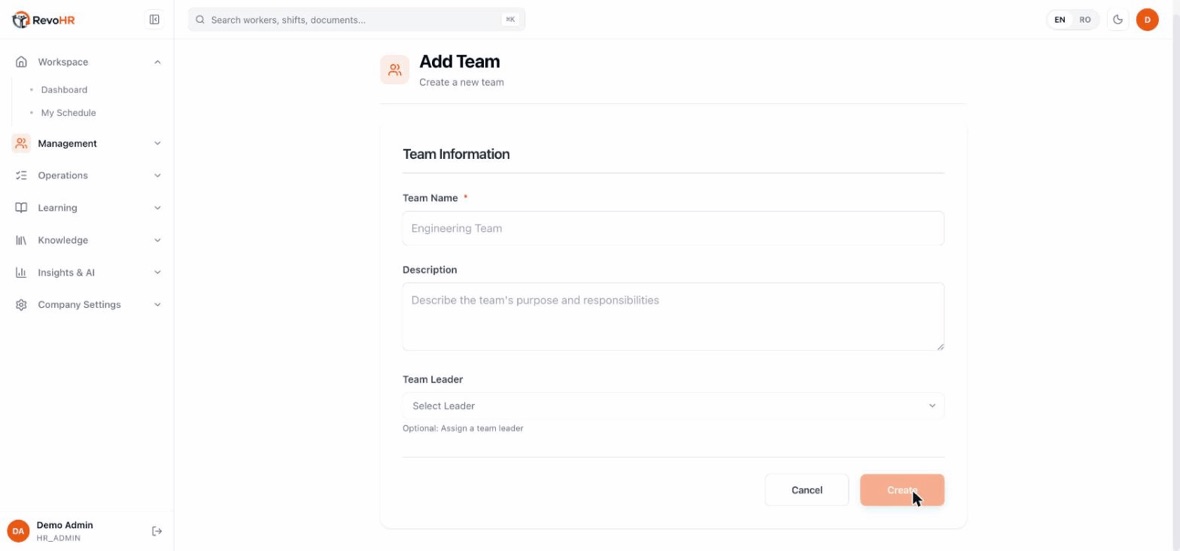
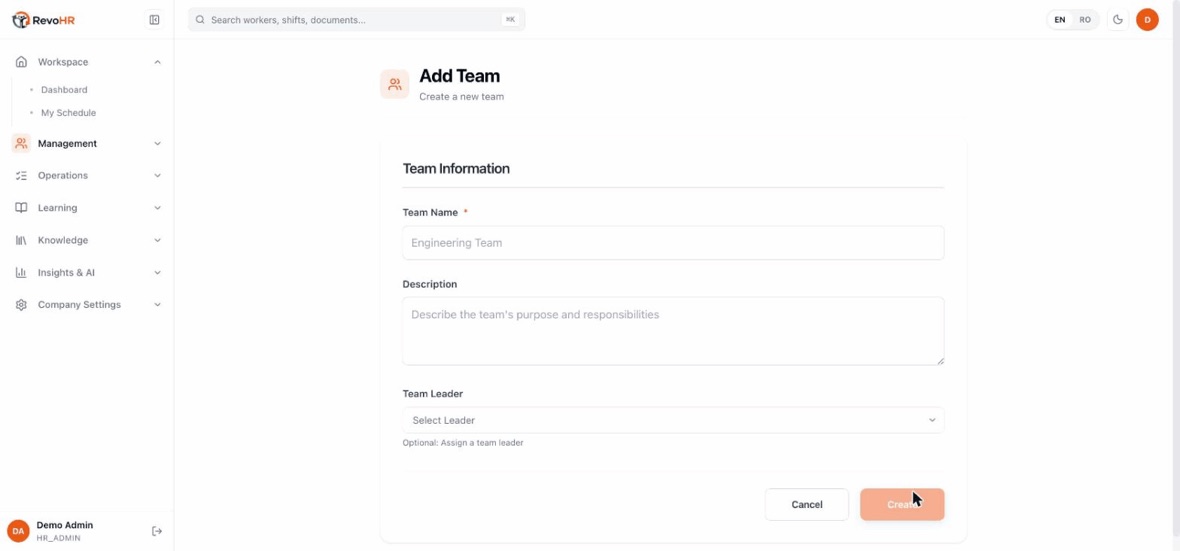
    Add Team is a page of its own. Three fields, and only one of them is required.
    Team name is required; the description and the leader are optional. Name teams the way your foremen already talk β€” "Otopeni Crew A" beats "Team 3" every time someone has to pick one from a list.
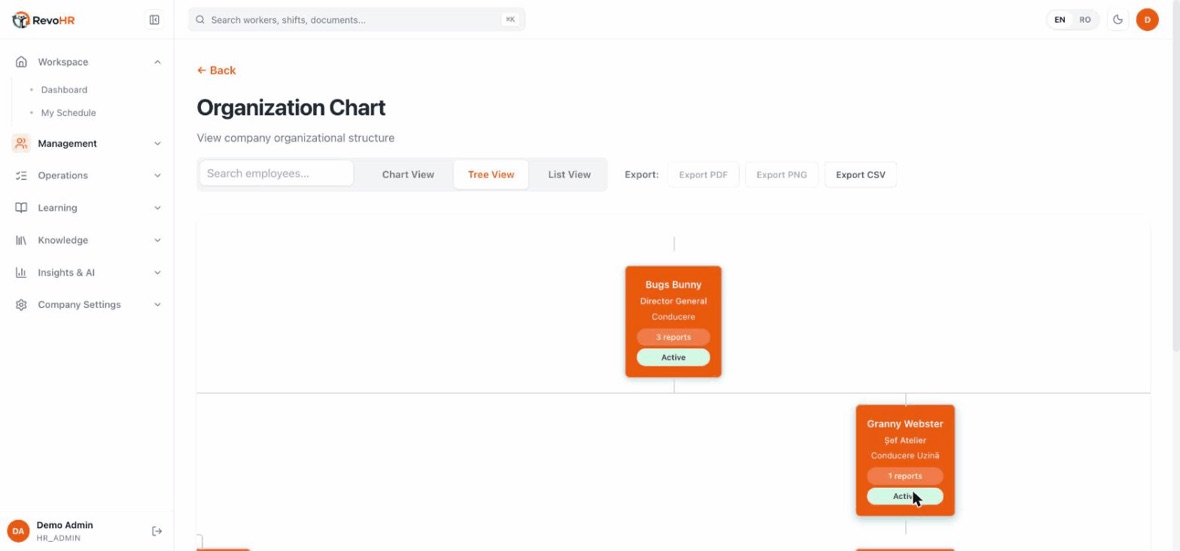
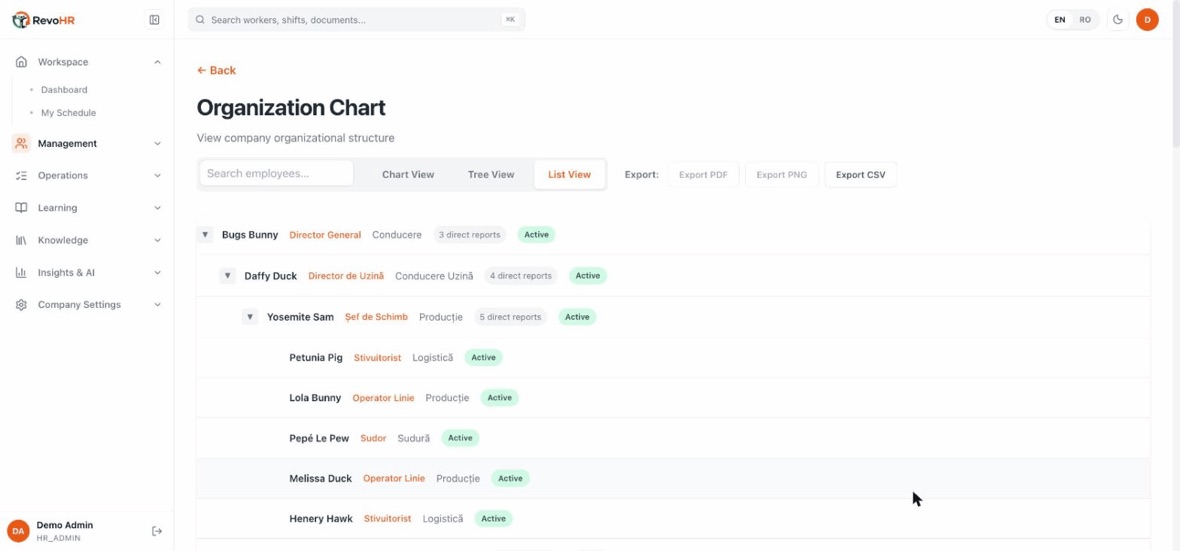
    The org chart is the other half of this screen, and it is a different structure: it follows the manager set on each employee record, not team membership.
    List View is the one that reads best: the whole hierarchy indented, with job title and department. The Export buttons on the right take the same structure out as PDF, PNG or CSV.
    1. Create your employees first. The leader and member pickers list existing workers, so an empty roster means you cannot choose a leader.
    2. Name the team and pick a leader. The name needs at least two characters; the leader is optional.
    3. Add members from either end β€” from the team's own page, or by setting a worker's team on their record. It is the same relationship either way.
    4. Fix the org chart through the Manager field on each employee. If the chart looks flat or wrong, that field is what to fix.

    Watch out

    Chart View renders blank and it is the default tab, so the screen looks broken on arrival β€” switch to Tree View. Also: selecting a team when scheduling adds nobody at all if that team has no members, and it does not warn you.

    Back to chapters

    Run the rota

    06

    Define a shift template

    A shift template describes a shift as a reusable pattern: when it starts and ends, how long the break is, which days it runs, and how many of each job title it needs. You define it once and reuse it every time you build a schedule.

    1:469 stepsEnglishSilent β€” the captions carry the narration.
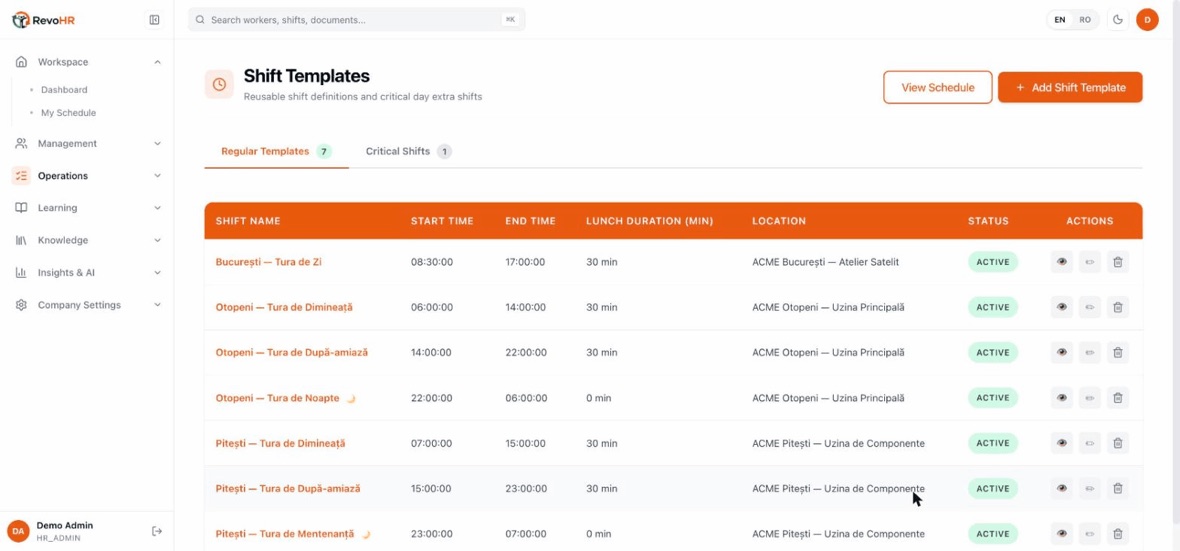
    Operations β†’ Shift Templates. A template is the shape of a working day at one site β€” its hours and its staffing rules. It is not a day on the calendar; the schedule plan turns templates into actual dates.
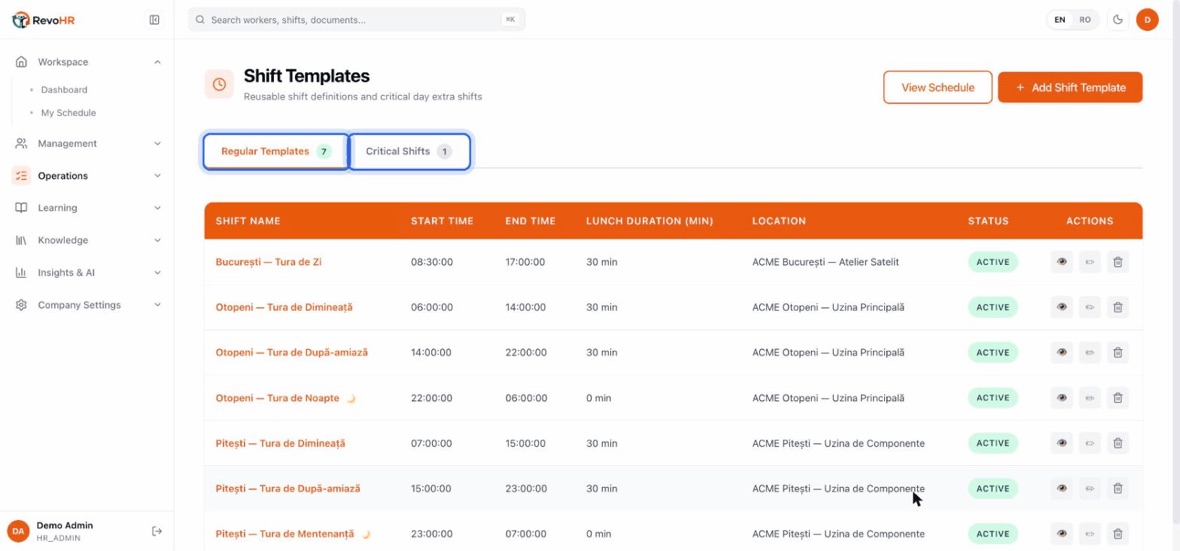
    Two kinds. Regular templates are the ones your rota runs on. Critical shifts are the extra cover you add for a day that needs it, without touching the regular pattern.
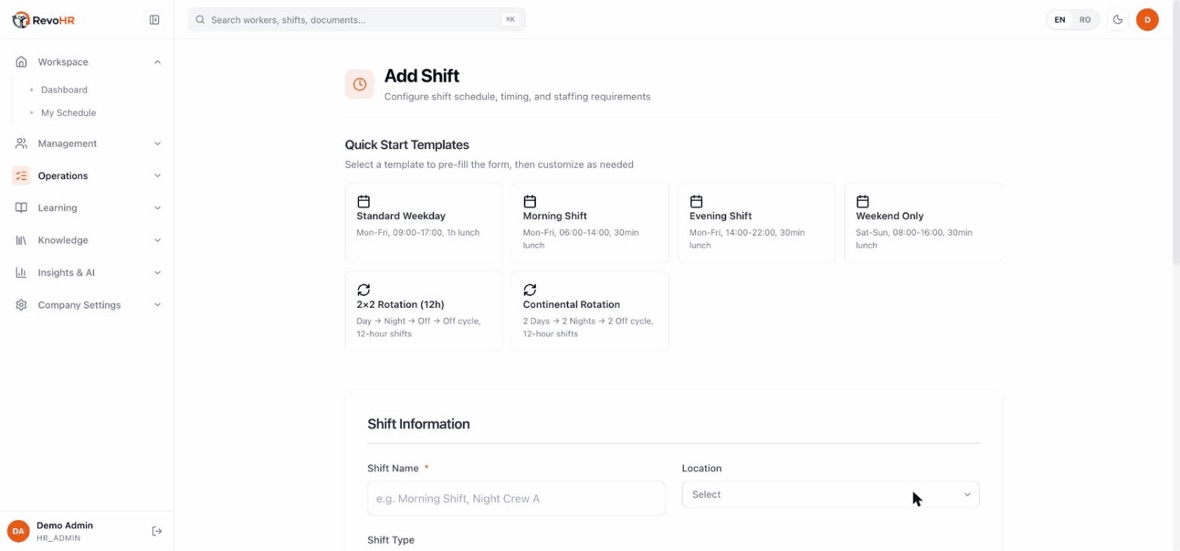
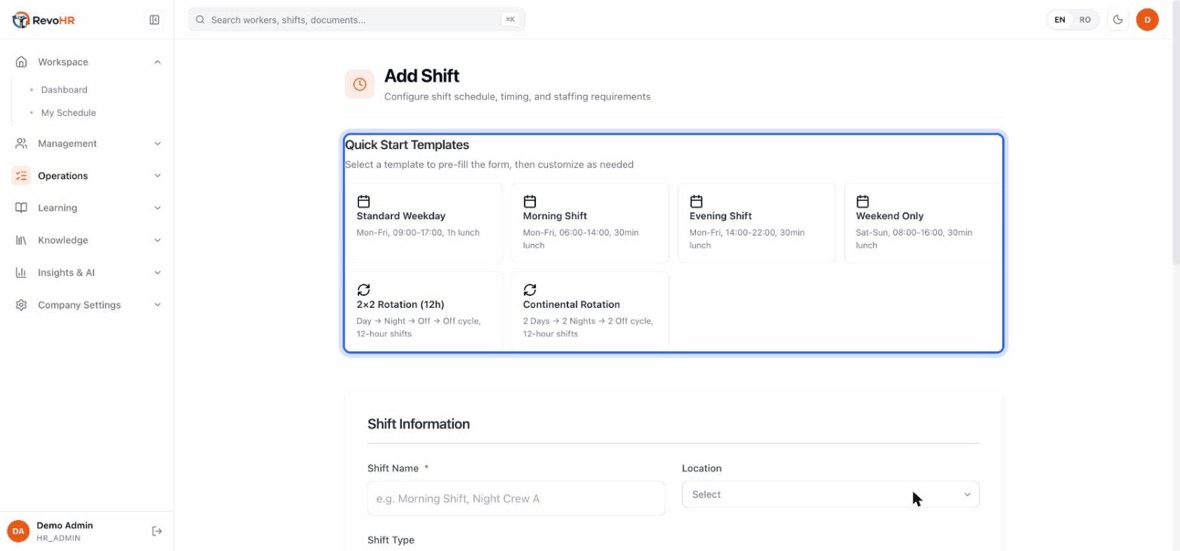
    Add Shift Template is one page, and it starts with a shortcut rather than a blank form.
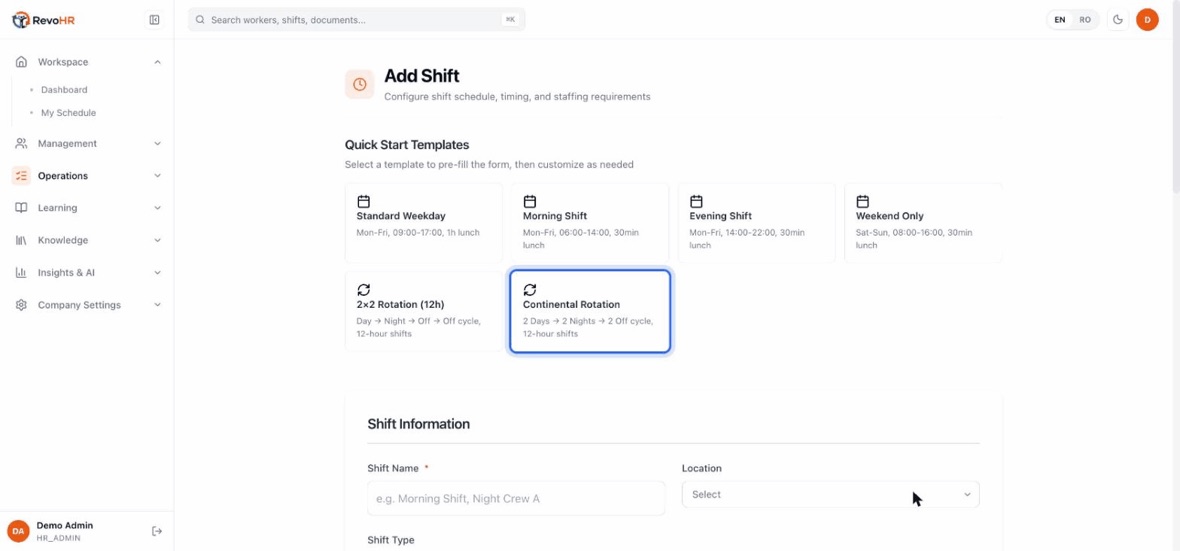
    Six quick start templates: standard weekday, morning, evening, weekend, and two rotations. Picking one pre-fills the whole form β€” you then change what does not fit rather than typing it all.
    Continental Rotation is the one most factories recognise: two days, two nights, two off, on twelve-hour shifts. Pick it and the pattern is built for you.
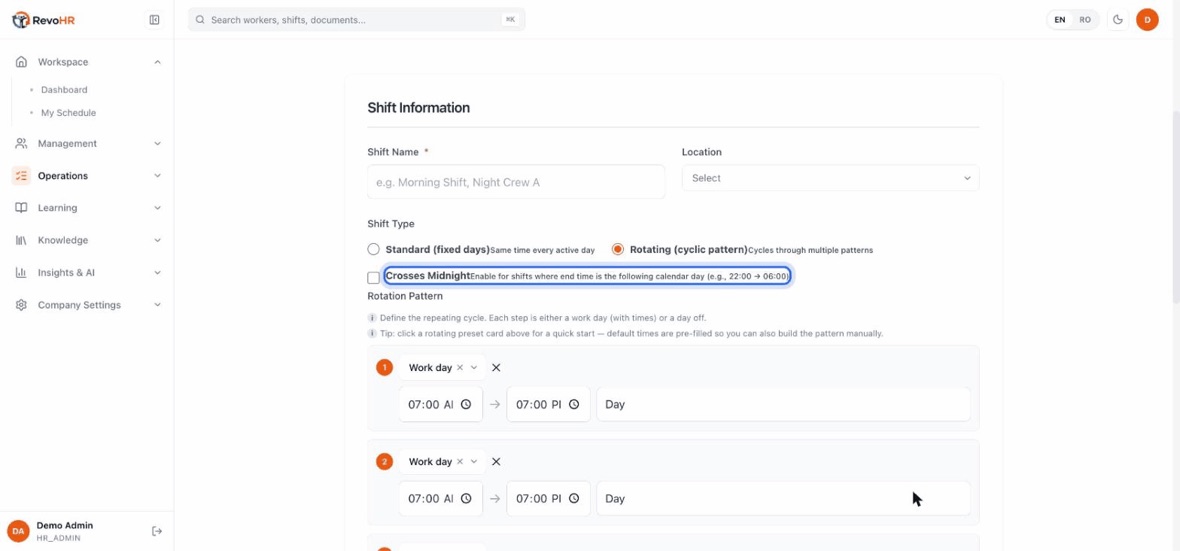
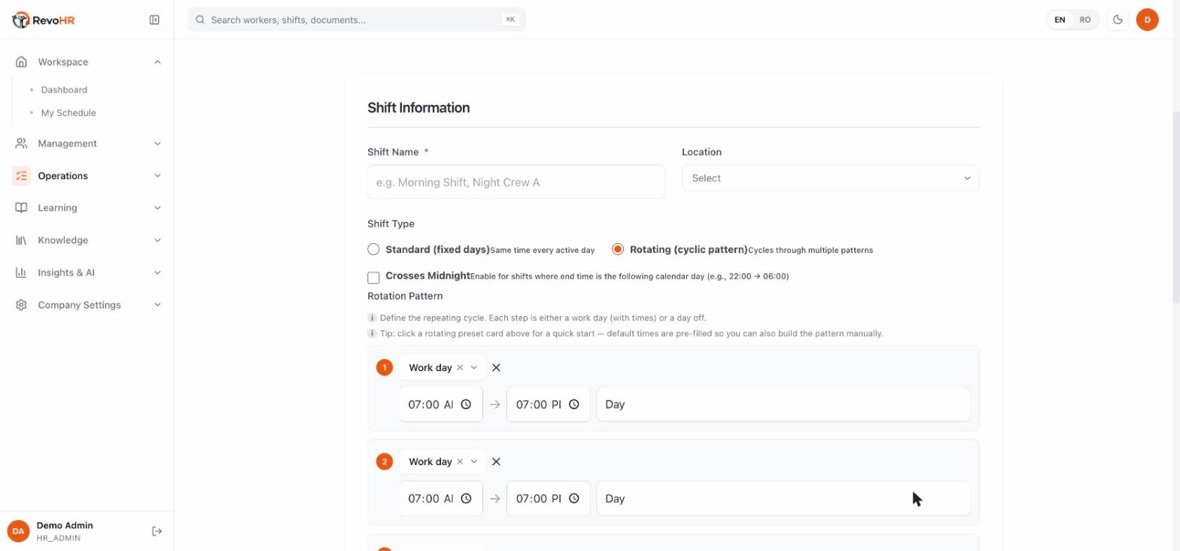
    Two switches decide how the template behaves. Rotating cycles through a pattern instead of repeating one time every day. Crosses Midnight is the one to remember for nights β€” without it, a 22:00 β†’ 06:00 shift is read as ending the same morning.
    The rotation pattern is the cycle itself, step by step: each step is either a work day with its own times, or a day off. Add or remove steps and the cycle length changes with them.
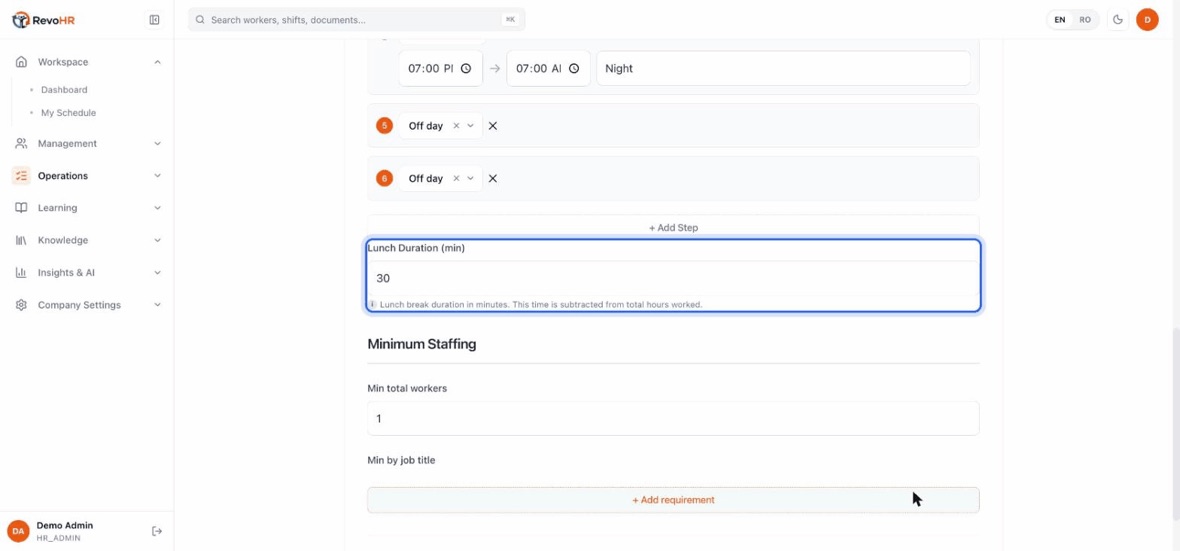
    Lunch duration is not cosmetic: those minutes are subtracted from the hours worked, so it is what makes a 08:00–17:00 shift count as eight hours rather than nine.
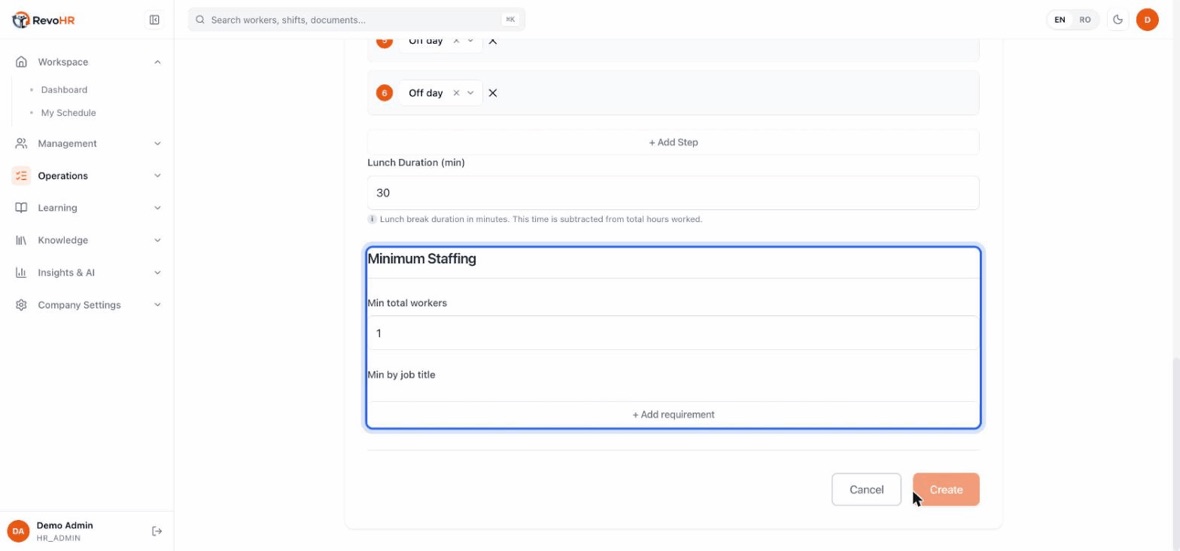
    Minimum staffing is the last piece: a total headcount, and optionally a minimum by job title. Job title, exactly as typed on the employee record β€” not the role and not the team. That is the field that decides whether a shift can be considered covered.
    1. Create your locations first. A shift can be saved without one, but it will not appear in the Shift Assignments staff view β€” you get a template you cannot roster.
    2. Start from a preset, then adjust the times and days.
    3. Tick Crosses Midnight for night shifts. It is a real setting, not a workaround: without it the hours and attendance for a 22:00–06:00 shift come out wrong.
    4. Choose Standard or Rotating. Standard gives you seven day checkboxes; Rotating replaces them with a list of Work/Off steps, where the number of steps is the cycle length.
    5. Add staffing requirements β€” two forklift drivers, one supervisor. This is not documentation: RevoHR checks it when someone requests leave and warns that approving would drop the shift below its minimum.

    Watch out

    Staffing requirements match on the worker's Job Title field, not on the team name. A team called β€œElectricians 1” whose members have no job title set will not satisfy a requirement for two electricians.

    Back to chapters

    07

    Build a schedule plan

    A schedule plan turns a rotation into an actual rota. You describe the pattern once β€” the slots people work and the crews that rotate through them β€” and RevoHR generates every shift for the weeks ahead.

    2:1711 stepsEnglishSilent β€” the captions carry the narration.
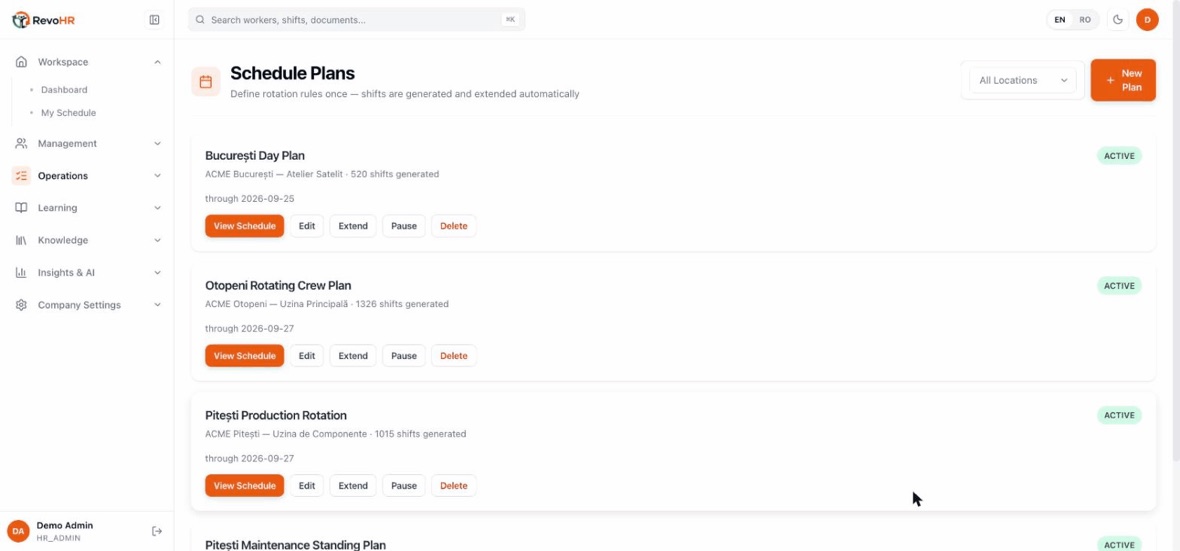
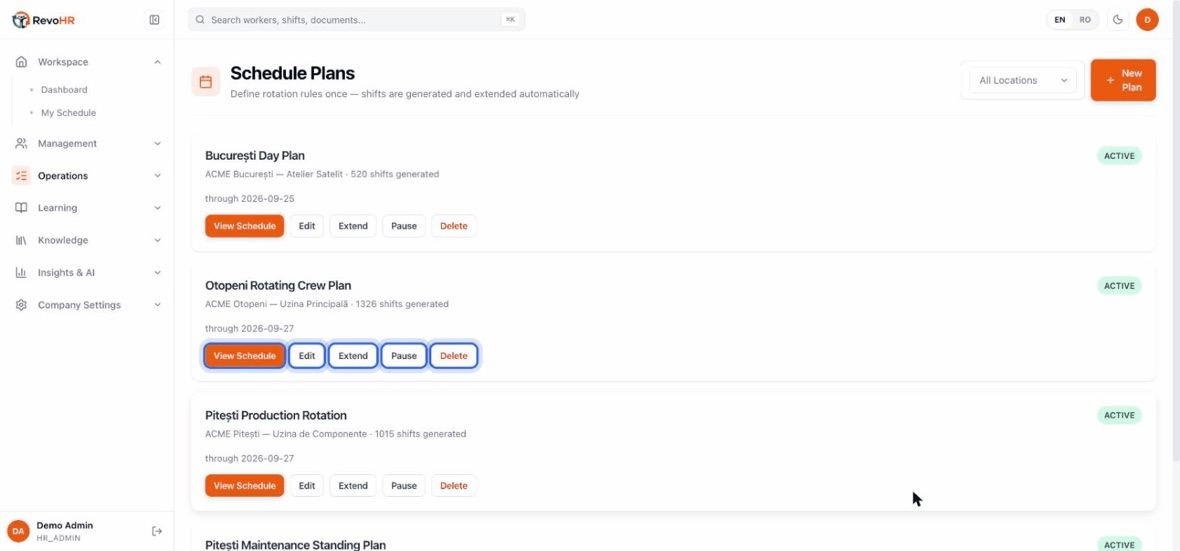
    Operations β†’ Schedule Plans. This is the screen that builds your rota. You describe the rotation once, and RevoHR generates every shift from it β€” and keeps extending it.
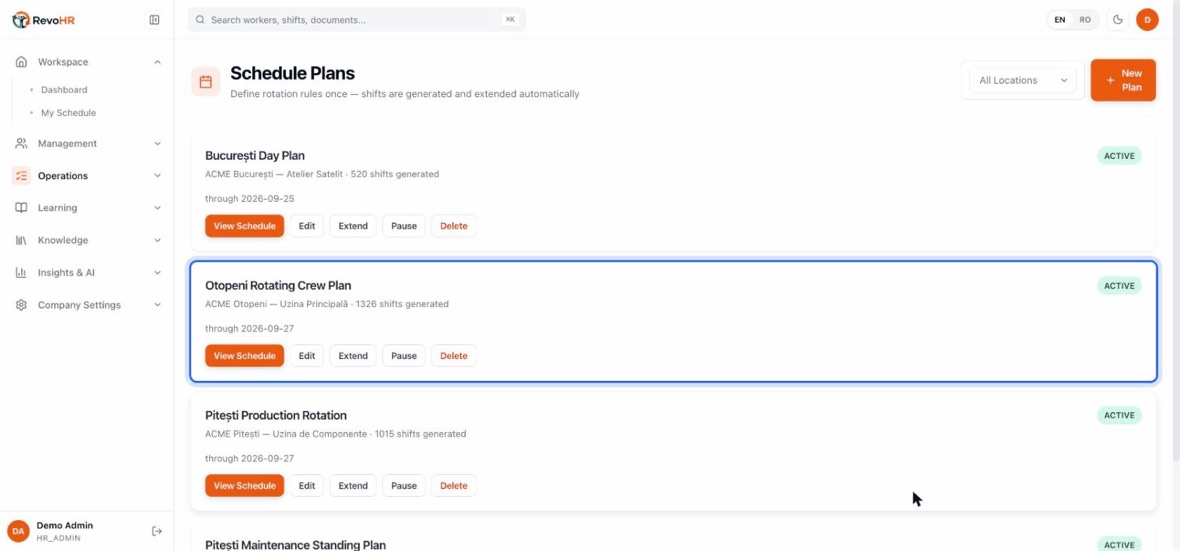
    A plan card tells you its location, how many shifts it has generated and how far ahead it runs. Those two numbers are the health check: a plan that stopped extending stops covering you.
    Five actions per plan. Extend pushes the horizon further out; Pause stops generation without deleting what exists. Reach for Pause, not Delete, when a site goes quiet for a season.
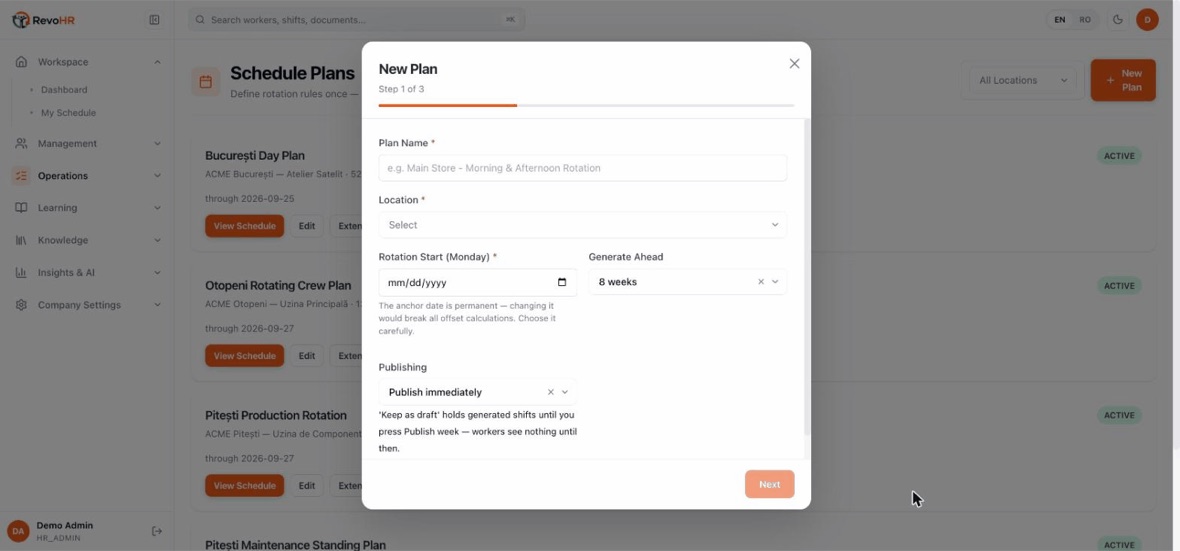
    New Plan is three steps: the plan itself, the shift slots, then the crews that rotate through them.
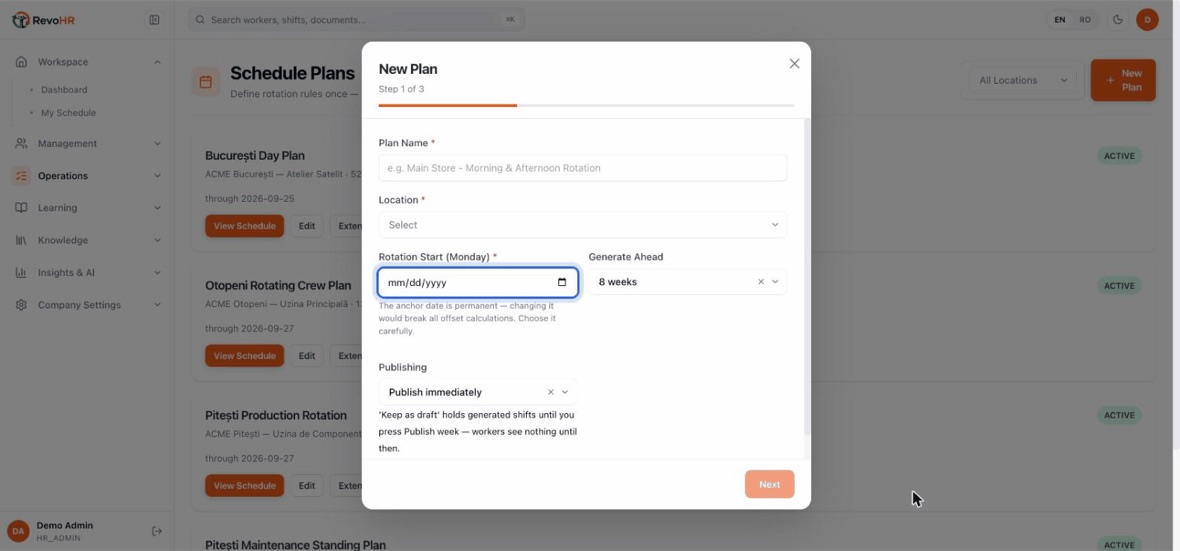
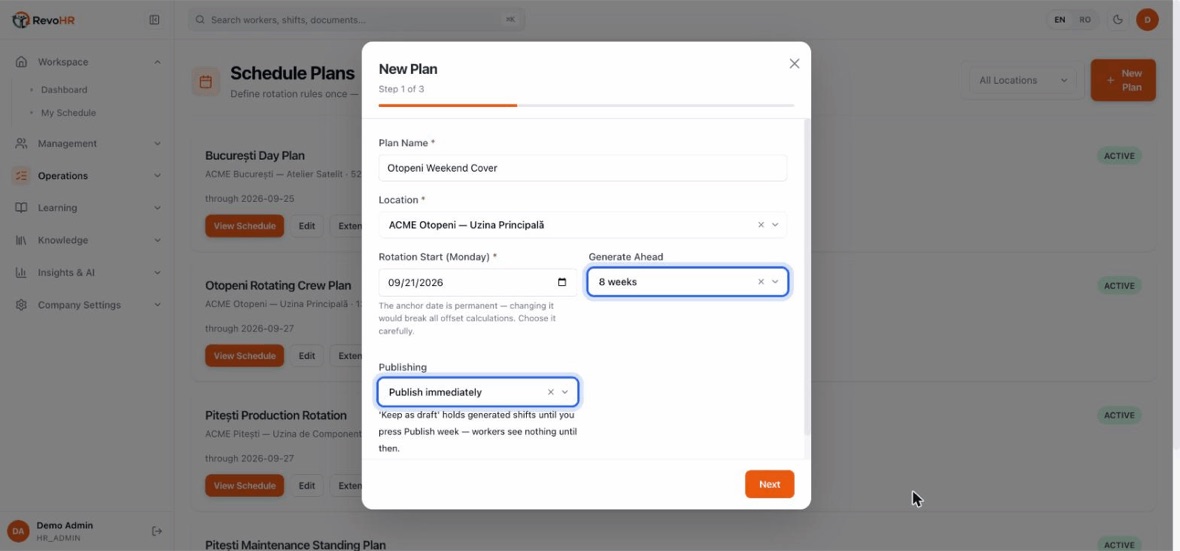
    Step one asks for a rotation anchor, and read the warning under it: the anchor date is permanent. Every offset in the rotation is counted from it, so changing it later would move every crew.
    Generate ahead is your horizon β€” eight weeks by default. Publish immediately decides whether the generated shifts go live or wait as a draft you check first.
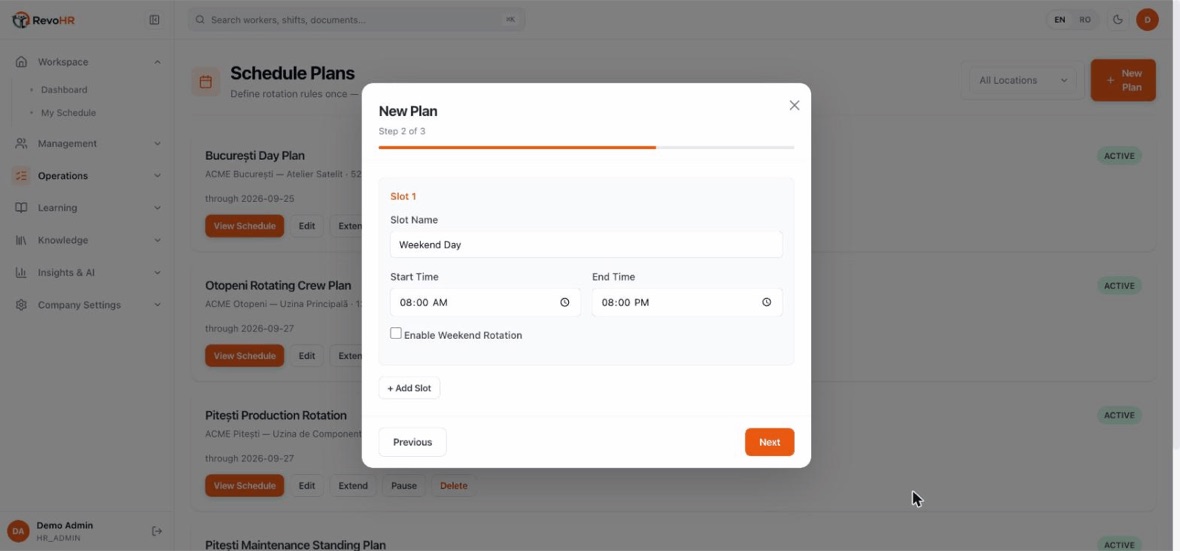
    Step two is the slots β€” the shapes of the working day at this site. Name one, give it a start and an end, and add as many as the site runs.
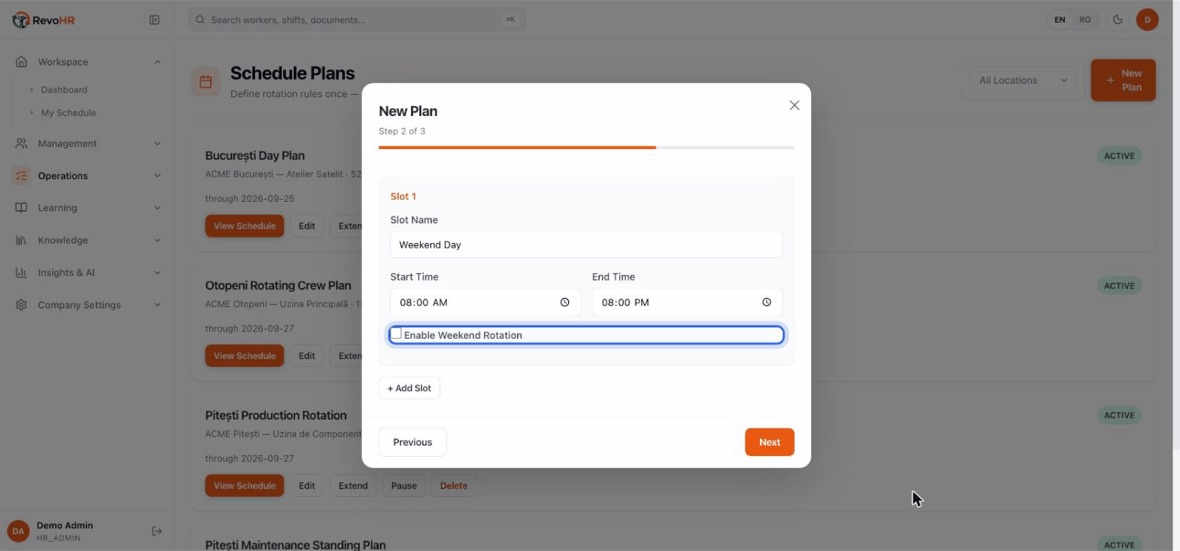
    Before you tick Enable Weekend Rotation, do the arithmetic. It adds Saturday and Sunday on top of a full Monday–Friday week, with no compensating day off β€” on a 40-hour base that is a 56–62 hour week for whichever crew's turn it is. Check it against your working-time law.
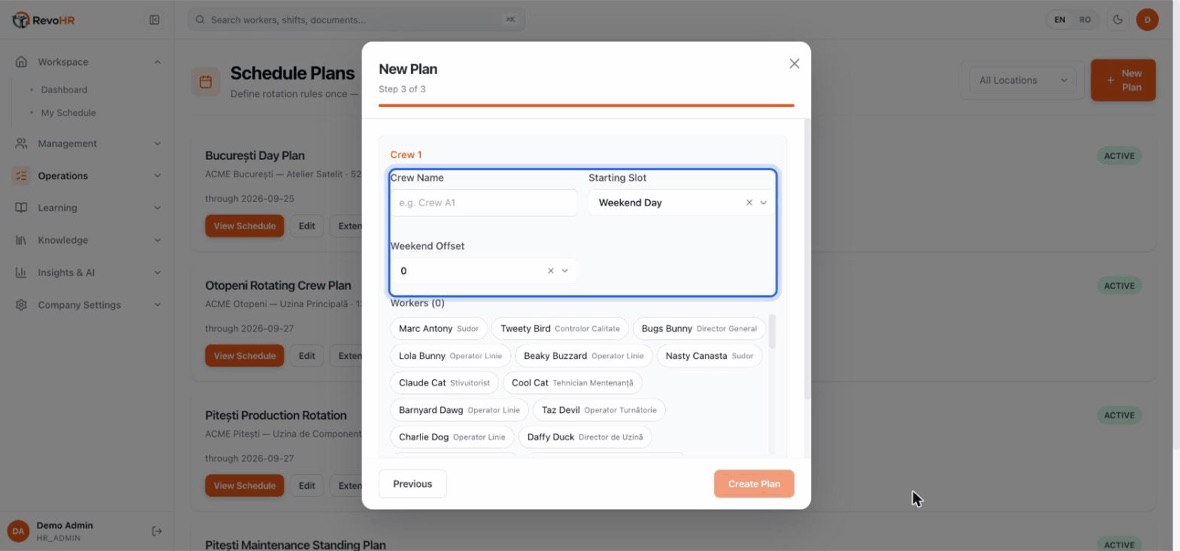
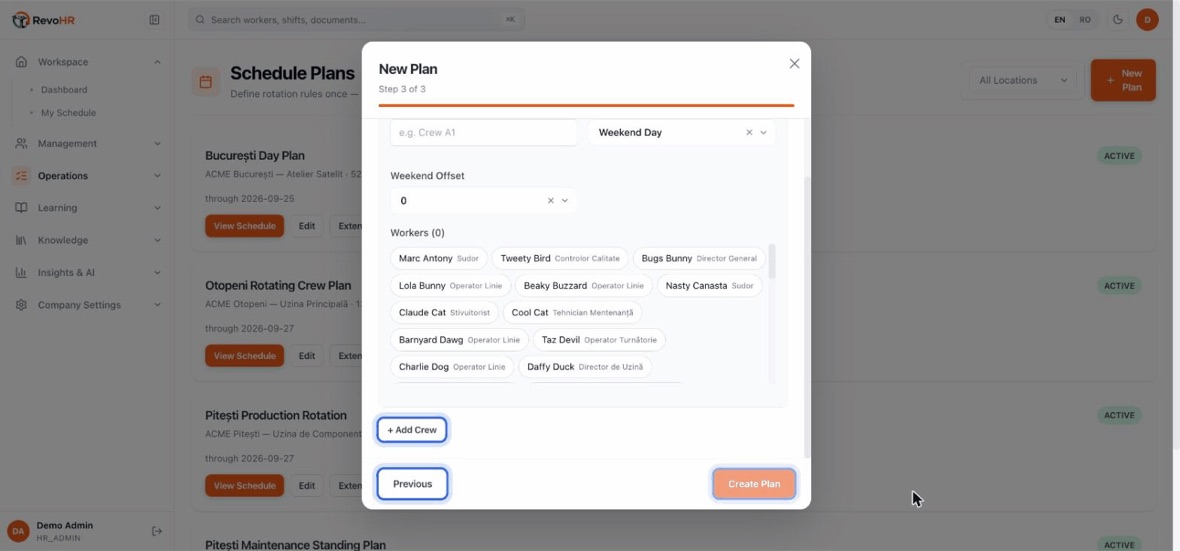
    Step three is the crews. Each crew gets a name, the slot it starts on, and an offset β€” the offset is what makes crew B start where crew A left off instead of on the same shift.
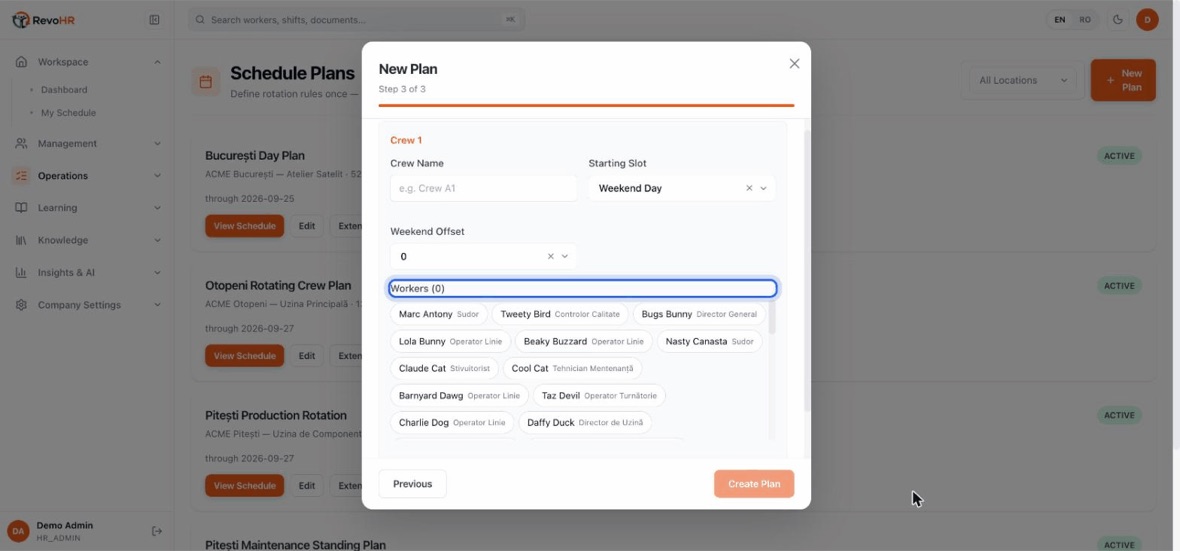
    Then you put people in the crew. Sizing matters more than the interface suggests: covering 24/7 takes 4.2 crews, not three β€” 168 shift-hours a week divided by a 40-hour week.
    Create Plan generates every shift in the horizon in one go. That is the point of this screen: you maintain the rule, not the calendar.
    1. Check the two prerequisites: at least one active location, and employees to put into crews.
    2. Set the rotation start date. It must be a Monday and it is permanent β€” every crew's position in the cycle is counted from it, so it cannot be changed later without invalidating the whole rota.
    3. Choose Draft over Immediate while you are trying a pattern. Draft generates everything but shows workers nothing until you press Publish week.
    4. Define the slots β€” positions like Morning or Night, each with its own times and days β€” then the crews and which slot each one starts in.
    5. Afterwards, Extend generates more weeks and Pause stops generating without deleting what exists.

    Watch out

    Weekend rotation adds days, it does not swap them. It puts Saturday and Sunday on top of a full Monday–Friday week with no compensating day off, so the crew whose turn it is works seven days straight. On a 40-hour base that alone lands the crew on a 56–62 hour week. Check it against your working-time law before enabling it. Related arithmetic: covering 24/7 needs 4.2 crews (168 shift-hours Γ· 40), not three.
    Back to chapters

    08

    Assign people to a shift

    Schedule plans generate the rota automatically. Shift assignments are for everything else: putting a particular team, or a particular set of people, onto a shift β€” and then telling them over WhatsApp.

    2:0212 stepsEnglishSilent β€” the captions carry the narration.
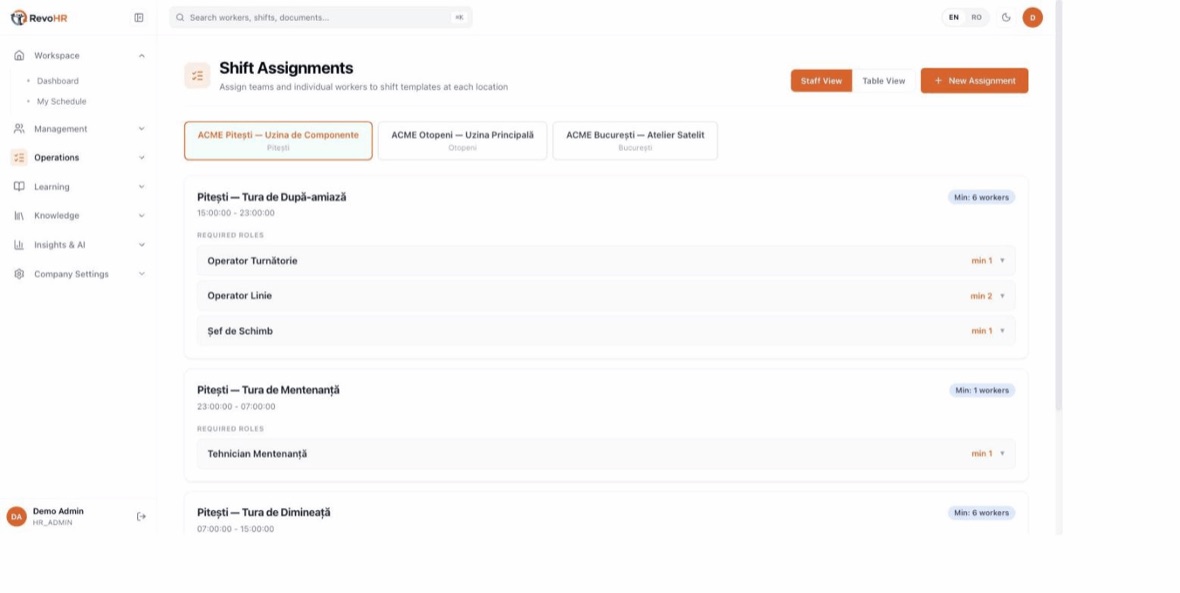
    Operations β†’ Shift Assignments. Schedule plans build the rota by themselves; this screen is for putting named people on a named shift.
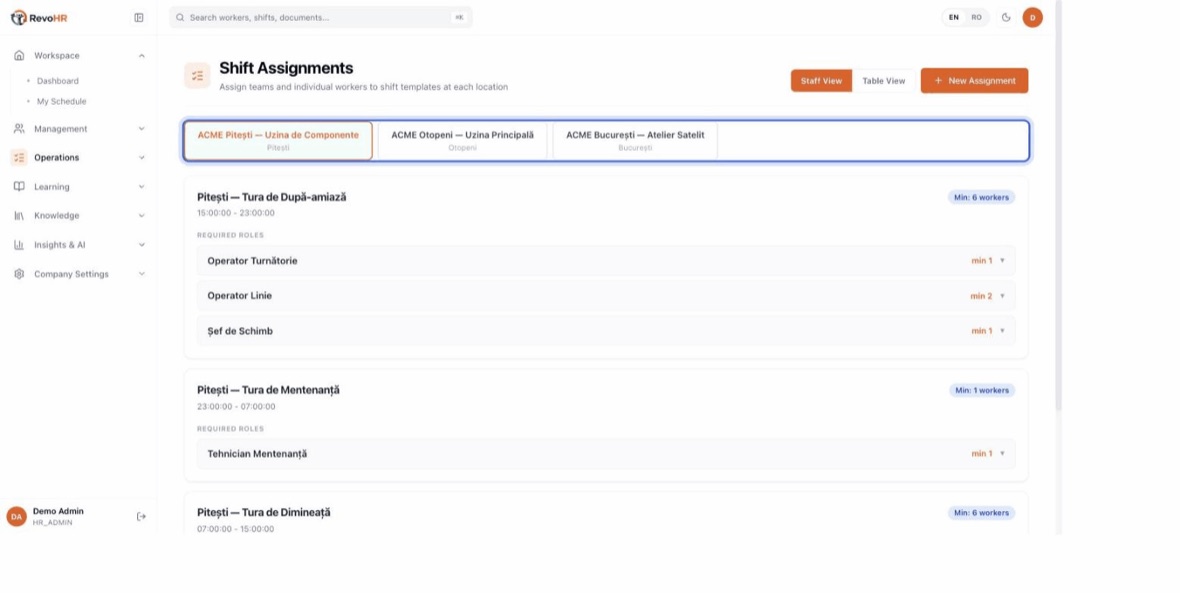
    Everything hangs off a location. Pick the site first β€” the shifts you see below belong to it and to nothing else.
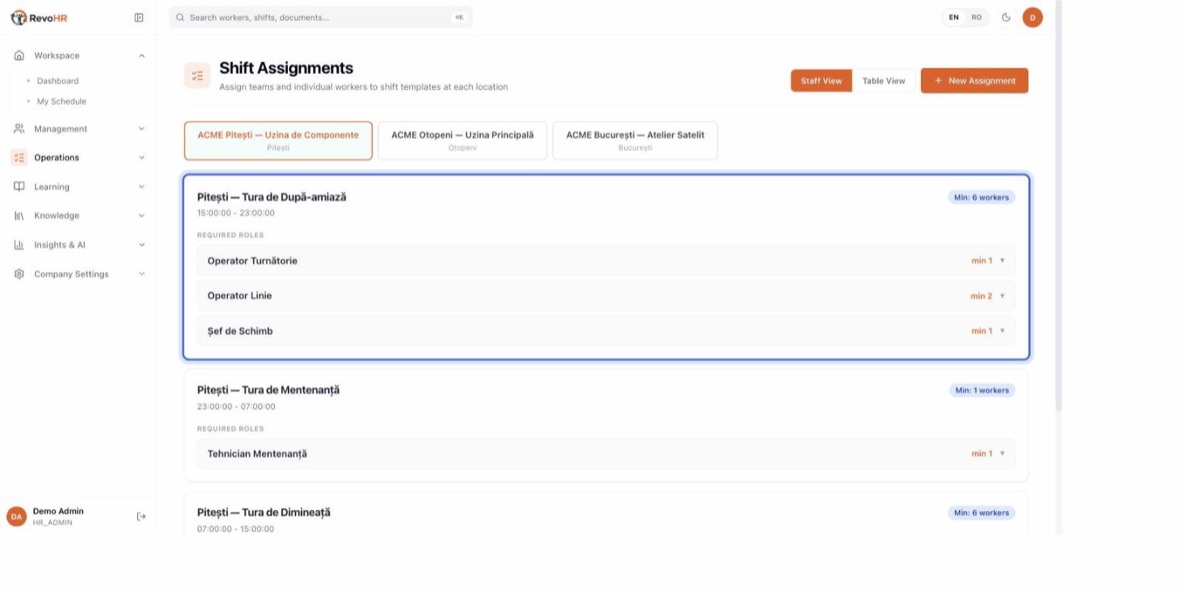
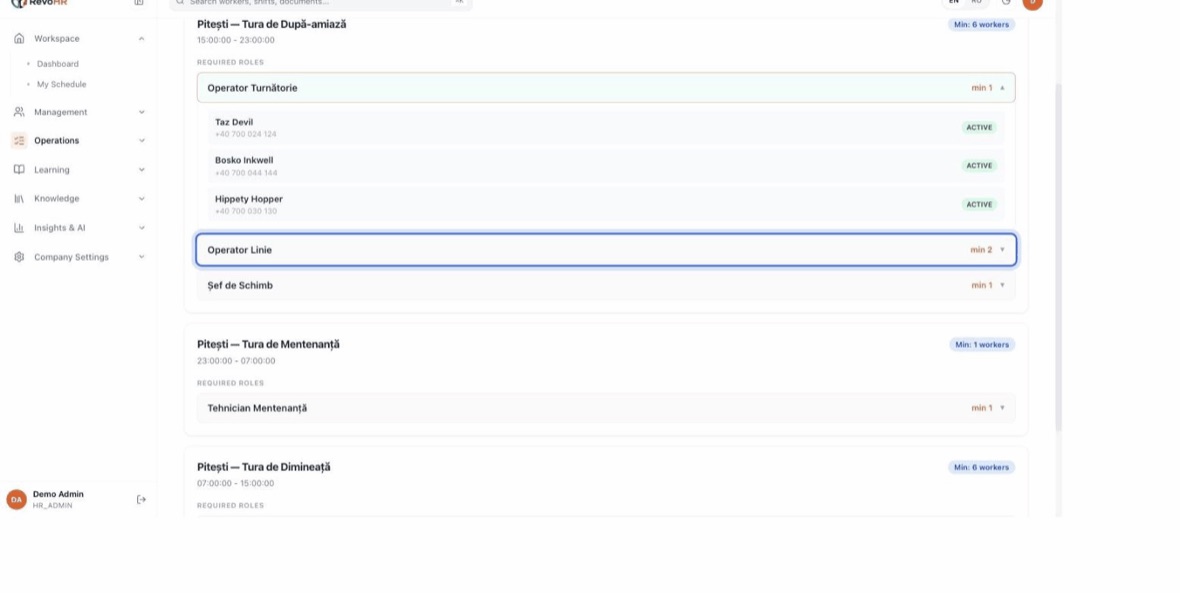
    A shift card shows its hours and its required roles with a minimum for each. That minimum is matched on the person's job title, not on their role and not on their team.
    Open a role to see who currently covers it. This is the staff view β€” who is on this shift, standing, until you change it.
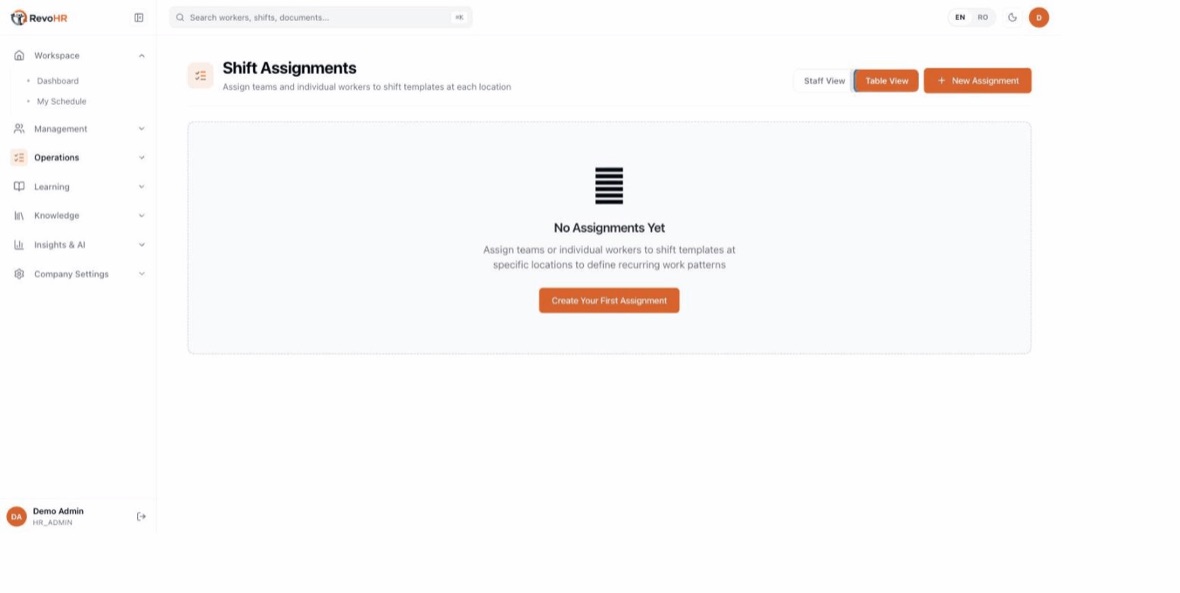
    Table View is the same data as a list. A fresh company has none β€” the rota it runs on comes from schedule plans instead.
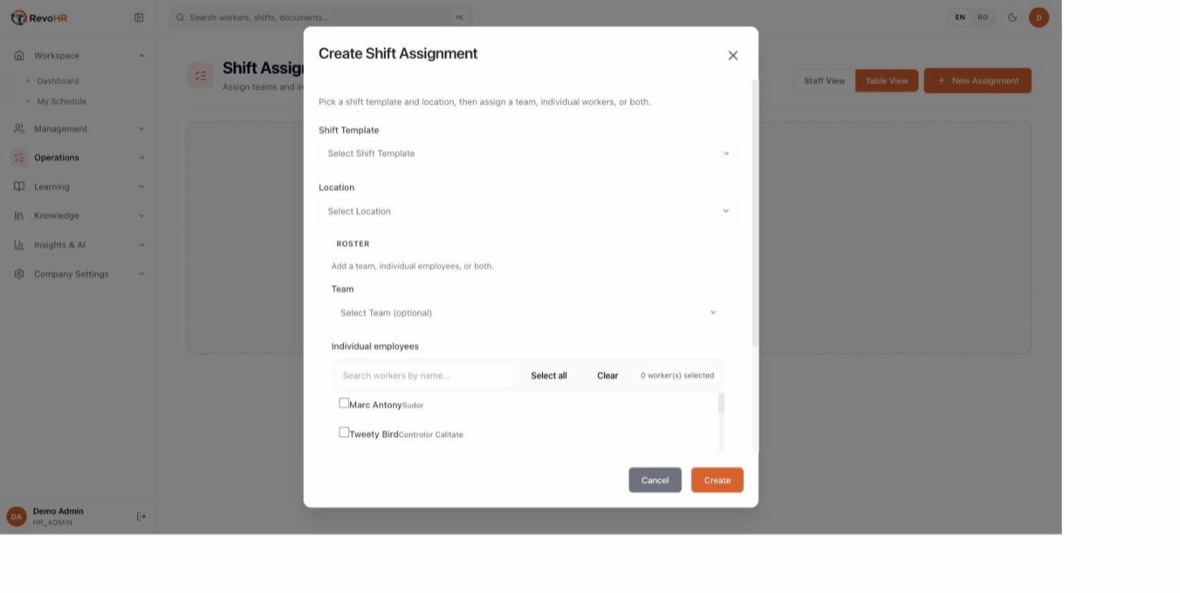
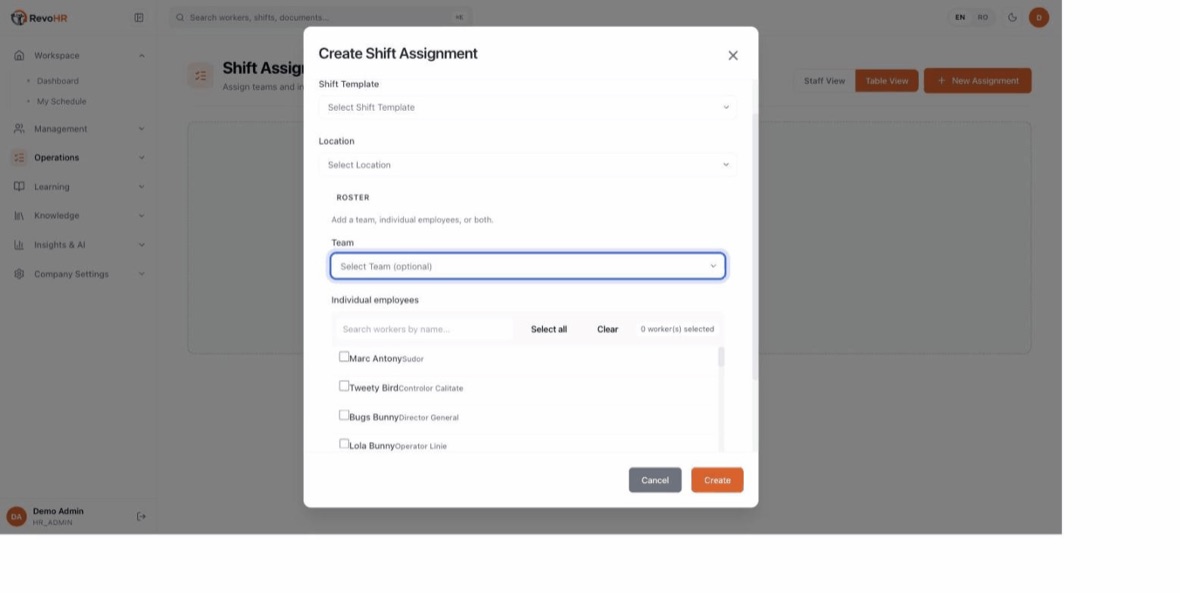
    New Assignment opens one dialog. There is no wizard: everything an assignment needs fits on one screen.
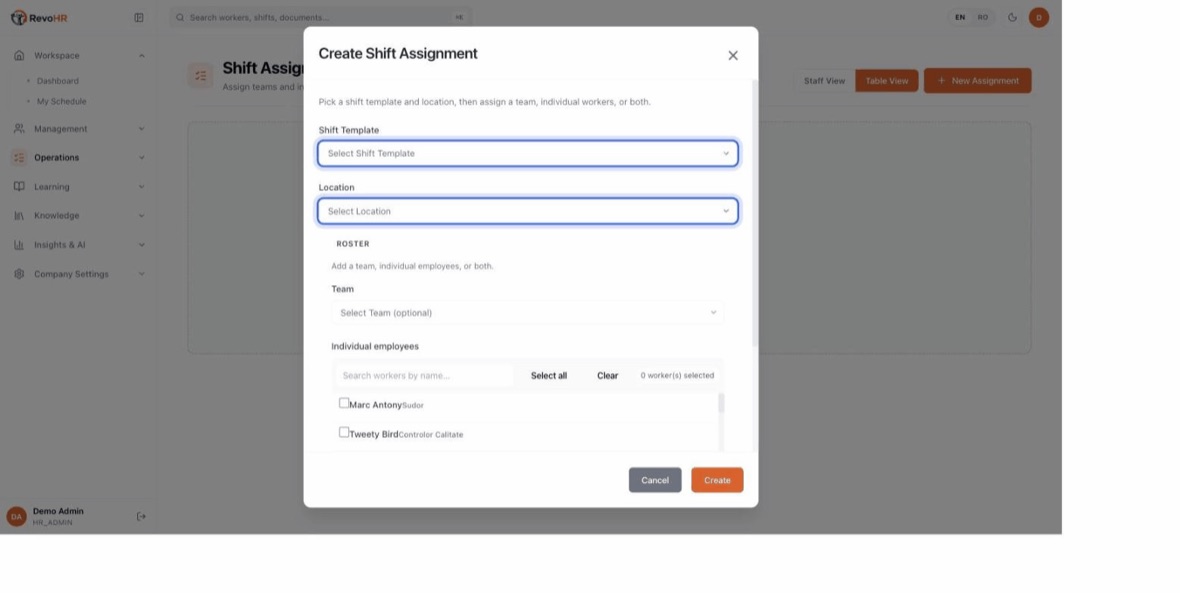
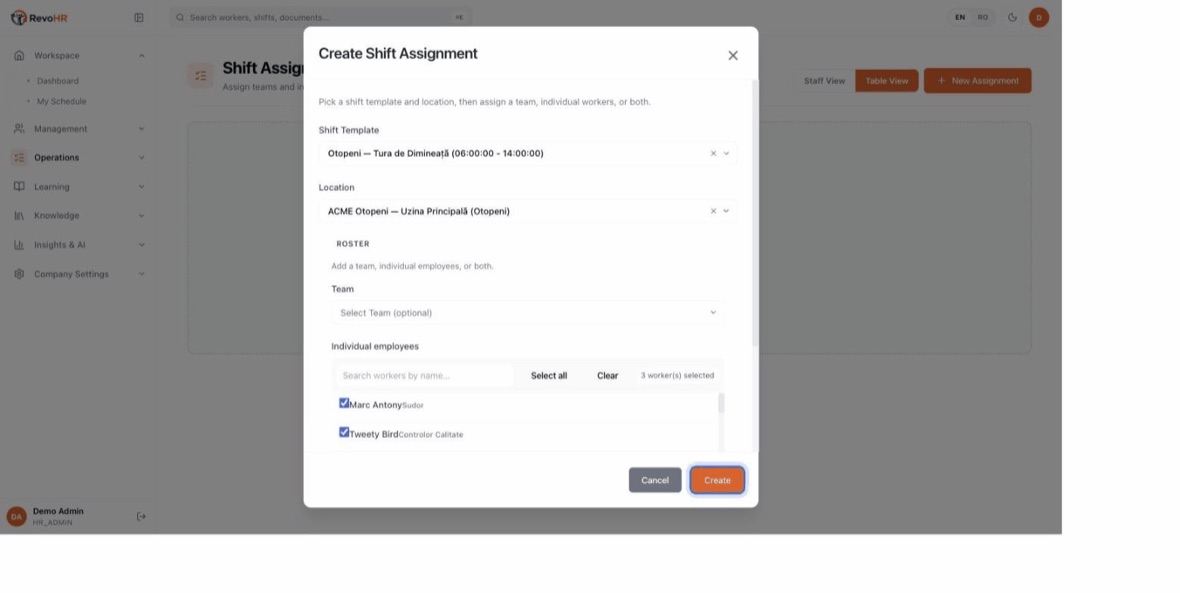
    Two things identify the assignment: the shift template and the location. The template already carries the hours, so you are not typing times here.
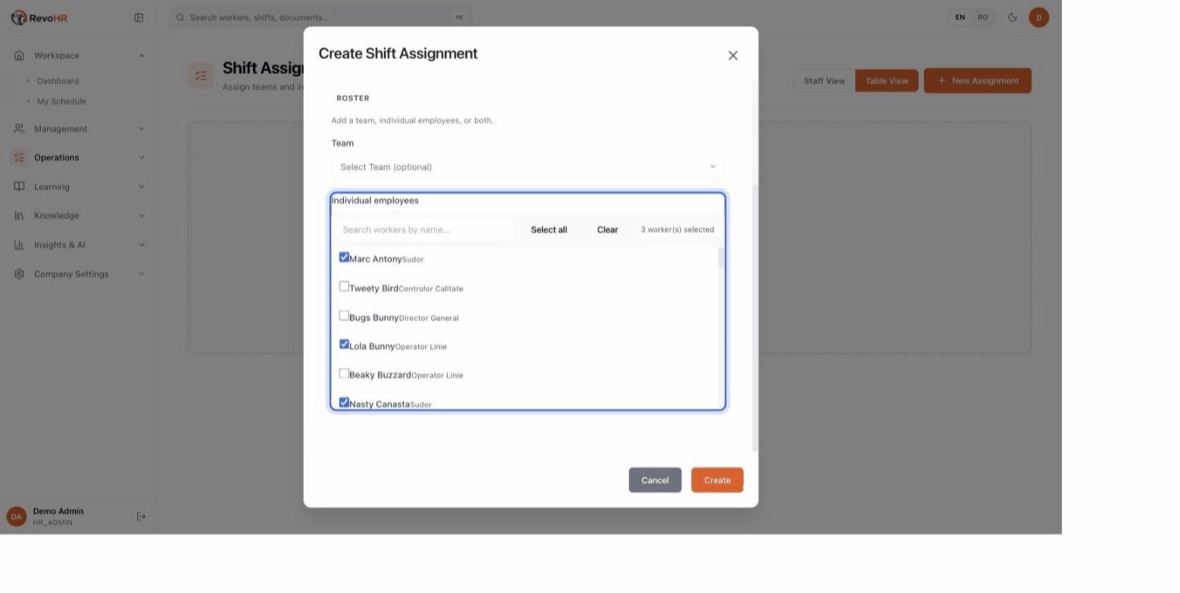
    A team is optional, and it is a shortcut: it puts everyone in the team on the shift without you ticking names one at a time.
    Or pick individual employees, or both. What you cannot do is leave both empty β€” an assignment with nobody on it is rejected.
    Create saves it. Note what is missing from this dialog: there is no date. An assignment is standing β€” it recurs on whatever days the template marks active.
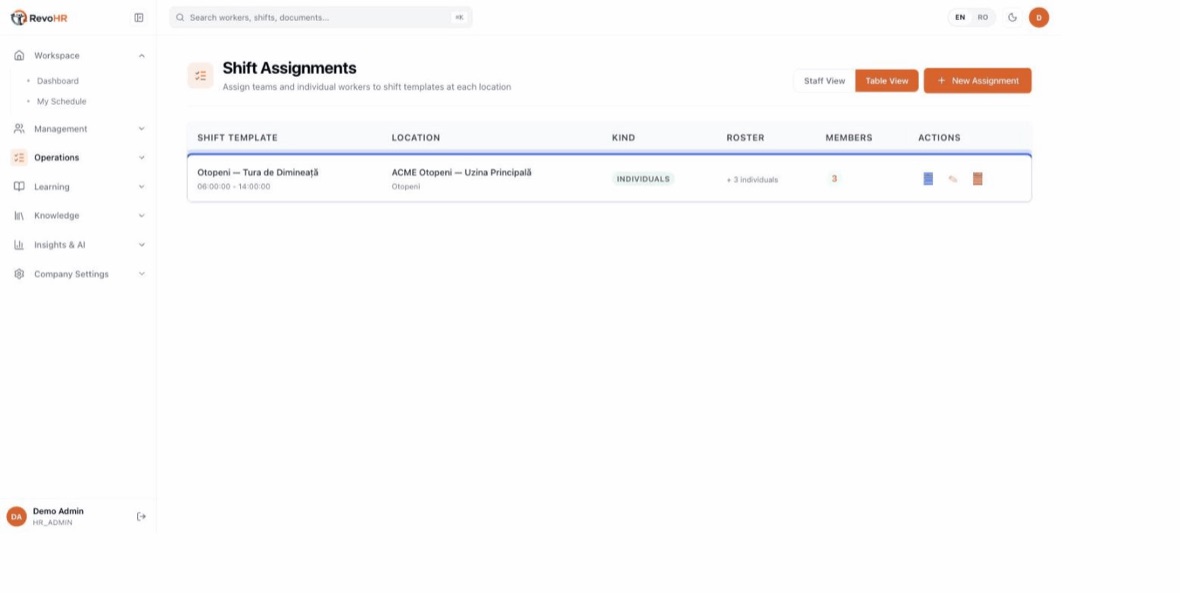
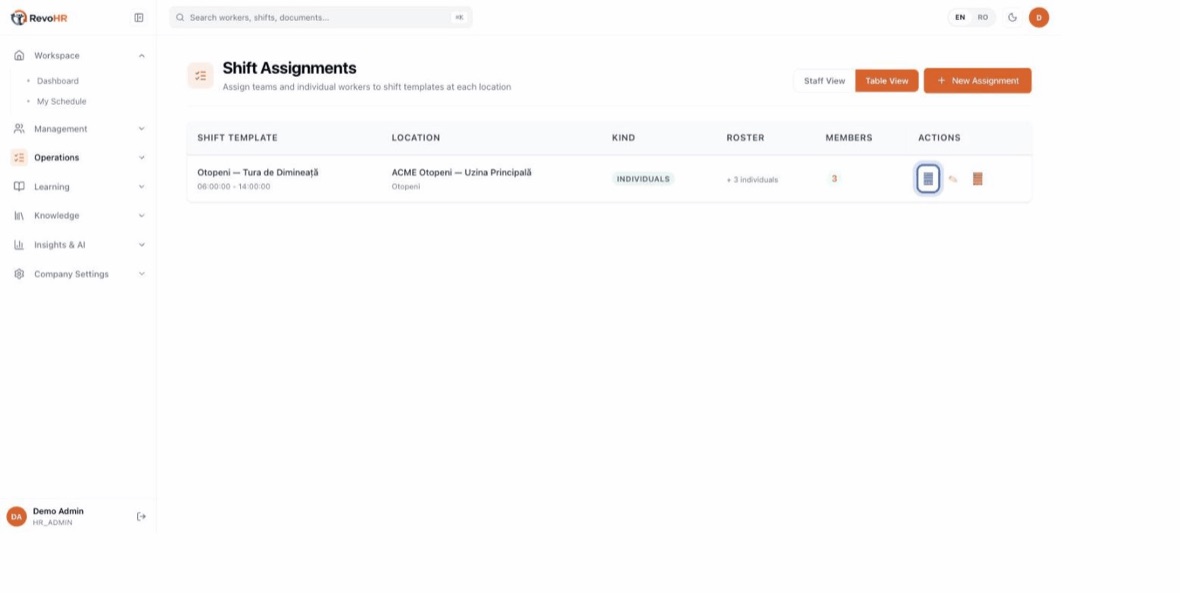
    The saved row: template, location, kind, roster, member count. INDIVIDUALS means named people rather than a team.
    Careful with the three buttons on the right. The middle one is edit; the first is notify β€” it sends a WhatsApp message to every worker on this shift β€” and the last deletes. Only the pencil has a legible icon.
    1. Have a location, a shift template at that location, and employees. A team is optional but lets you select everyone at once instead of ticking names.
    2. Supply a team or at least one worker. An assignment with neither is rejected.
    3. Publish first, then notify. Publishing makes the shift real; notifying tells people. Keeping them separate lets you publish a whole week quietly, check it, and notify only once you are sure.
    4. Read the notify report. It shows sent, failed and skipped β€” and skipped means the worker has no phone number, or WhatsApp is not configured.

    Watch out

    Do not read this screen as a day-by-day roster. An assignment made here carries no date: it is a standing link that recurs on whatever days the shift template marks active, until you change it. There is a separate dated mechanism for putting one team on one shift on one date β€” that is the one you want for a crew that moves between sites as work progresses.

    Back to chapters

    09

    Review attendance and approve timesheets

    Attendance needs no terminals, no badges and no app. Workers check in and out by sharing their location in WhatsApp, and RevoHR records the time, the position, and the distance from the site.

    1:479 stepsEnglishSilent β€” the captions carry the narration.
    Operations β†’ Time & Attendance. Two screens live here: Daily Attendance, one day at a time, and Weekly Timesheets, which is what payroll reads.
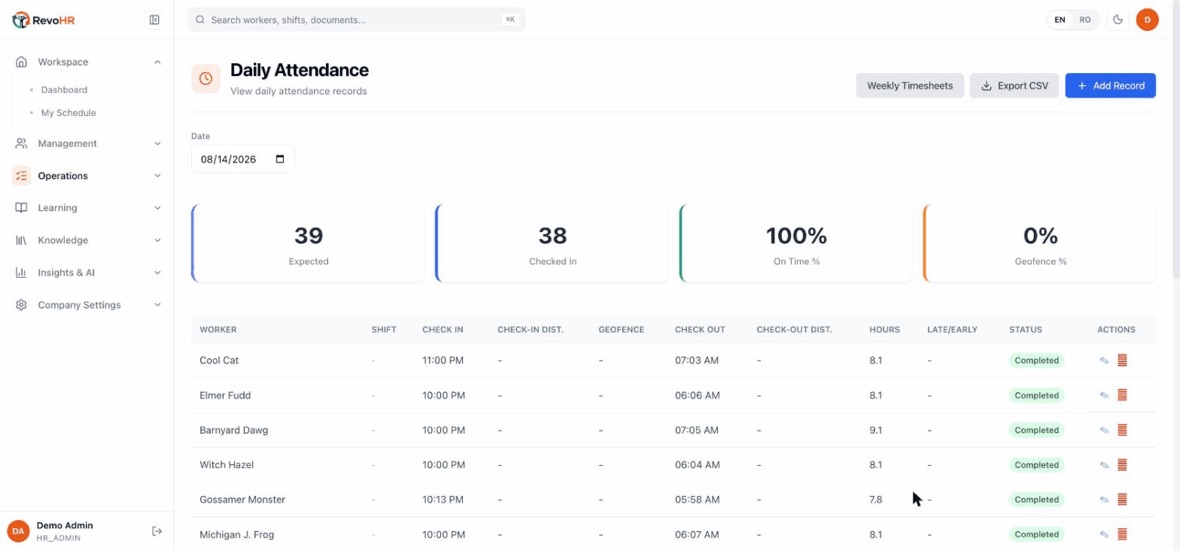
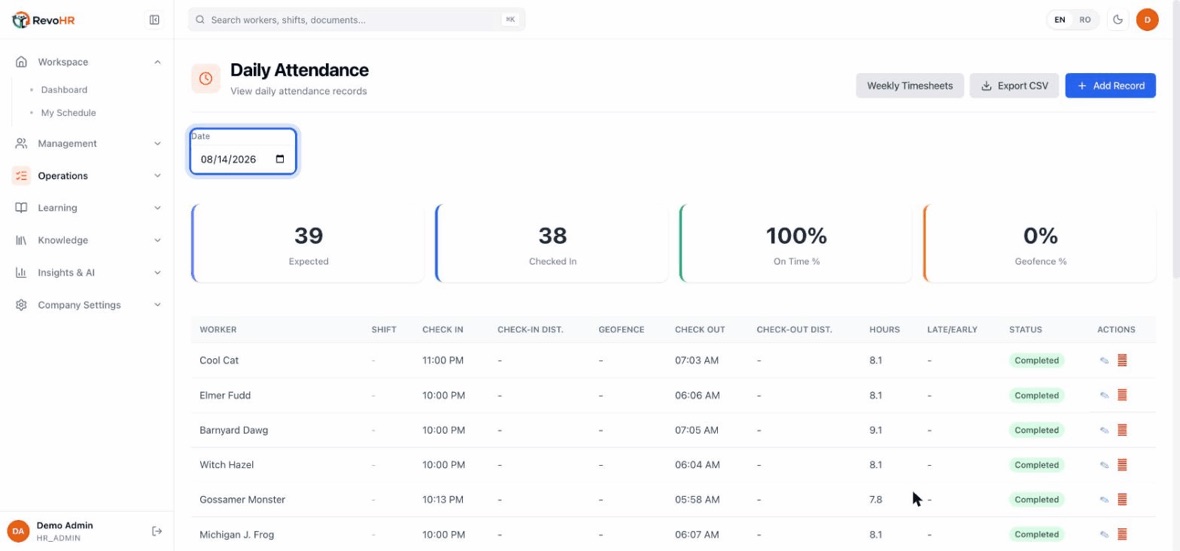
    Daily Attendance always shows one date. Change the date and the whole page reloads for that day β€” there is no range here, that is the timesheet's job.
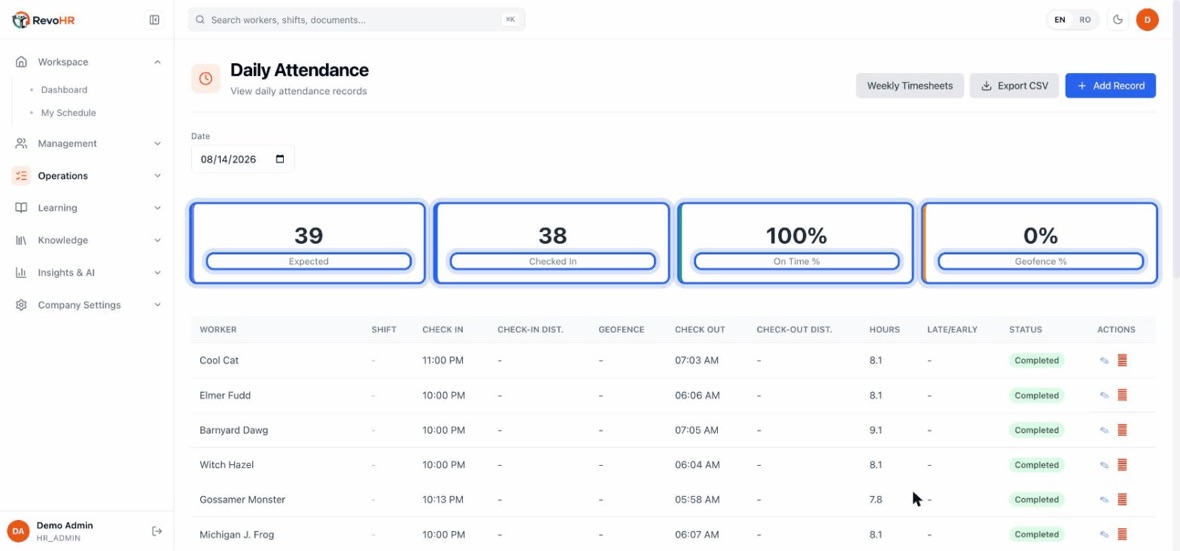
    Four numbers at the top: expected against checked in tells you who is missing today, and it is the only pair you need in the morning. On-time and geofence percentages are the quality of the day, not the count.
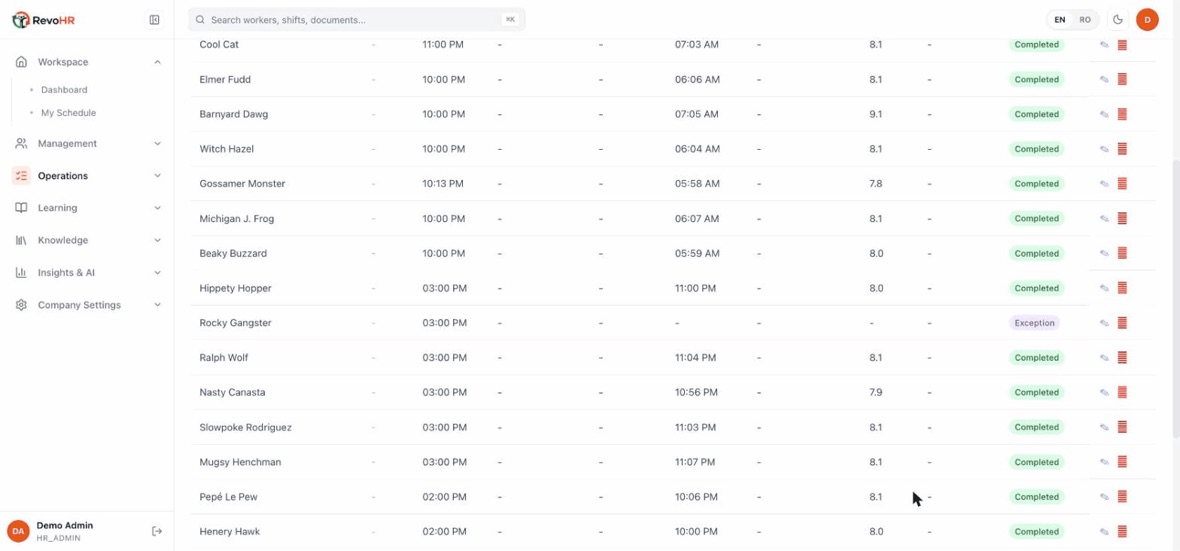
    The table is one row per worker: check-in, check-out, hours, and a distance beside each punch. The distance is how far from the site the worker was when they pressed it β€” blank when the check-in carried no location.
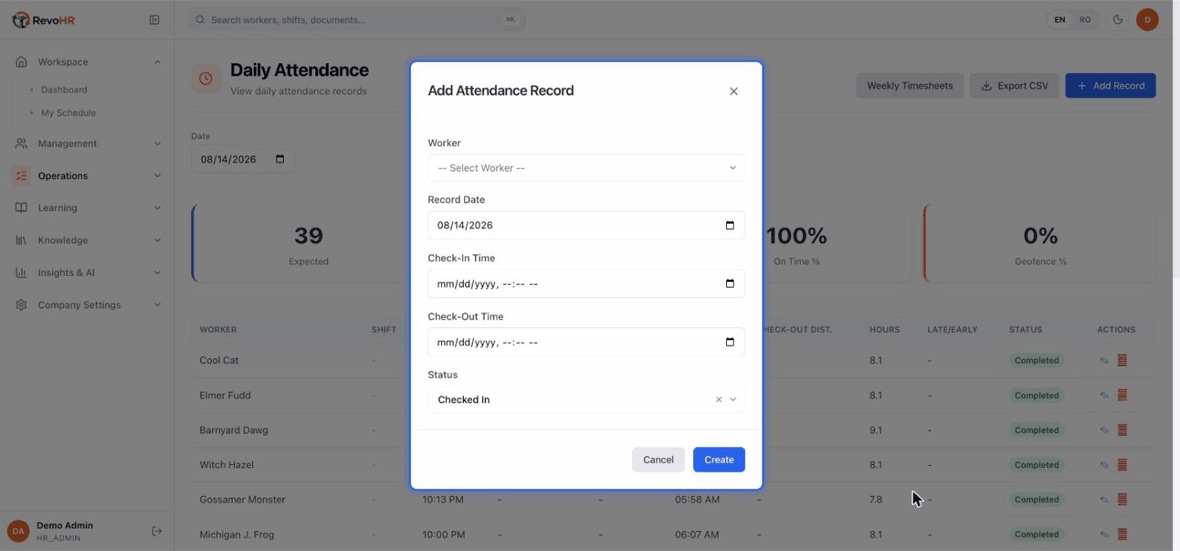
    Add Record is the manual fallback: a worker whose phone died, a shift worked before you rolled RevoHR out. Worker, date, the two times and a status β€” you are writing the record the phone would have written.
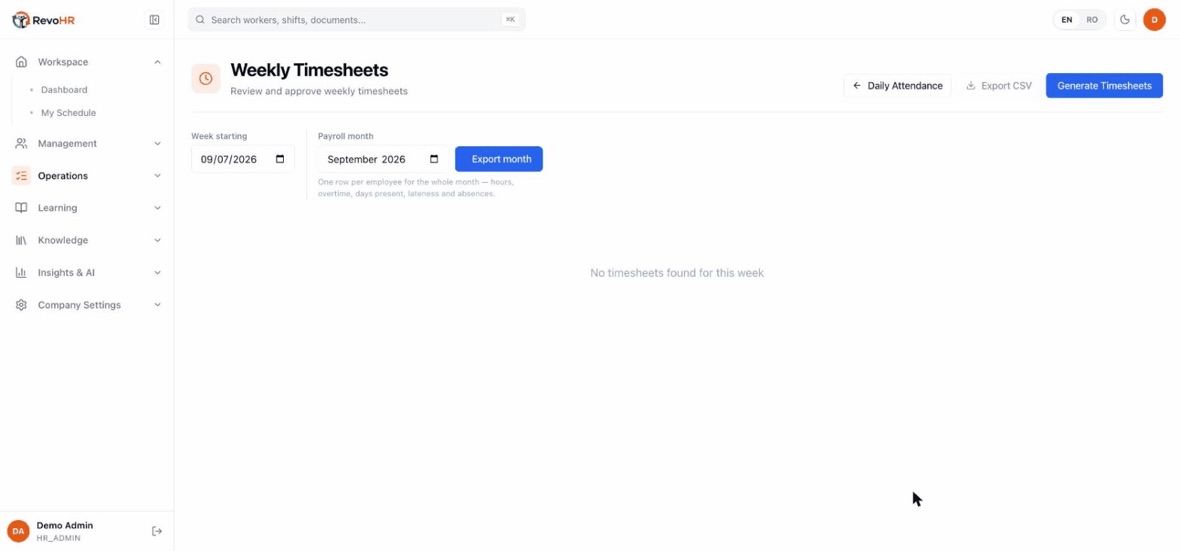
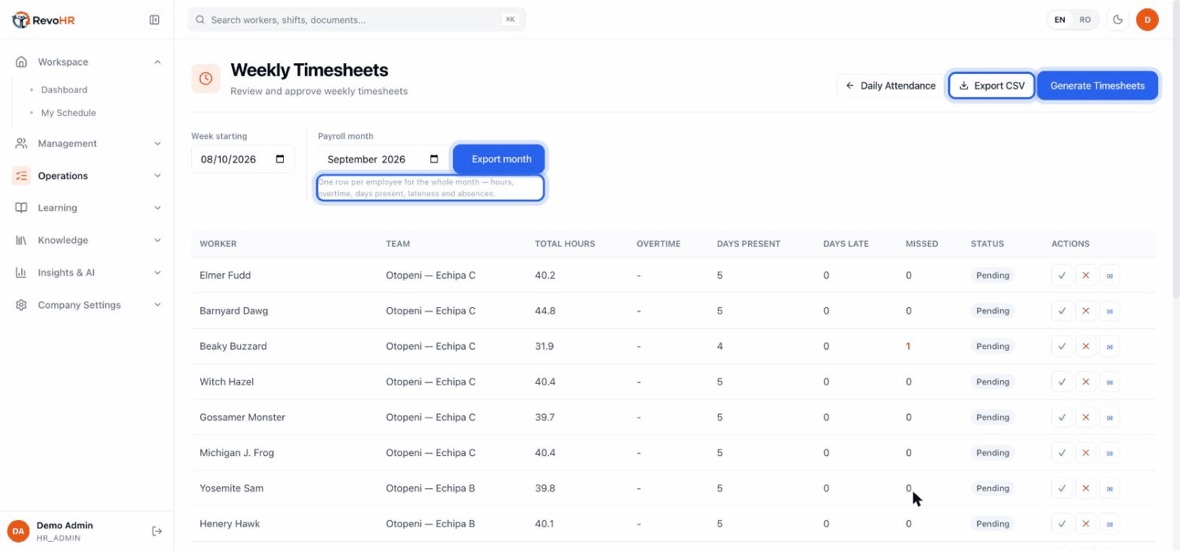
    Weekly Timesheets rolls the punches up into a week. Pick the week from Week starting β€” an empty week means nothing has been generated for it yet, not that nobody worked.
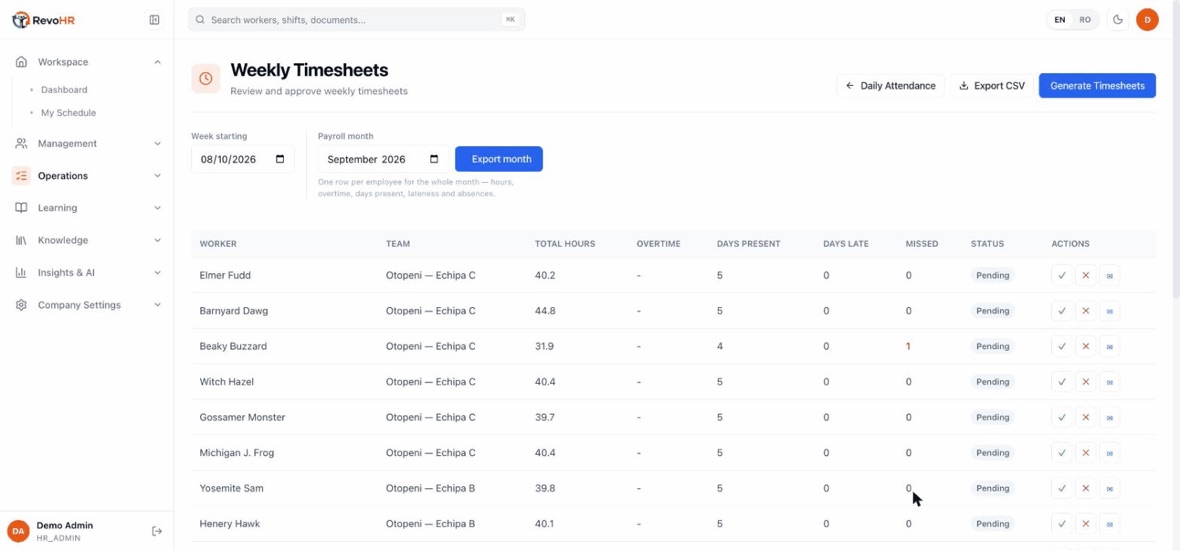
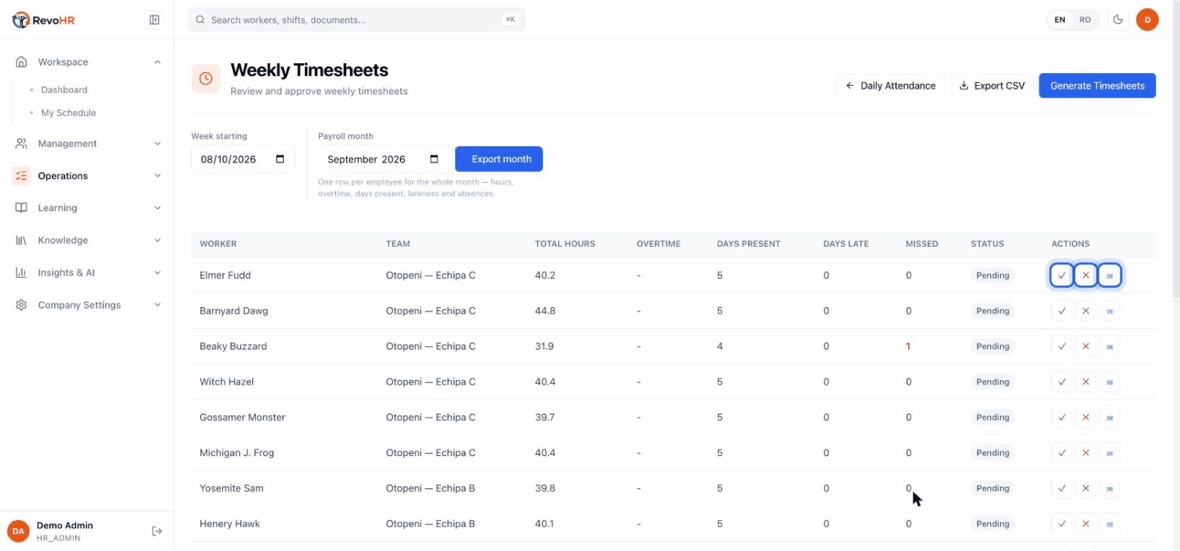
    One row per employee: their team, total hours, overtime, days present, lateness and absences. This is the sheet a manager actually argues with, so it is the one worth reading before approving.
    Three actions per row: approve, reject, and send. Everything starts Pending β€” the hours are recorded but not signed off, and payroll should be reading approved rows only.
    Two exports, and they are not the same. Export CSV takes the week on screen. Export month takes one row per employee for a whole payroll month β€” hours, overtime, days present, lateness and absences. That is the one you send to payroll.
    1. Make sure records can exist at all: locations with coordinates and a radius, published shifts, and WhatsApp credentials. Records are created from the schedule, so a day with no published shift has no rows.
    2. Work the Exception rows. A record moves through Scheduled, In progress, Completed, Missed or Exception β€” Exception is the one that needs a human.
    3. Correct by hand where you need to, for a flat phone or a mistake: set the worker, the date, the times and the status.
    4. Generate the week, then approve it. Timesheets are built week by week from Monday, and generation is a step you take β€” until you press it there is nothing to approve.

    Watch out

    Two things happen without you. A worker who never checks in is marked Missed about two hours after the shift starts, and is told. A worker who checks in and never out has the shift closed about three hours after it should have ended β€” and is not told; that one only reaches you as a flag.

    Back to chapters

    10

    Manage leave

    Workers request leave over WhatsApp, in their own language, in conversation. Everything after that happens here: routing it to an approver, checking it against staffing, deducting the balance, and keeping the record.

    1:539 stepsEnglishSilent β€” the captions carry the narration.
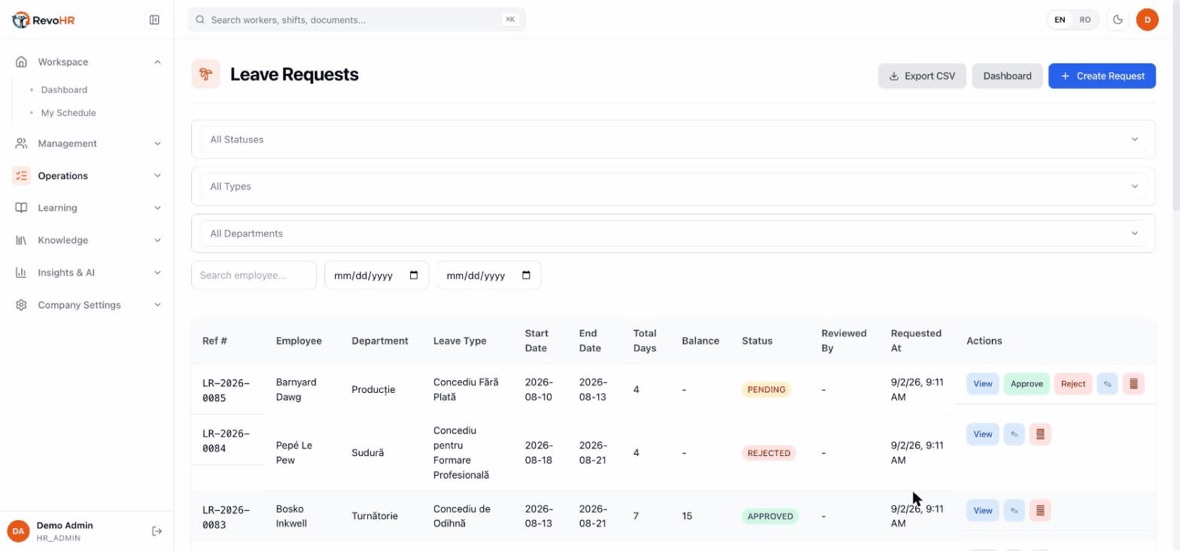
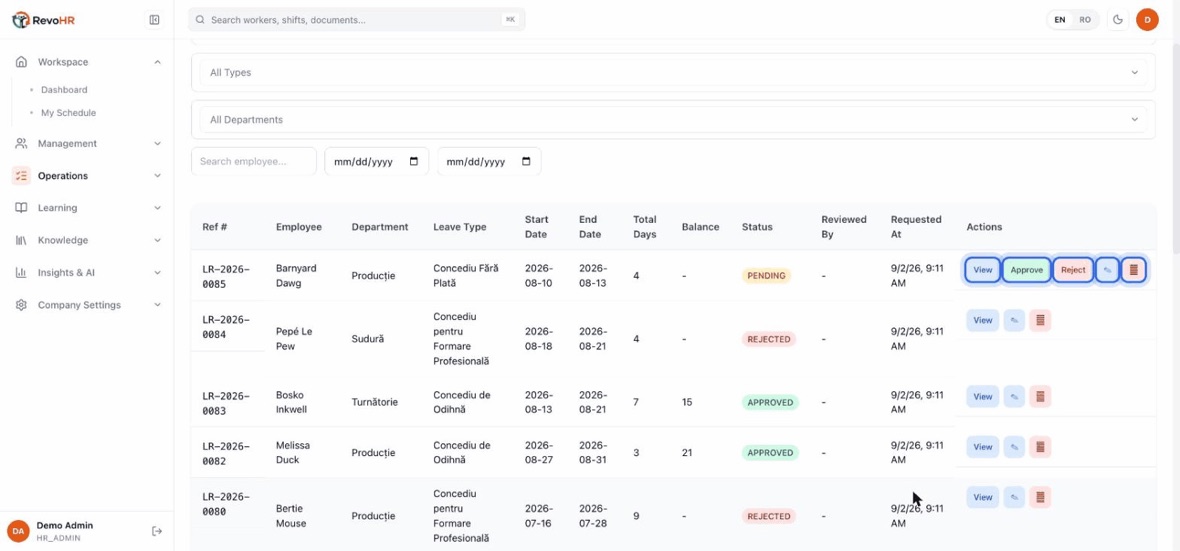
    Operations β†’ Leave Requests. Every request in the company on one screen, each with a reference number, the type, the dates, the day count and where it stands.
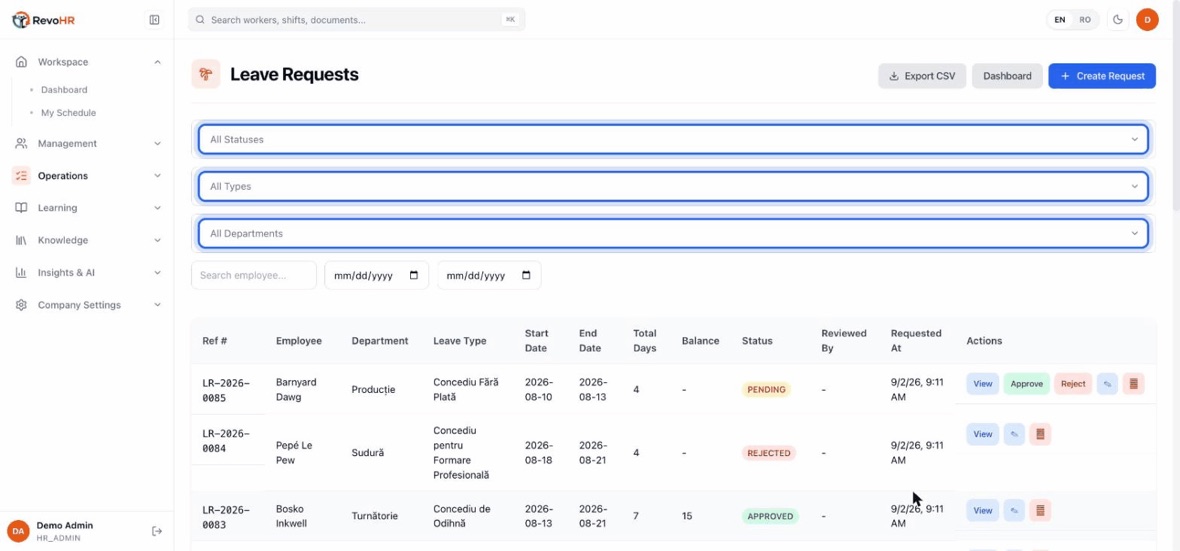
    Three filters: status, type and department. Pending plus your own department is the view you will use every morning.
    You can approve or reject straight from the row β€” but only do that when you already know the answer. The View screen is where the decision is actually informed.
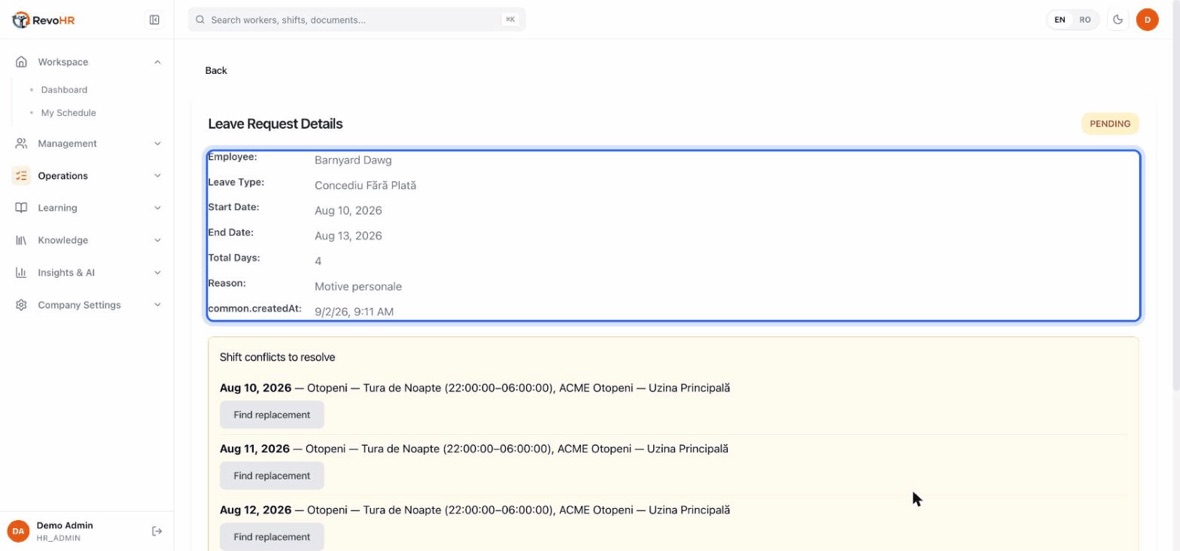
    The request itself: who, what type, the dates, the total days and the reason they gave. Nothing surprising β€” the interesting part is underneath.
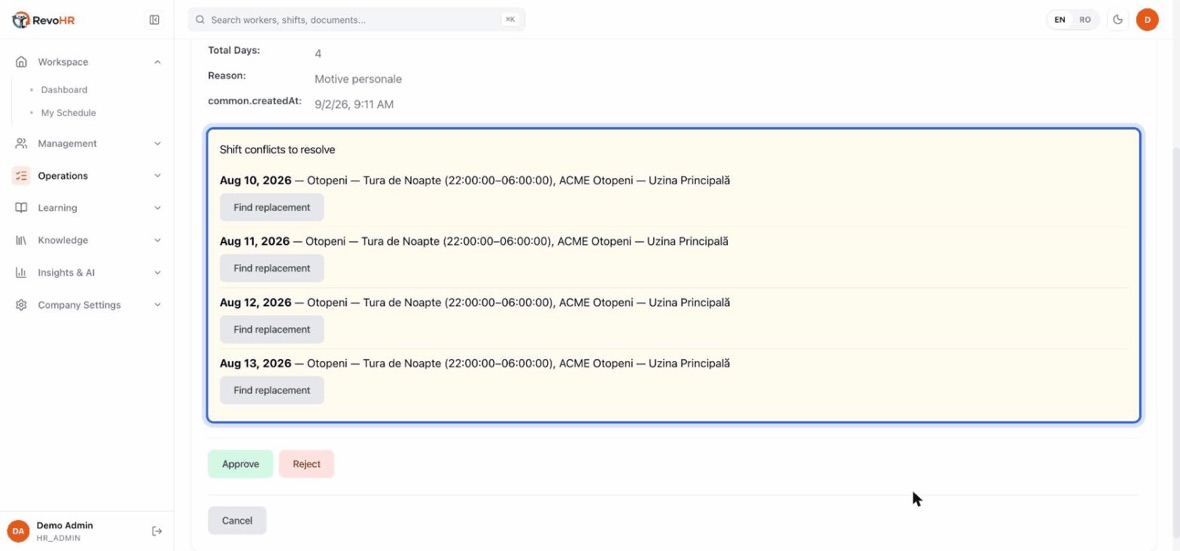
    Shift conflicts to resolve. RevoHR has already checked the rota against these dates and listed every shift this person would have worked. Four nights at Otopeni, in this case β€” that is the real cost of saying yes.
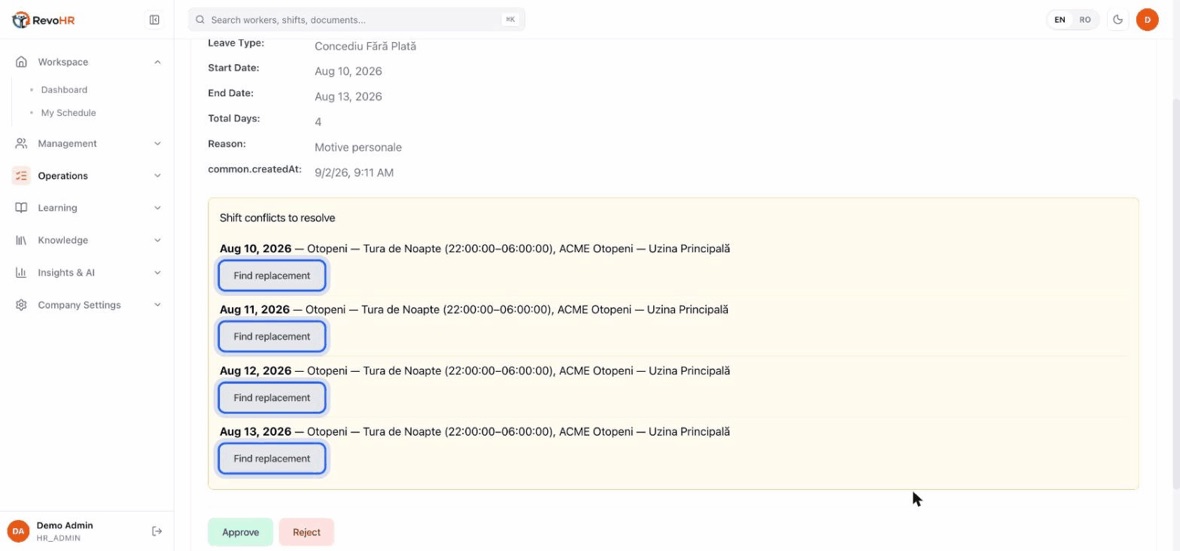
    And each conflict has Find replacement beside it. That is the whole point of this screen: you are not approving leave and discovering the hole later β€” you close it in the same place, before you approve.
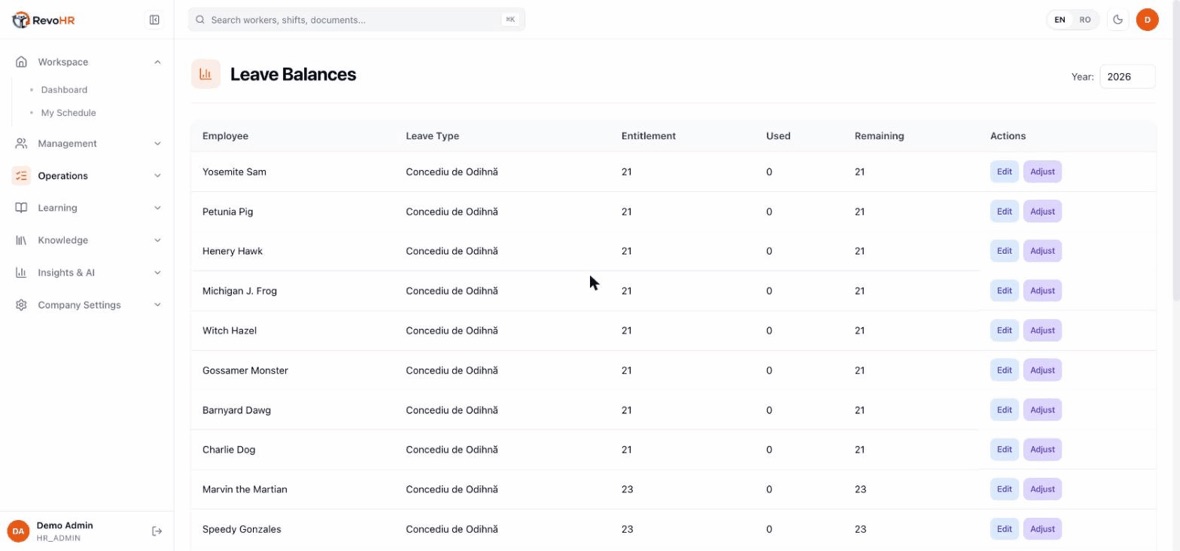
    Operations β†’ Leave Balances is the other half: entitlement, used and remaining, per person and per leave type, for a chosen year. Adjust is how you correct one without rewriting the policy.
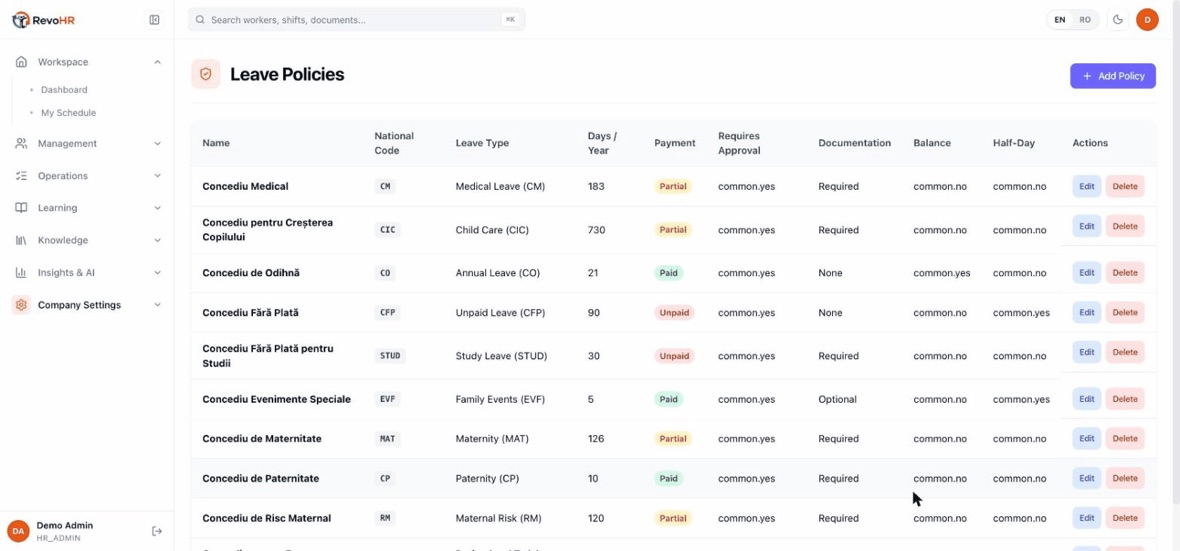
    Company Settings β†’ Leave Policies is where the rules live. Each one carries a national code β€” CO, CM, CFP, CIC β€” and that code is what ends up in your payroll export, so it has to match what your accountant expects.
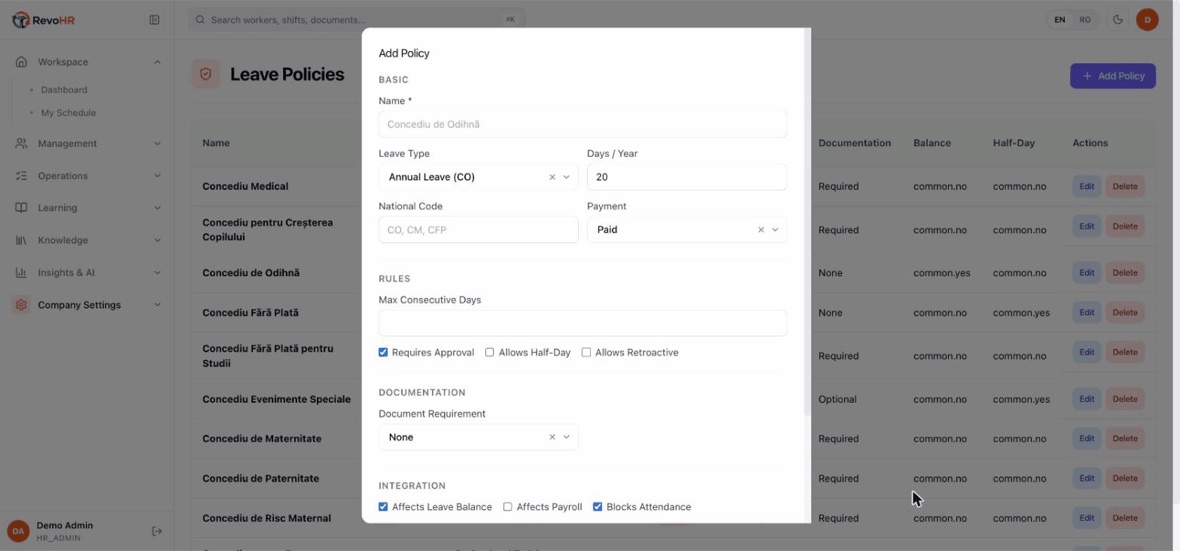
    A policy is more than a day count. It decides whether the leave is paid, whether it needs a document, whether it draws down a balance, whether it blocks attendance, and whether it goes into the payroll export at all.
    1. Set up your leave policies first. Policy names override the built-in labels everywhere else, so without them requests and balances show technical names.
    2. Use the ten statutory codes as shipped: CO annual, CM medical, CFP unpaid, STUD study, FORM employer training, EVF family events, MAT maternity, CP paternity, CIC child care, RM maternal risk. These are payroll export codes β€” they are not yours to invent.
    3. Let RevoHR count the days. Give the worker, the type and the dates; business days are calculated around weekends and public holidays.
    4. Resolve conflicts before approving. Each conflicting shift is listed with its own Find replacement button, and approval unlocks once every conflict is clear.

    Watch out

    If the dates collide with shifts the worker is already published on, approval is blocked, not warned. That is deliberate β€” approving would otherwise create a silent coverage gap that surfaces at shift start. The same block applies to a manager approving from WhatsApp. Rejection always needs a reason, and that reason is sent to the worker in their own language.

    Back to chapters

    11

    Handle coverage requests

    A worker who cannot work a shift can ask for it to be covered. The request comes to you, you choose who covers it, and both people are told.

    The coverage request list, with tabs for pending, approved, rejected and all.
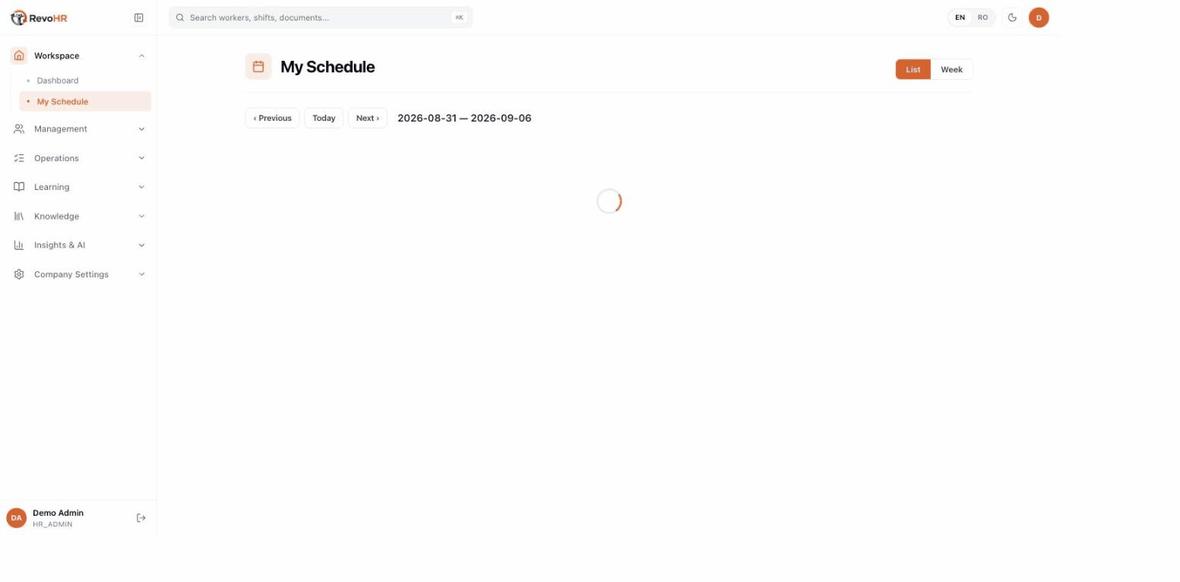
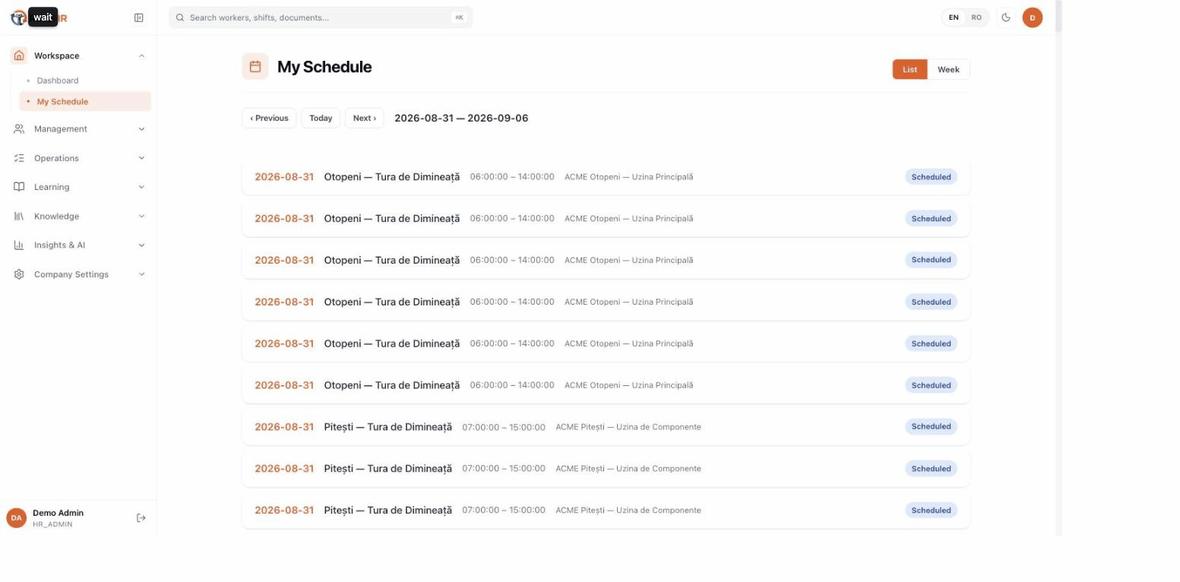
    My Schedule under Workspace, where a rostered person raises their own request.
    1. Work from the pending tab. Each row shows who asked, which shift, and any reason they gave.
    2. Choose the covering worker before approving. Approving with nobody selected is refused, because an approved shift with nobody on it is worse than an unanswered request.
    3. Know who you cannot pick: the person who asked is disabled in the dropdown, and so is anyone inactive.
    4. Approve to reassign the shift, or reject to leave it with the original worker.

    Watch out

    Do not confuse this screen with My Schedule. My Schedule lists shifts across the company for a day, so it is a rota view rather than a personal one. Coverage is handled here, from the request the worker sent you.

    Back to chapters

    Teach and answer

    12

    Build and assign a training

    Training in RevoHR is delivered over WhatsApp, in each worker's own language, and assessed. The point is not distribution β€” it is evidence: who completed which course, in which language, with what score, and when.

    2:1712 stepsEnglishSilent β€” the captions carry the narration.
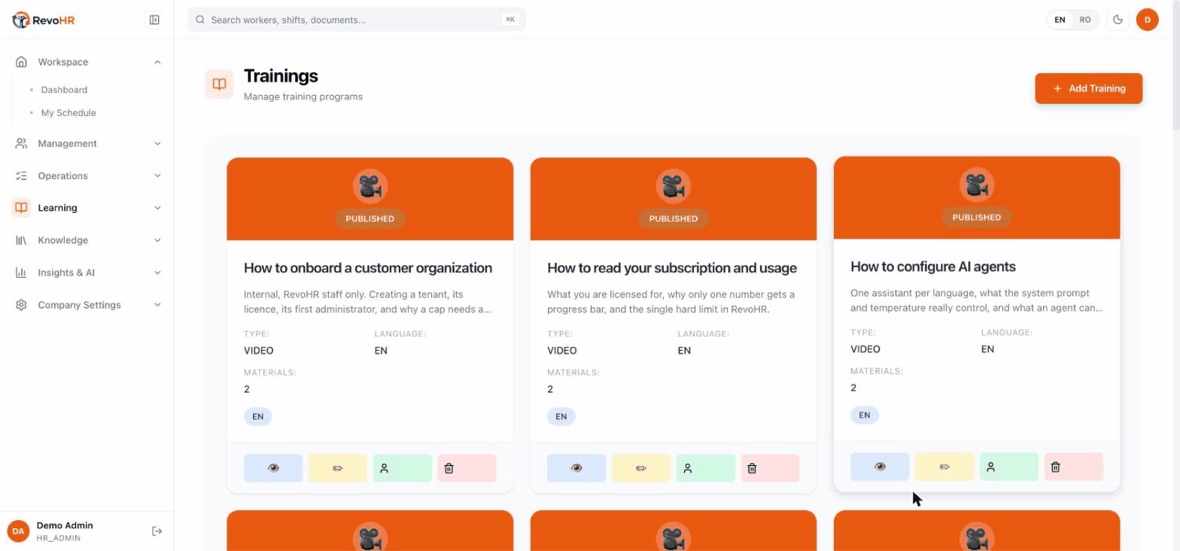
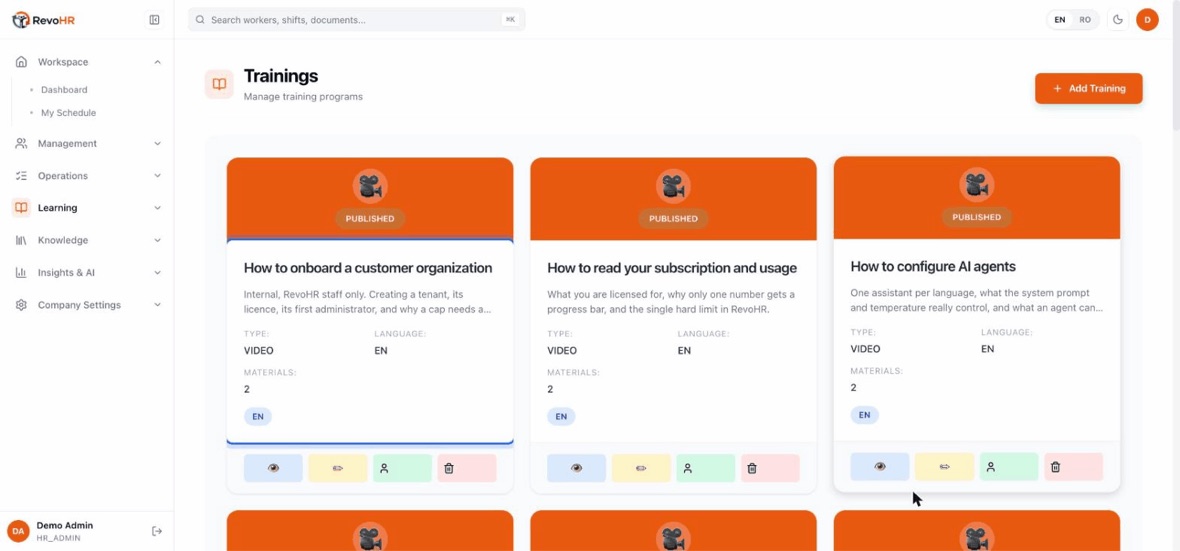
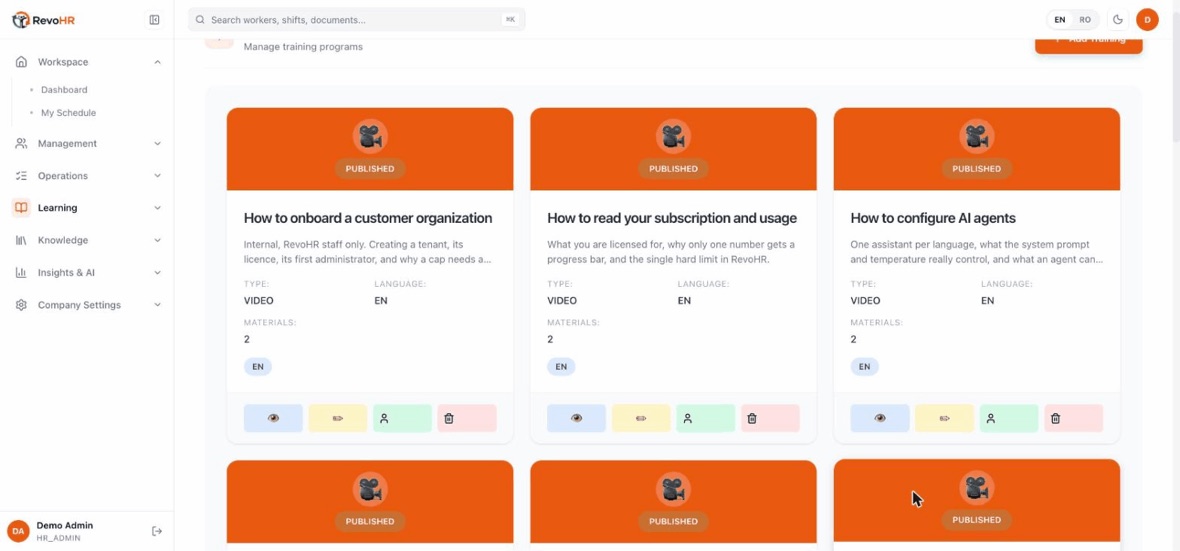
    Learning β†’ Trainings Catalog. Every training your company has, whatever it is made of β€” a document, a video, a quiz.
    A card tells you the type, the language and how many materials it carries. Language here is the language of this training, not of the worker who will take it.
    Four actions per training: view, edit, assign and delete. Assign is the one that matters β€” a training in the catalogue that nobody is assigned to does nothing at all.
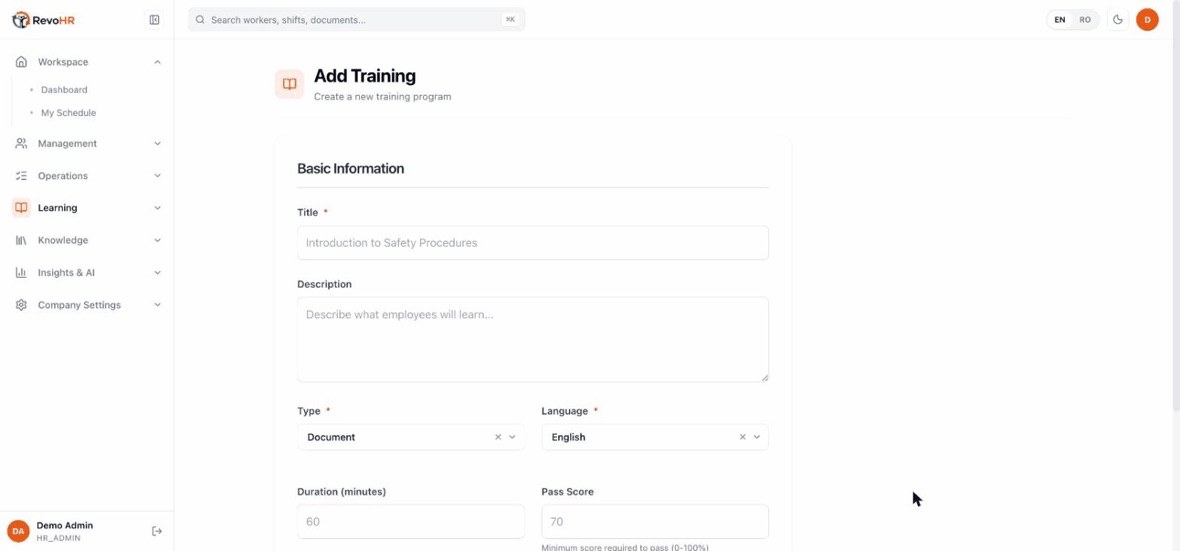
    Add Training is one page, no wizard. Only the title and the type are required.
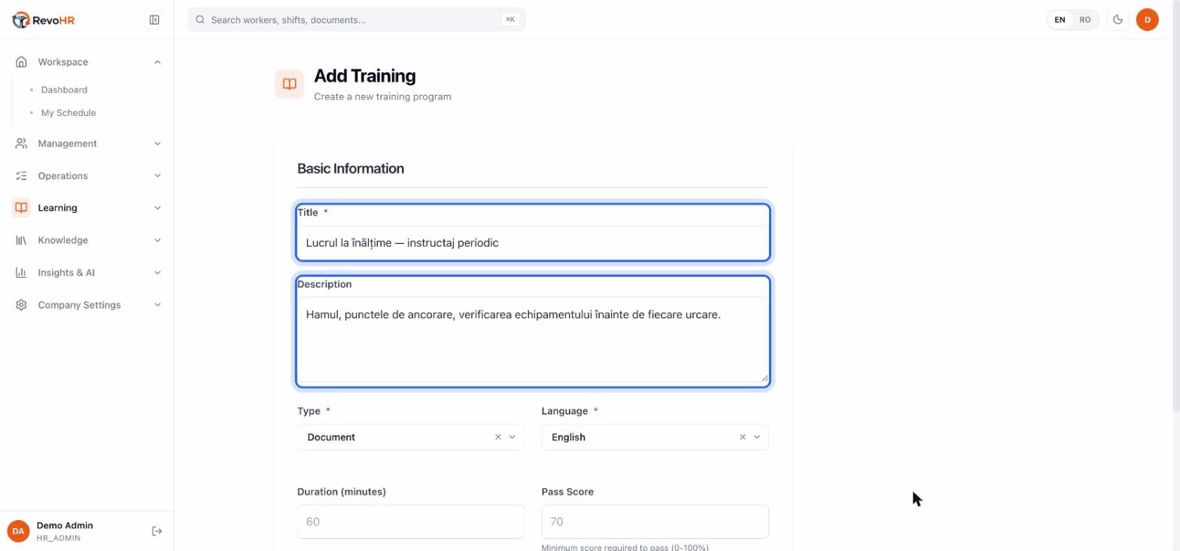
    Write the title for the worker who will see it on their phone, and use the description to say what they will be able to do afterwards.
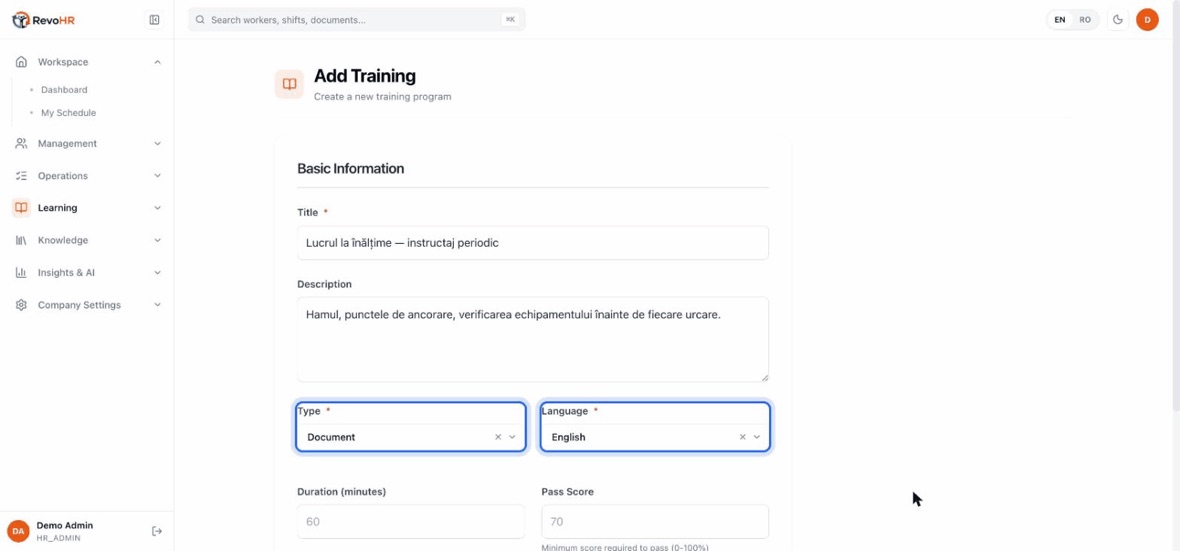
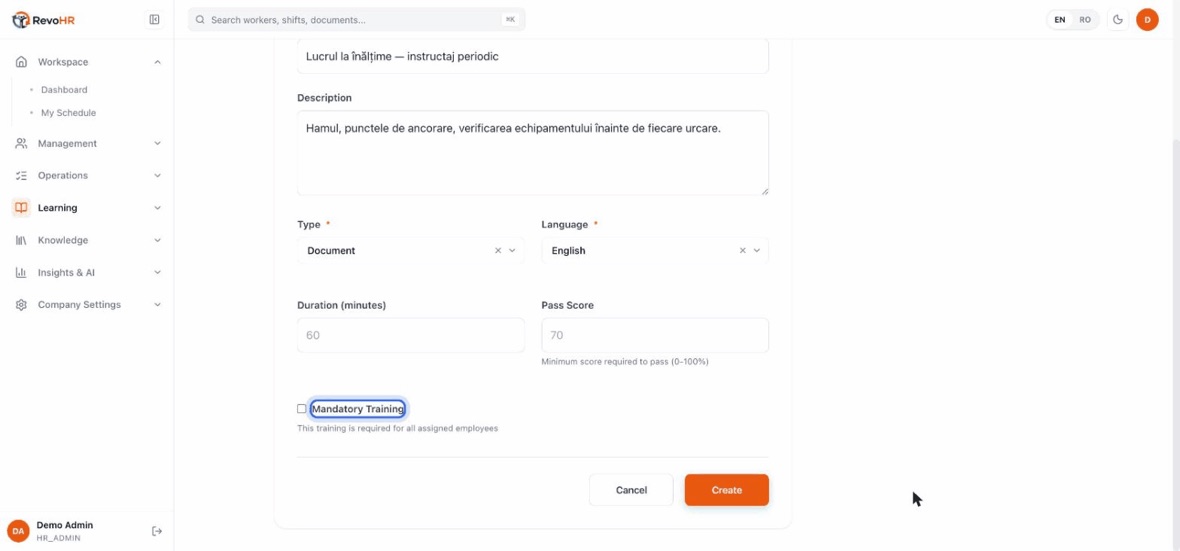
    Type is what the training is made of β€” a document to read, a video to watch. Language is what the material itself is in, so it has to match the material you are about to upload.
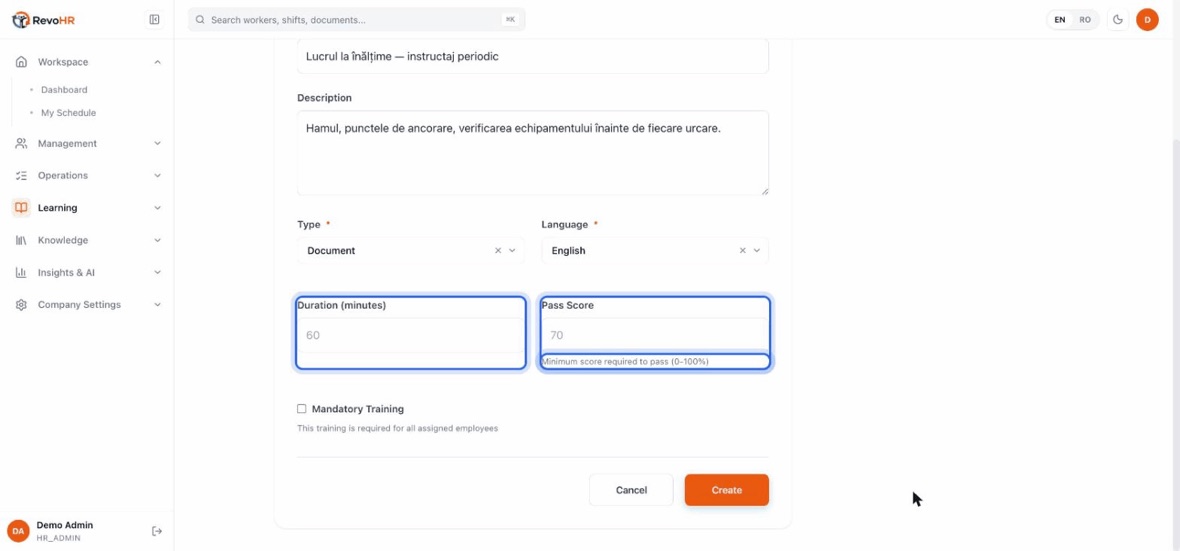
    Duration is what you tell the worker to expect. Pass score only means something when the training has questions β€” a percentage between 0 and 100.
    Mandatory changes what the assignment means: it is required of everyone it is given to, and that is what makes it show up as overdue rather than merely unfinished.
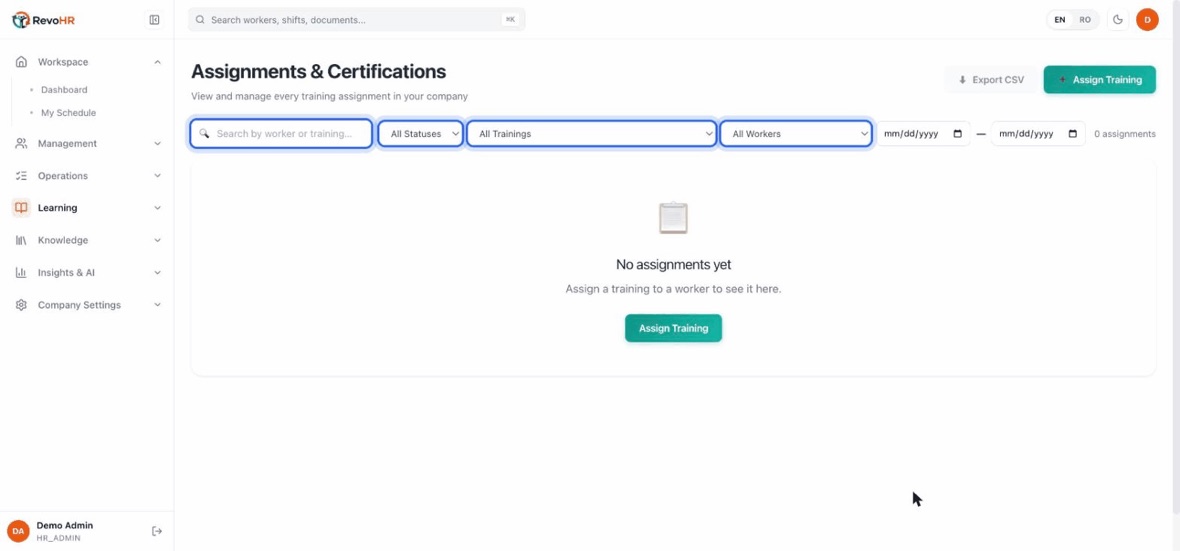
    Assignments & Certifications is the other half: every assignment in the company, filtered by status β€” assigned, in progress, completed, overdue β€” and by training or worker.
    But you do not assign from that list. Assignment starts from the training itself, with the person icon on its card β€” you pick the training first, then the people.
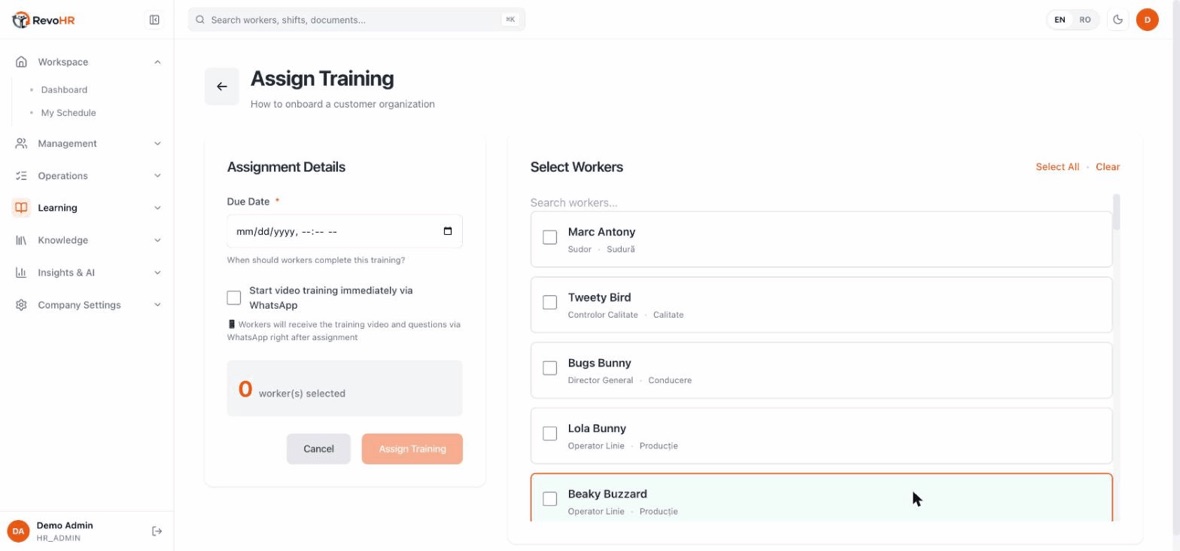
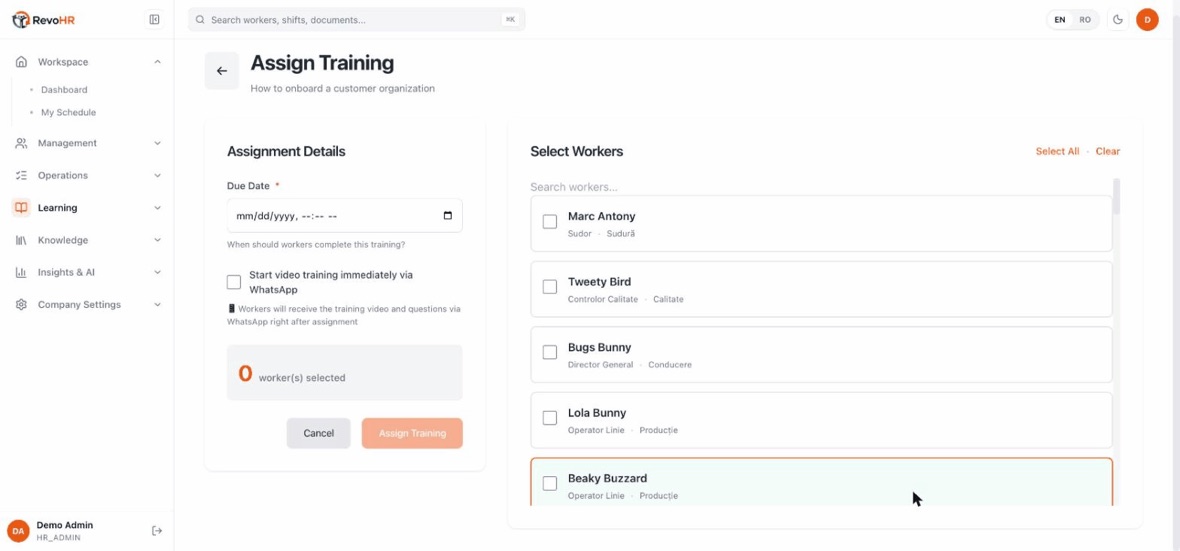
    Then two things. A due date, which is what turns an unfinished training into an overdue one. And a switch: start immediately via WhatsApp β€” leave it off and you have only recorded the assignment; turn it on and the workers get the training on their phones now.
    Then pick the people β€” one by one, or Select All. Each worker gets it in the language on their own record, which is why that field on the employee form matters here too.
    1. Create the training: title of at least three characters, type, the language it is authored in, whether it is mandatory, and the pass score.
    2. Save it before you touch the upload control. The control does nothing until the training exists, and tells you to save first β€” this catches almost everyone once.
    3. Attach the materials, then publish. A training stays a draft until you publish it, and only published trainings can be assigned. Archive retires one without destroying its records.
    4. Add up to five quiz questions per material. Multiple choice is marked exactly; open-ended answers are assessed against a reference answer you write.
    5. Assign from the training itself. Pick the workers, set a due date, and each person gets a WhatsApp message in their own language.

    Watch out

    Two badge columns mean different things. One is where the worker is β€” assigned, in progress, completed, overdue. The other is whether the message got through β€” sent, failed, skipped, pending. Skipped means no phone number, or WhatsApp not configured, and it is the answer to β€œwhy does this person show no progress”.

    Back to chapters

    13

    Generate a training video

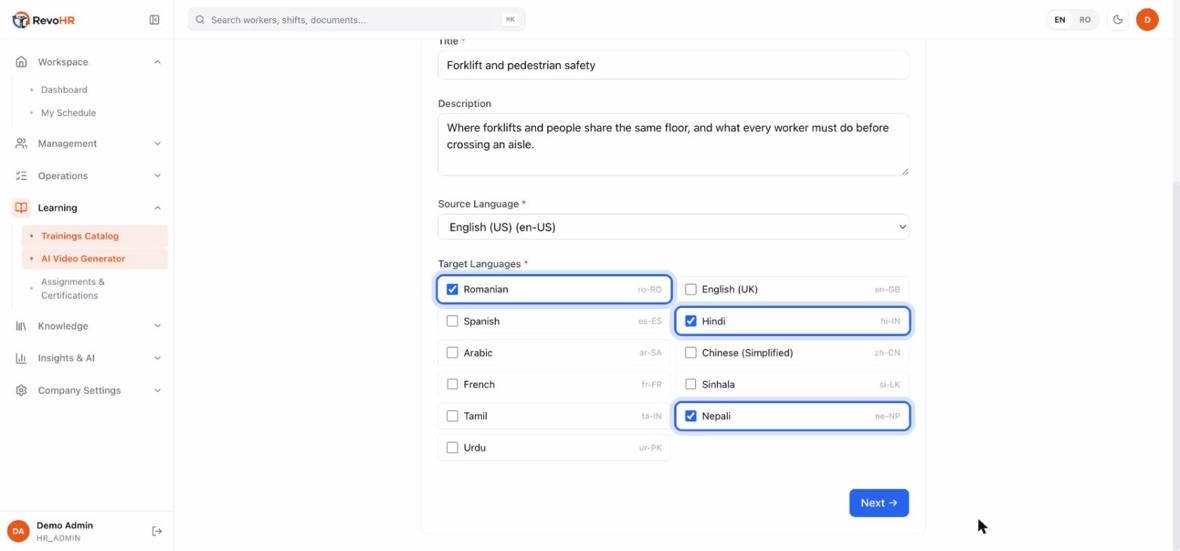
    A safety induction for a workforce speaking Romanian, Hindi and Arabic normally means three production runs and three budgets. This builds all of them from the same slides and script, with synthetic narration, in one pass.

    2:3115 stepsEnglishSilent β€” the captions carry the narration.
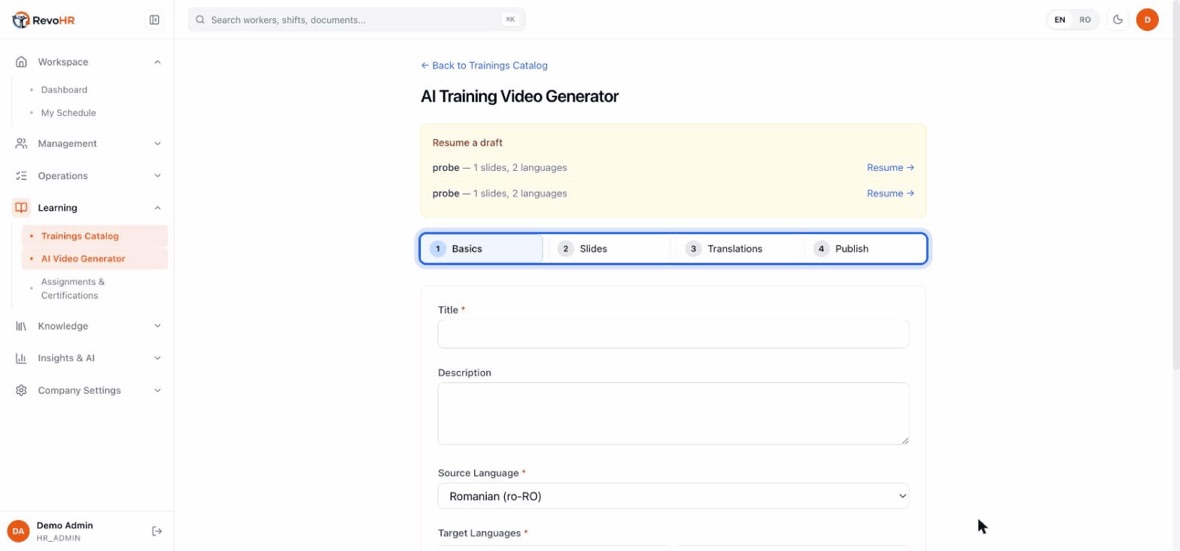
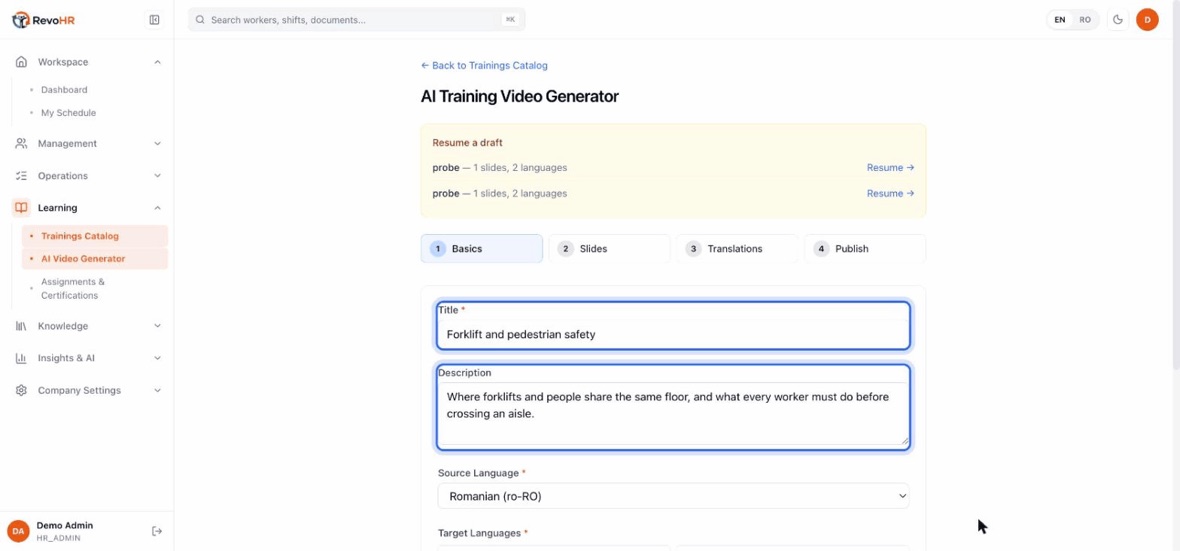
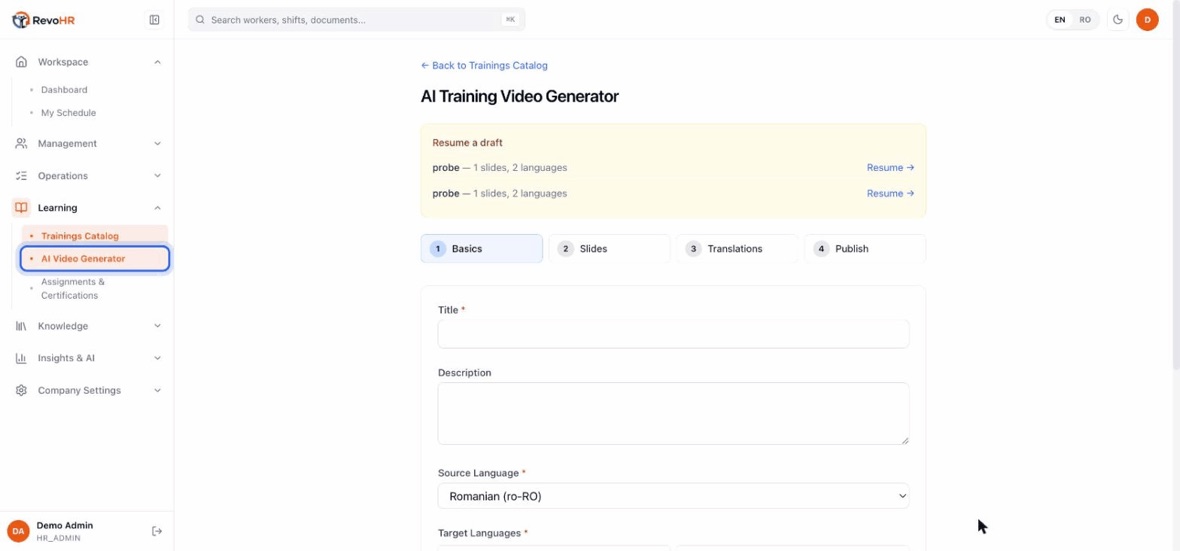
    Learning β†’ AI Video Generator. This is not the trainings catalogue β€” it is the tool that builds the video itself.
    Four steps, in this order: Basics, Slides, Translations, Publish. You can go back, but you cannot skip forward.
    Title and description. This is what the worker sees in their catalogue, so write it for them, not for HR.
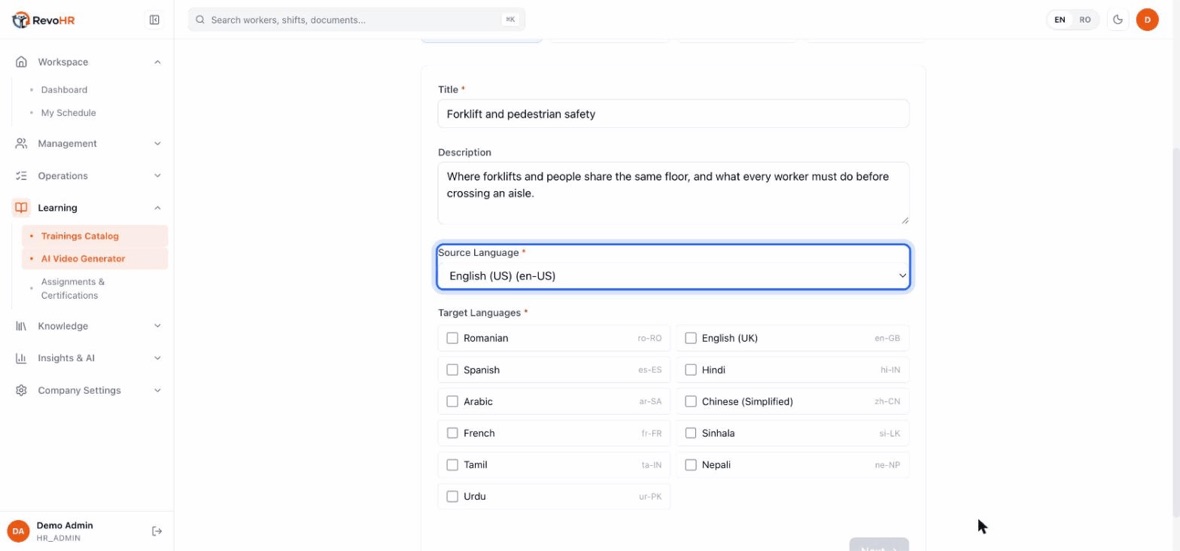
    Source language is the language you write the slides in. Everything else is translated out of it.
    Target languages are the versions you get. Each one becomes its own video with its own voice β€” pick only the languages your people actually read.
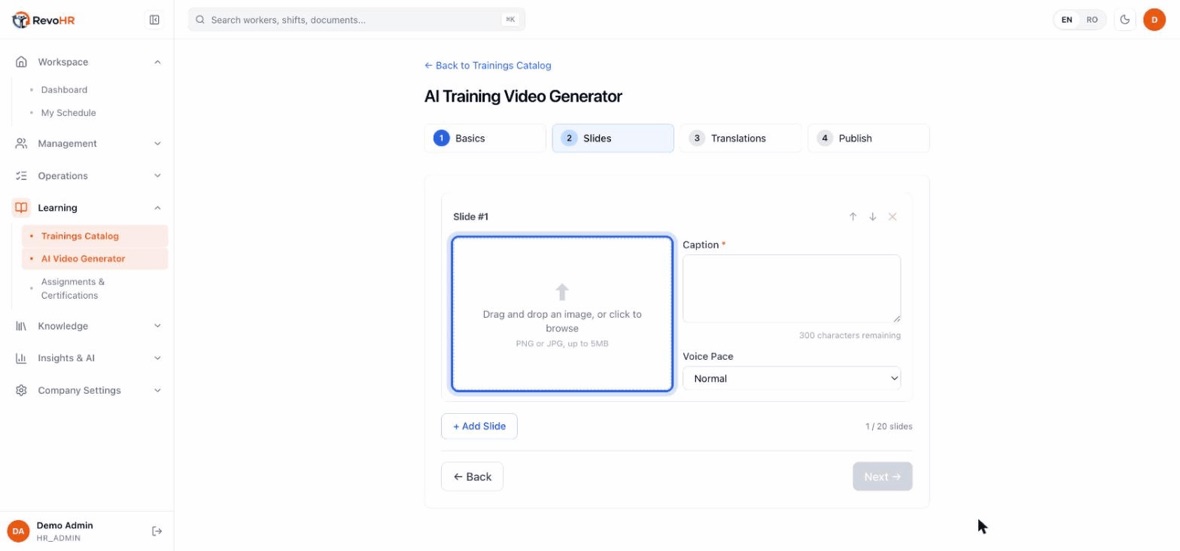
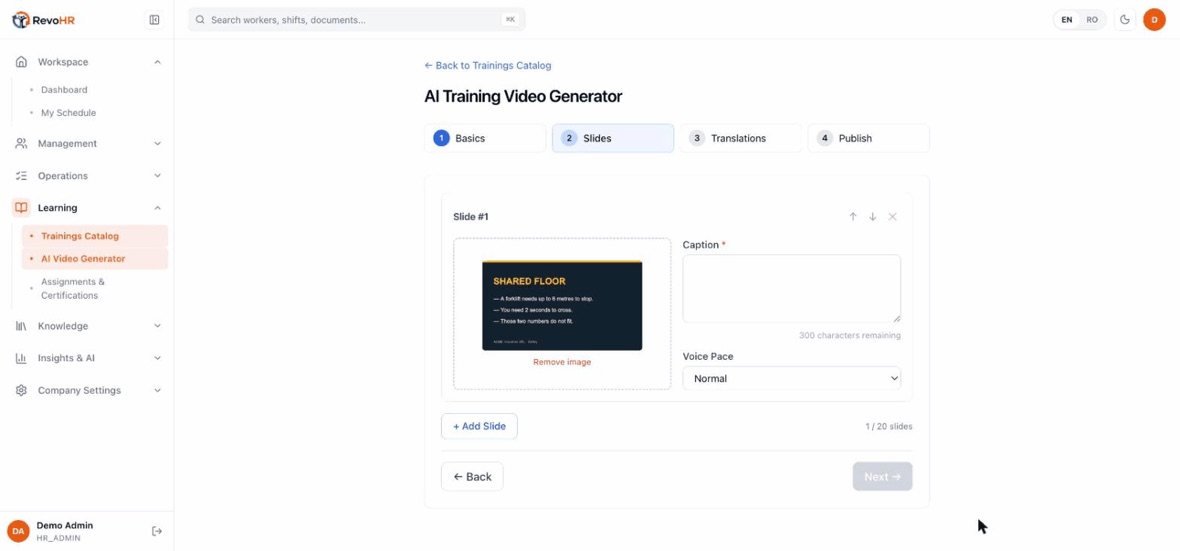
    Step two is the slides. One image per slide, PNG or JPG up to 5 MB, twenty slides at most.
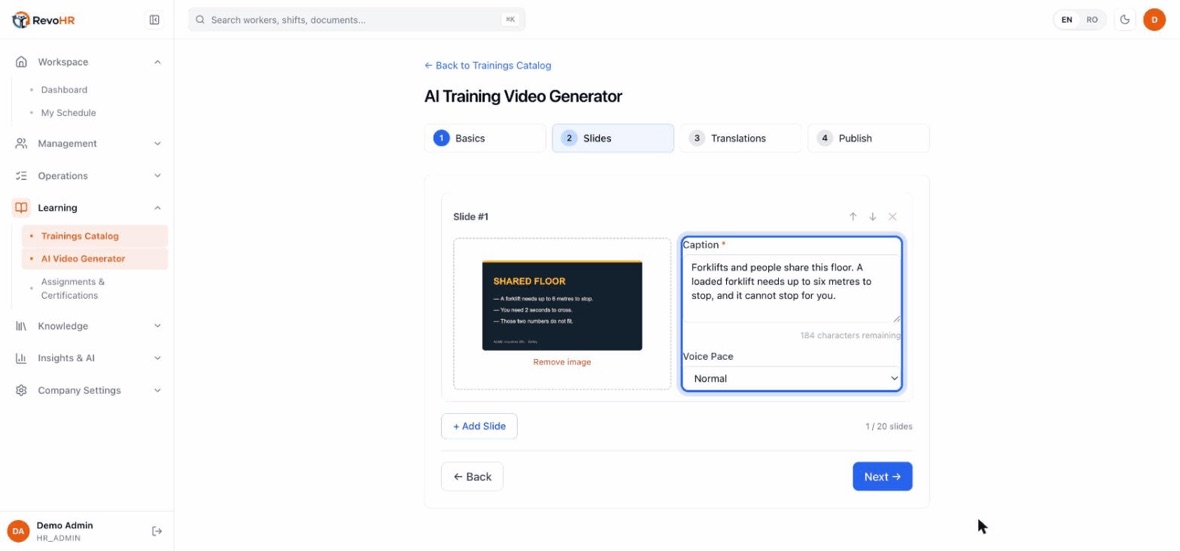
    The image is the slide. RevoHR does not design it β€” it shows it, so bring a picture that already says something.
    The caption is the script. It is what the voice will say and what gets translated, and you have 300 characters per slide.
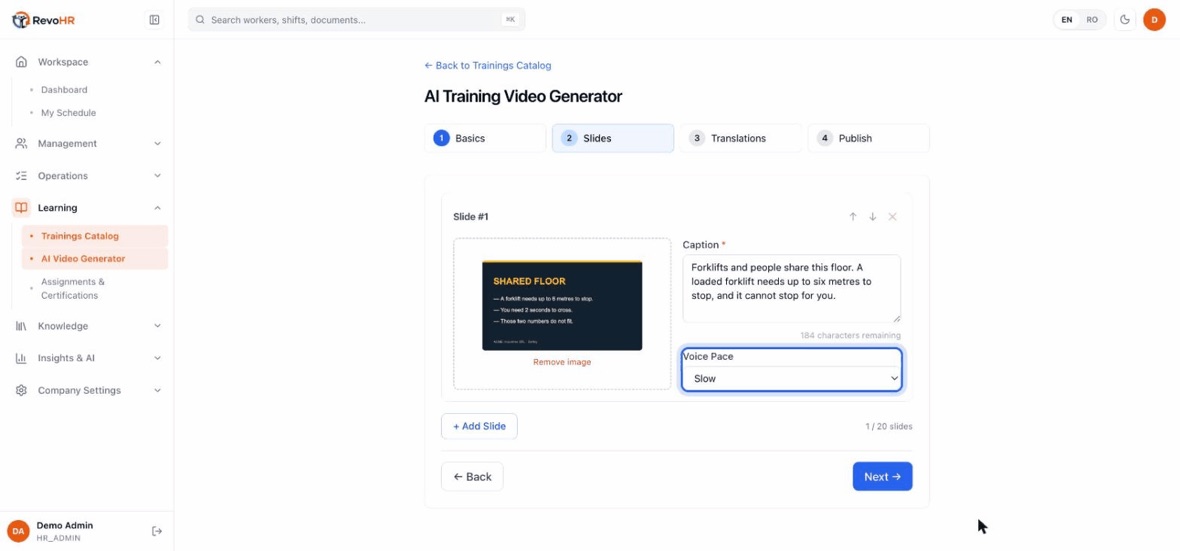
    Voice Pace is set per slide: Normal or Slow. Slow is worth it for an instruction someone has to act on.
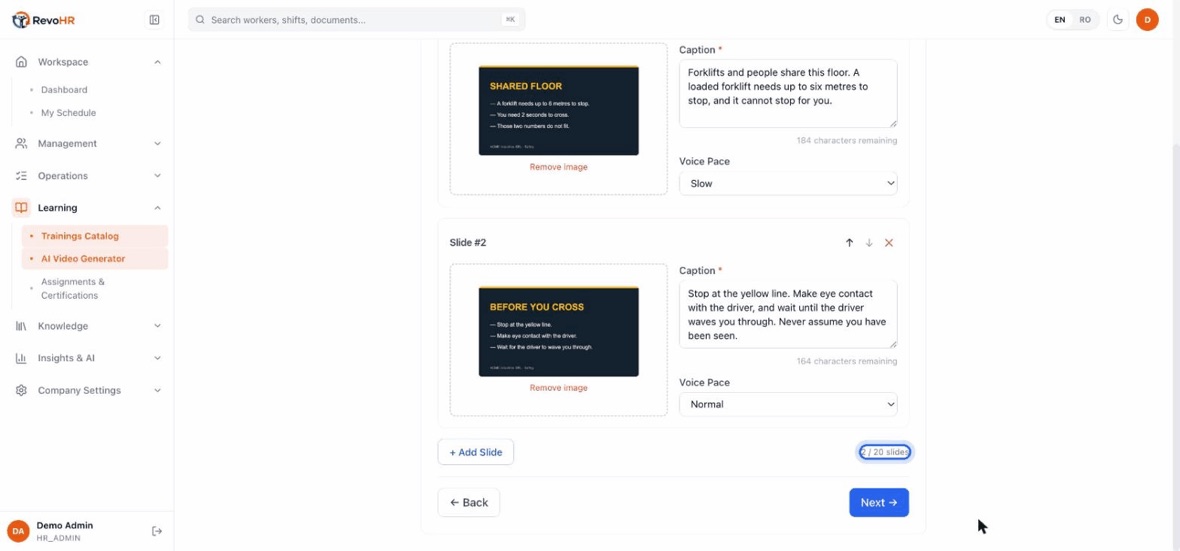
    + Add Slide for the next one. The counter tells you where you are: 2 / 20 slides.
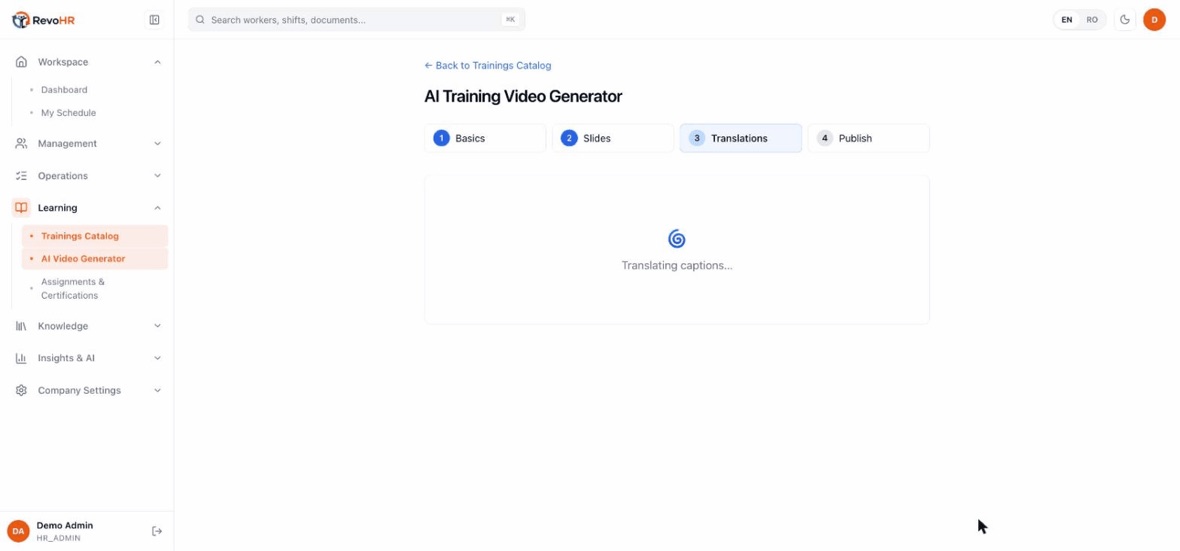
    Step three translates every caption for you. A few seconds, and it happens before anything is rendered.
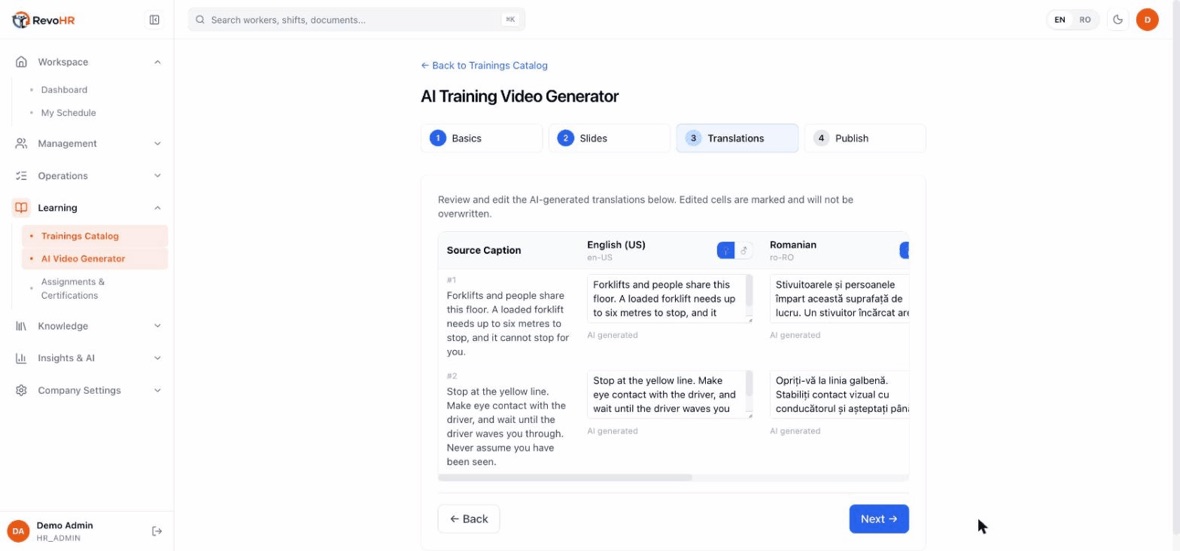
    Every caption in every language, and you can edit any of them. An edited cell is marked and never overwritten. Each language also carries a male or female voice toggle.
    Careful here. Pressing Next on the translations screen starts the render immediately β€” there is no confirmation step, and voice generation is billable.
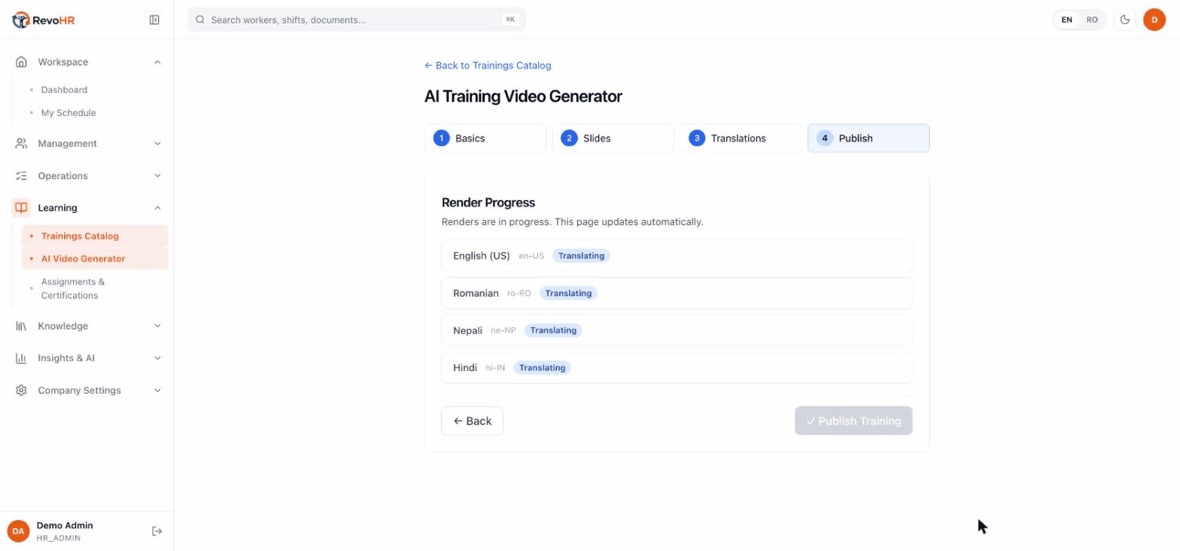
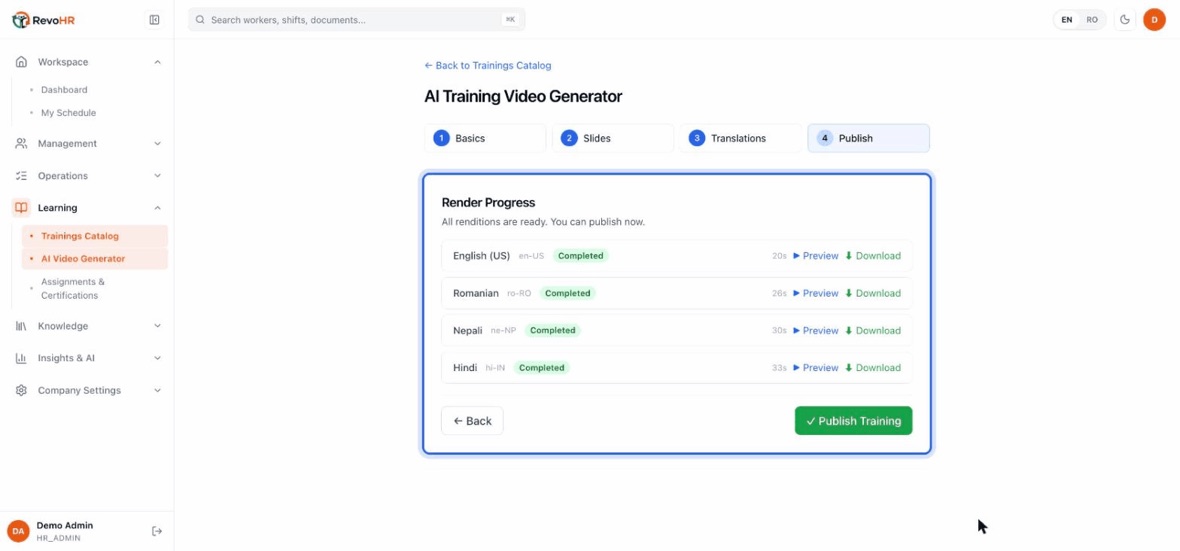
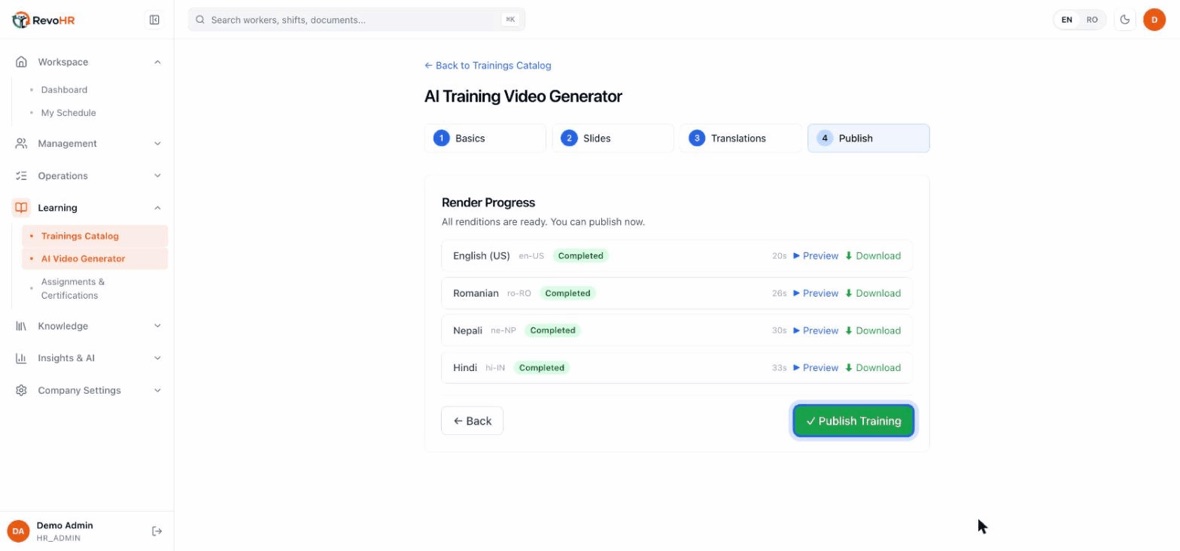
    Each language renders on its own and reports its own runtime: 20s, 26s, 30s, 33s. They finish out of order, and the page updates itself.
    Publish Training is the last step. Until you press it the videos exist, but nobody has been assigned anything.
    1. Understand the cost before you start. Submitting triggers billable voice synthesis, and the source language always gets its own rendition alongside every target β€” so the minimum you can produce is two.
    2. Step 2, slides: an image up to 5 MB, PNG or JPG, and a caption that is the narration for that slide. Voice pace is normal or slow, and slow suits safety-critical content and non-native listeners.
    3. Step 3, translations: every caption against every language, every cell editable. A cell you change is marked Edited and is never overwritten by a later re-translation.
    4. Step 4, publish: each language moves through pending, translating, synthesising voice, rendering, completed. Retry affects only the failed row. Publish training then creates the course.

    Watch out

    Nothing uploads until you press Next. If an upload fails partway, pressing Next again re-sends only the missing images rather than starting a second video β€” so retry here rather than starting over. Submit in small batches: submitting many videos at once queues them, and the queue can outlive the signed URLs for their own slide images, which fails the late jobs after they have already cost you.

    Back to chapters

    14

    Build the documents library

    Emailing a PDF to three hundred workers is not policy distribution. This library stores your policies and handbooks and makes them answerable: a worker asks a plain-language question in WhatsApp and gets the answer from your own documents, with the source named.

    1:329 stepsEnglishSilent β€” the captions carry the narration.
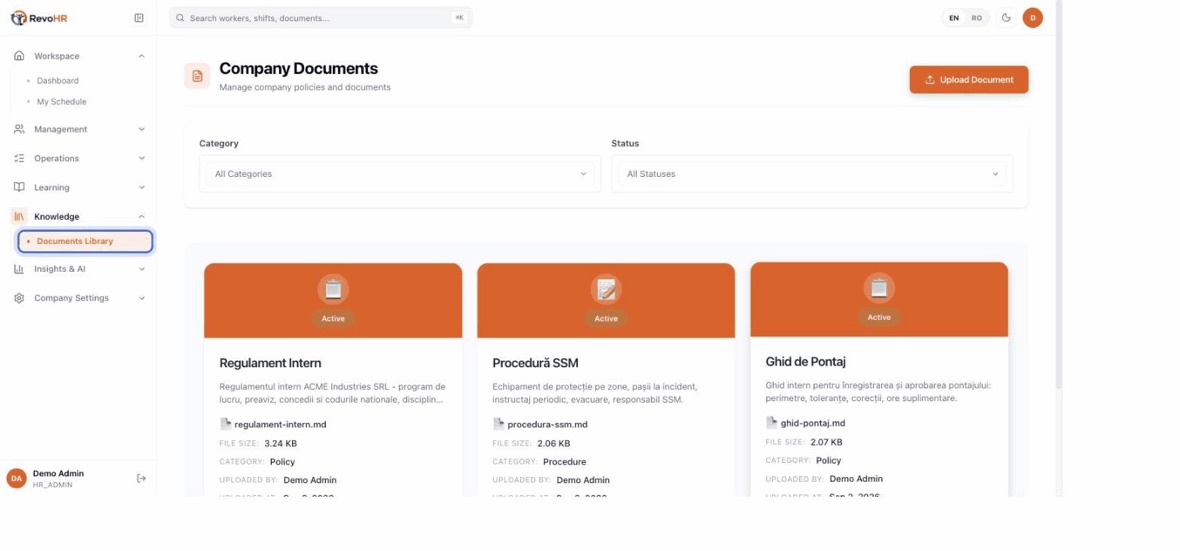
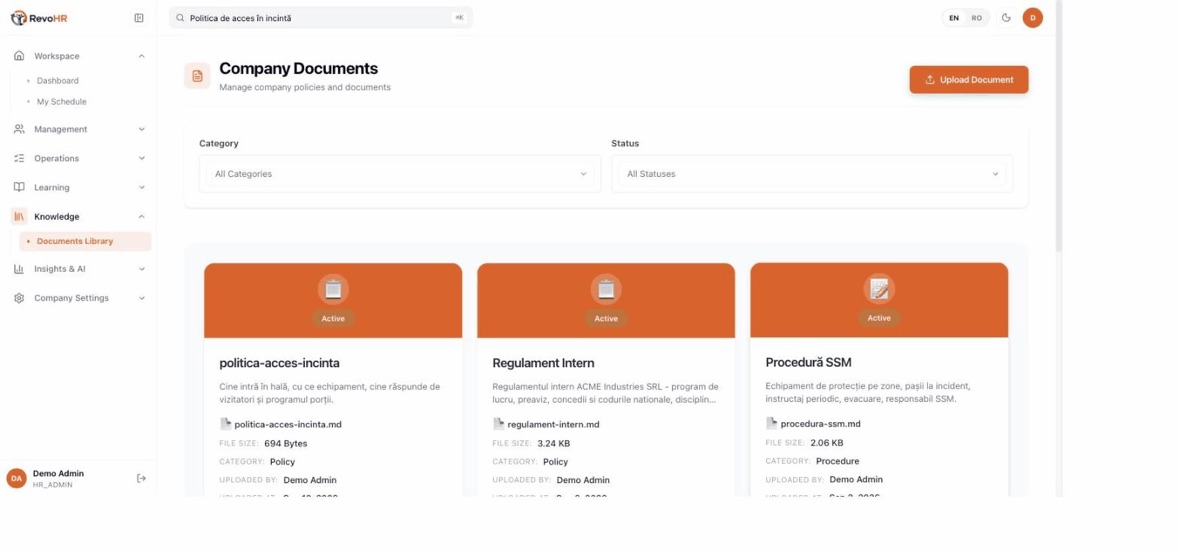
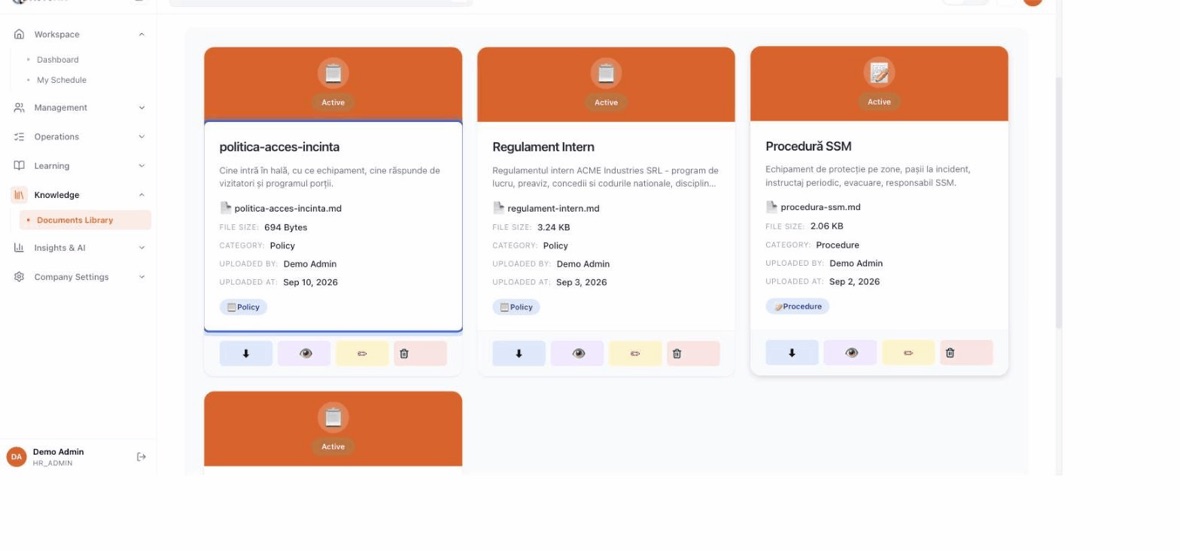
    Knowledge β†’ Documents Library. This is the company's own policy shelf β€” and it is what the WhatsApp assistant answers from.
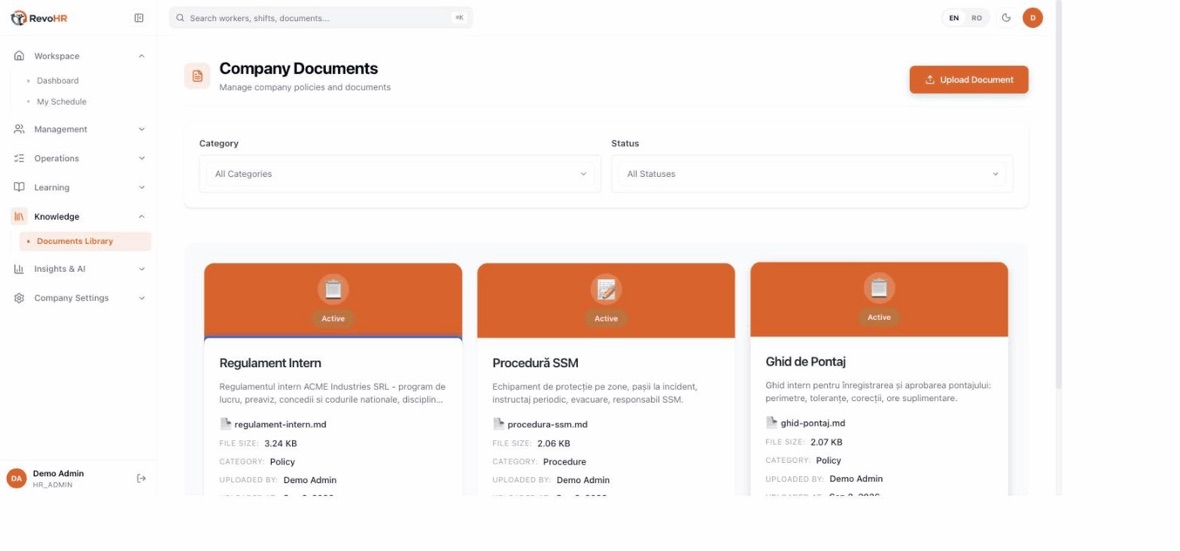
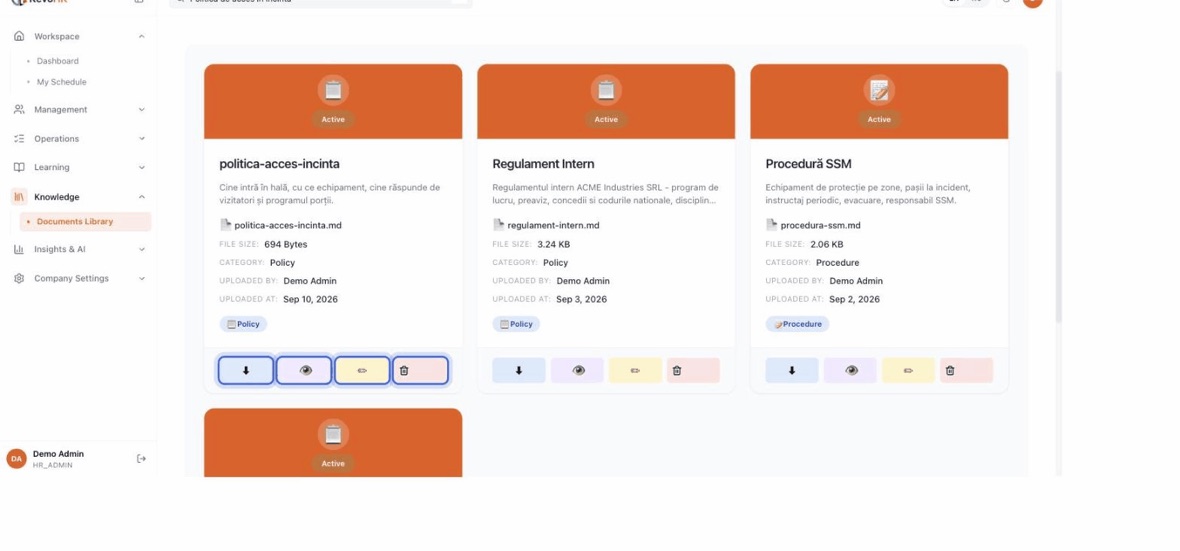
    Each document is a card: file, size, category, who uploaded it and when. Active means it has been indexed and the assistant can already use it.
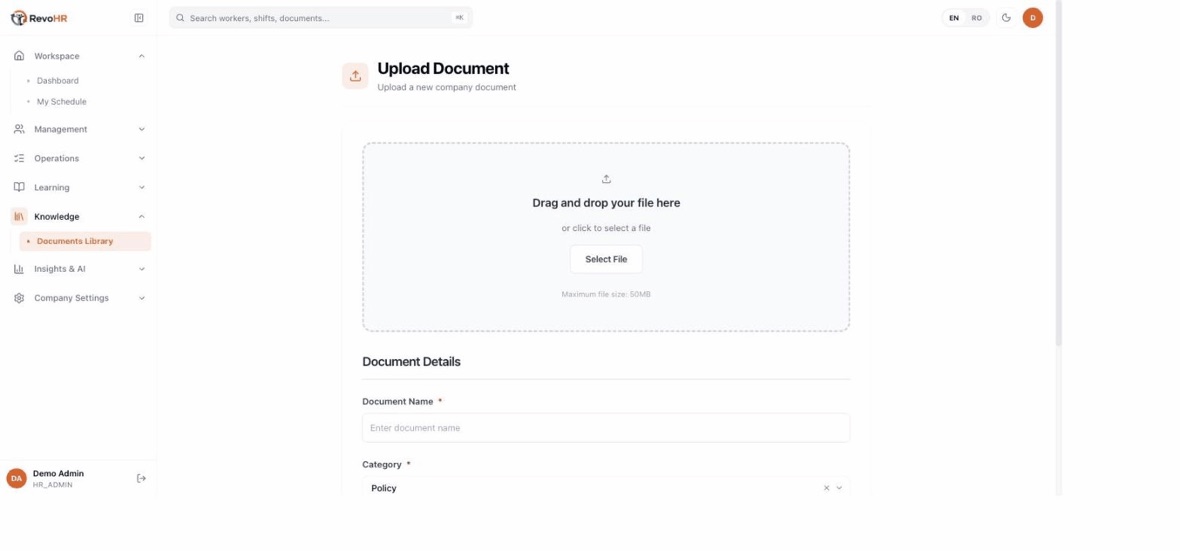
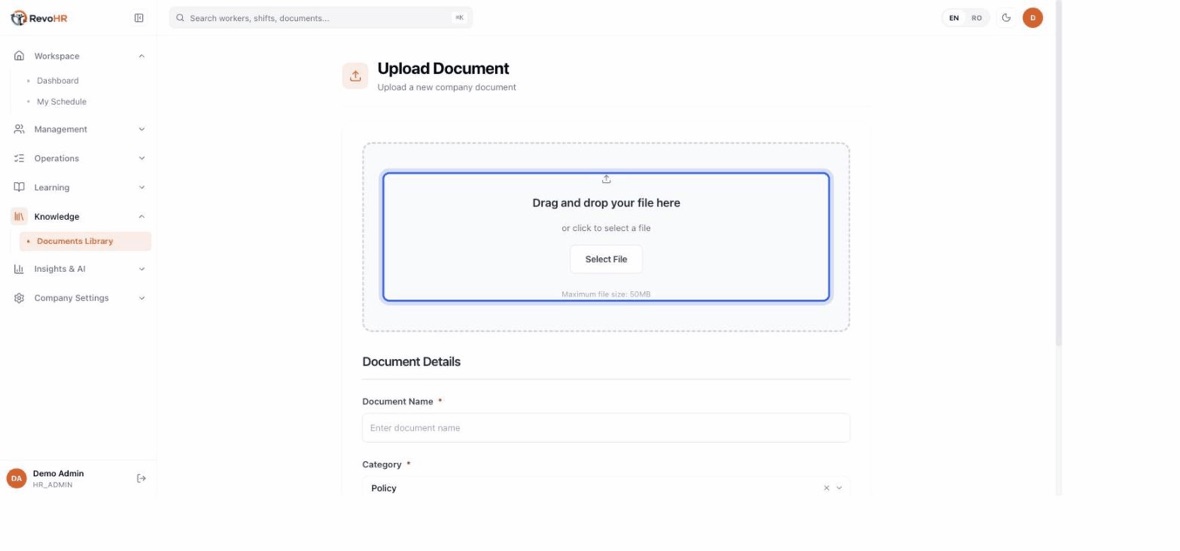
    Upload Document is a page of its own, not a pop-up. One file at a time.
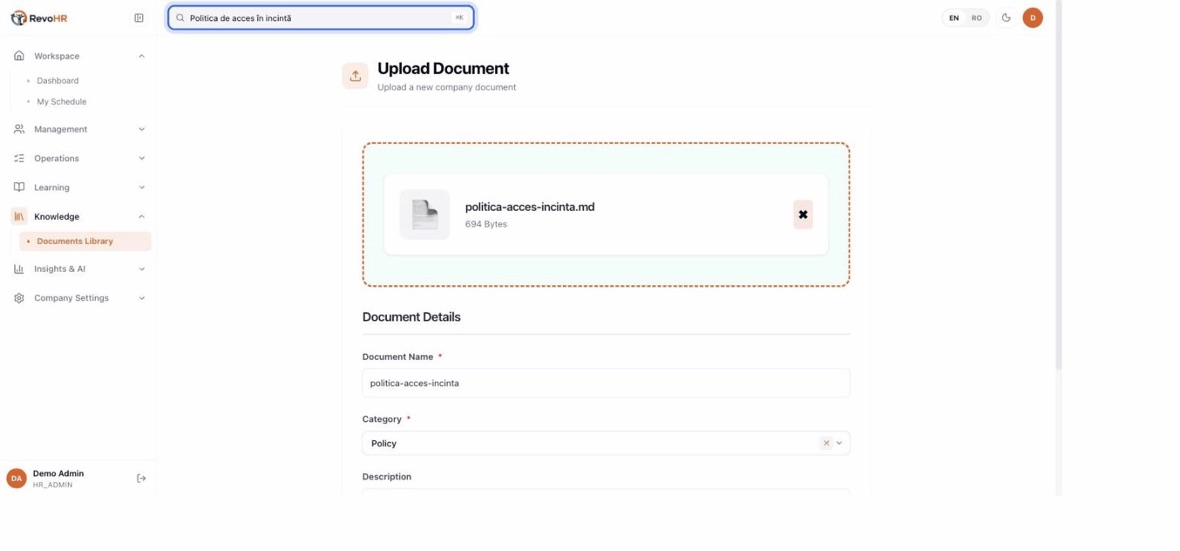
    Drop the file or browse for it. Up to 50 MB, and it can be a handbook, a procedure, a regulation β€” whatever your people actually ask about.
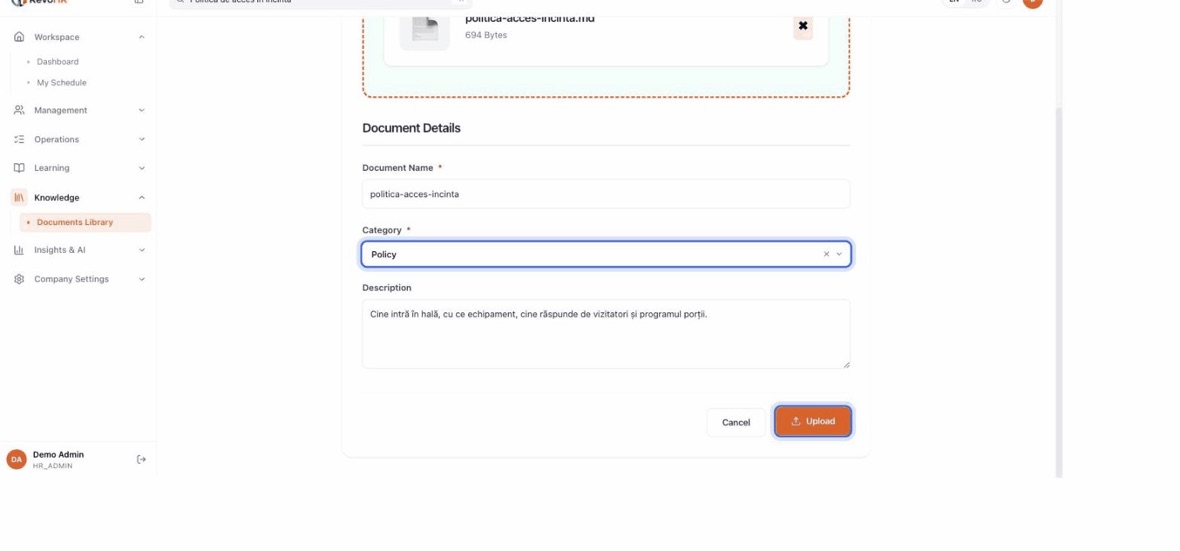
    Then the details. The name is what shows in the library, and the description is worth writing: it is the short answer to "what is this document for".
    Category sorts the shelf β€” Policy, Procedure, and the rest. Press Upload and RevoHR reads the file and indexes it.
    Back in the library, the new document is there. Until indexing finishes the assistant does not know it exists β€” a small text file is instant, a long PDF is not.
    The card carries everything you need to judge it later: the real filename, the size, and the date. An outdated handbook produces confidently outdated answers.
    Four actions per document: download, preview, edit, and re-index. Your workers never open this screen β€” they ask in WhatsApp, in their language, and the answer names the document it came from.
    1. Upload the document β€” up to 50 MB, with a name and a category.
    2. Wait for indexing. RevoHR reads the document and indexes it so the assistant can answer from it; the status column shows progress. Until it finishes, the assistant does not know the document exists.
    3. Leave the workers alone β€” they never open this screen. They ask in WhatsApp, in their own language, and the answer cites which document it came from.
    4. Keep it current. The assistant answers from what is in here, and an outdated handbook produces confidently outdated answers.

    Watch out

    A document shared with a worker expires after 60 minutes, so one forwarded outside the company does not stay open indefinitely. Updating a policy archives the previous version rather than deleting it, so the audit record survives.

    Back to chapters

    15

    Configure AI agents

    An AI agent is the assistant a worker converses with in WhatsApp. Each is configured for one language and one purpose, and you decide how it behaves.

    1:5911 stepsEnglishSilent β€” the captions carry the narration.
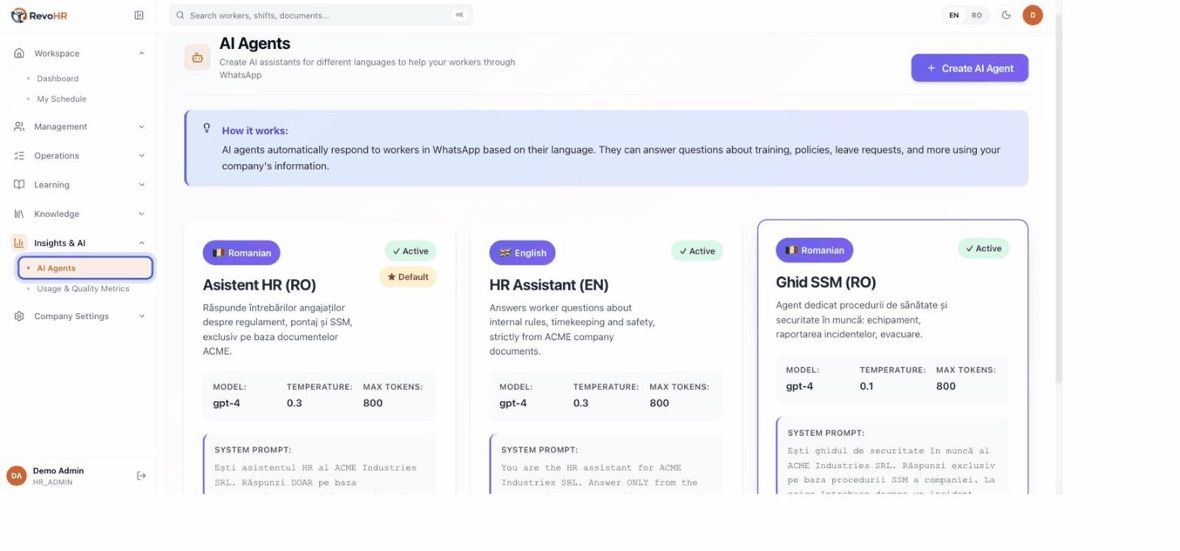
    Insights & AI β†’ AI Agents. An agent is the assistant a worker actually talks to in WhatsApp.
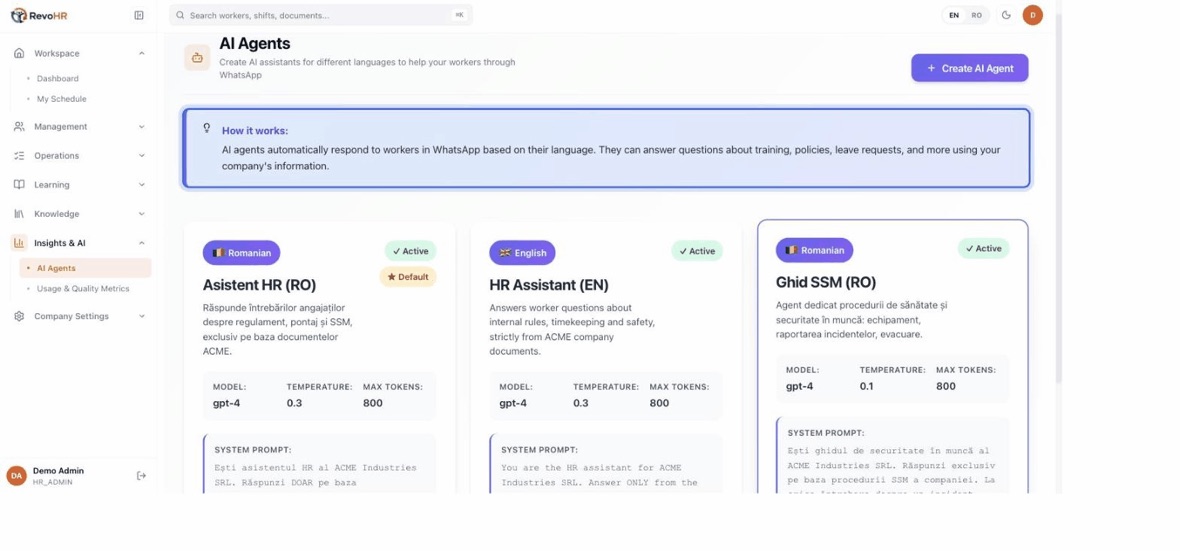
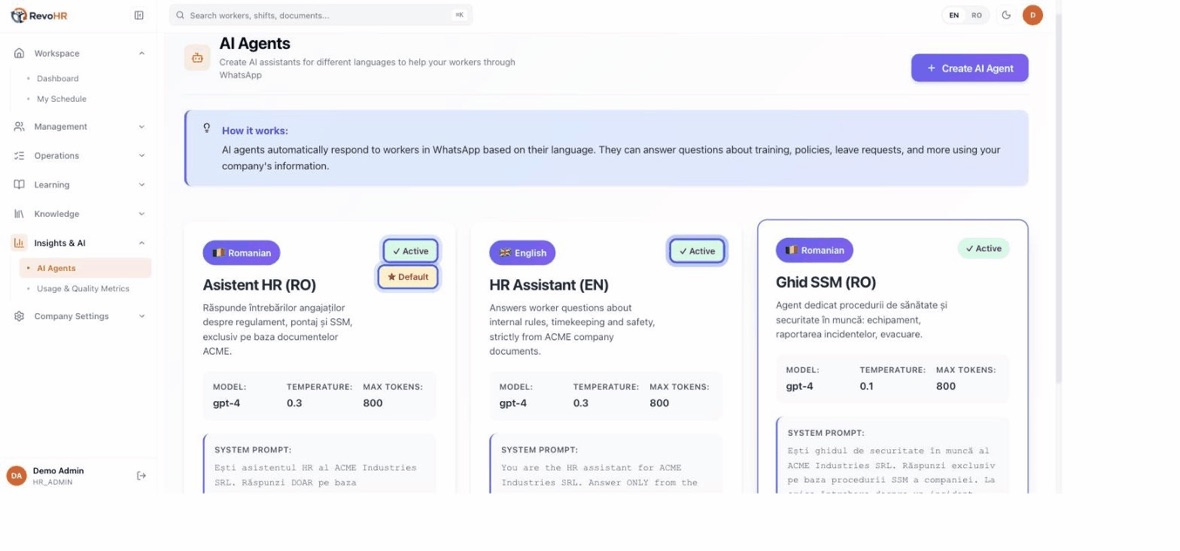
    Read the explainer once: which agent answers is decided by the worker's preferred language, not by the order of this list and not by anything the worker types.
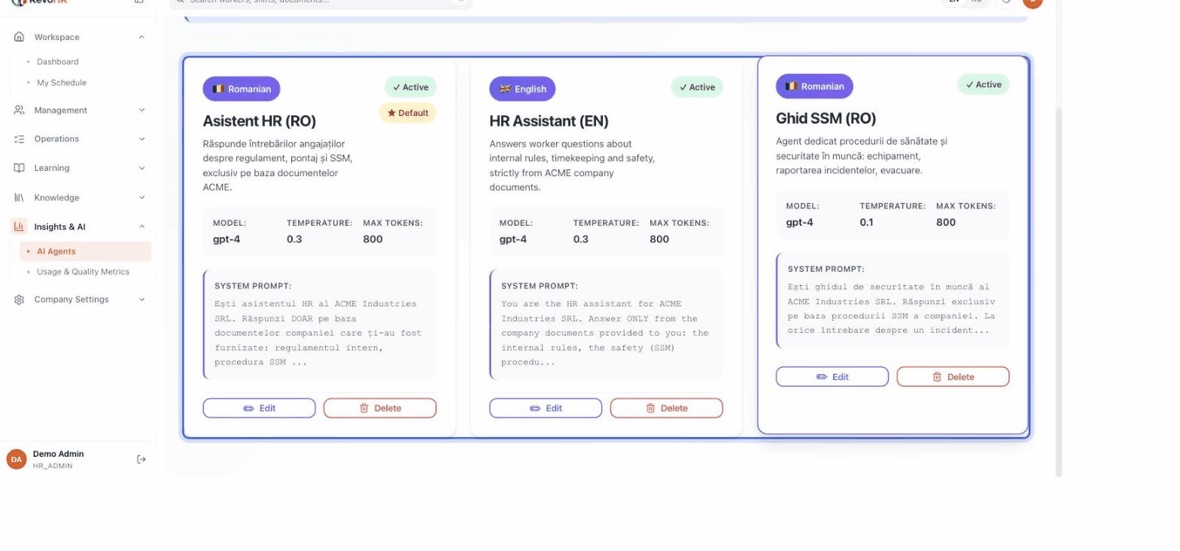
    One card per agent, and everything that shapes its behaviour is on it: model, temperature, max tokens and the system prompt. This one is told to answer only from ACME's own documents.
    Active means it is answering. Default is the fallback for a worker whose language has no agent of its own β€” so keep one, and keep it sensible.
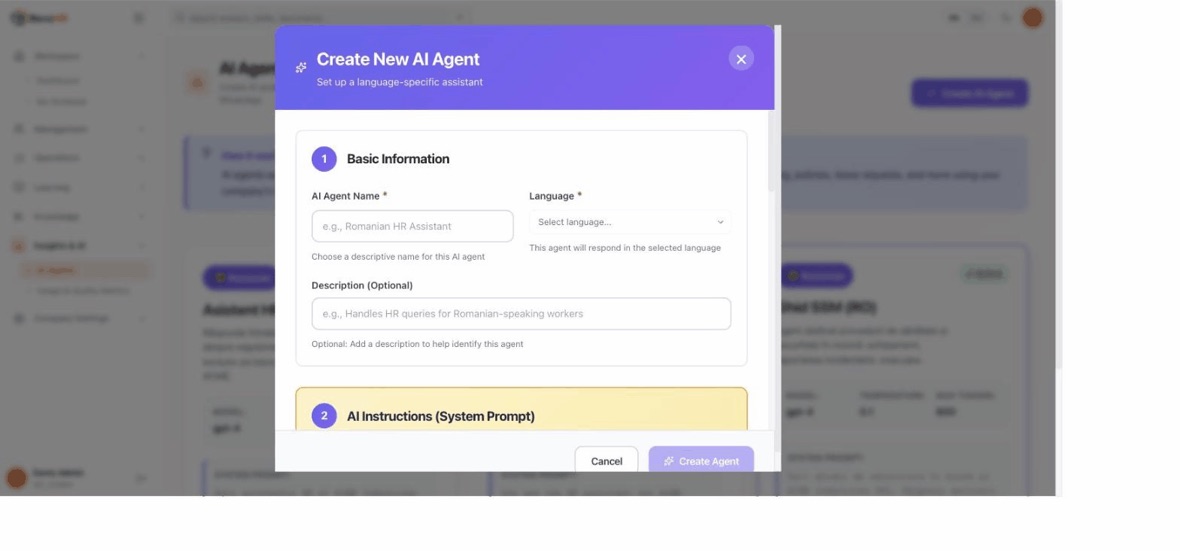
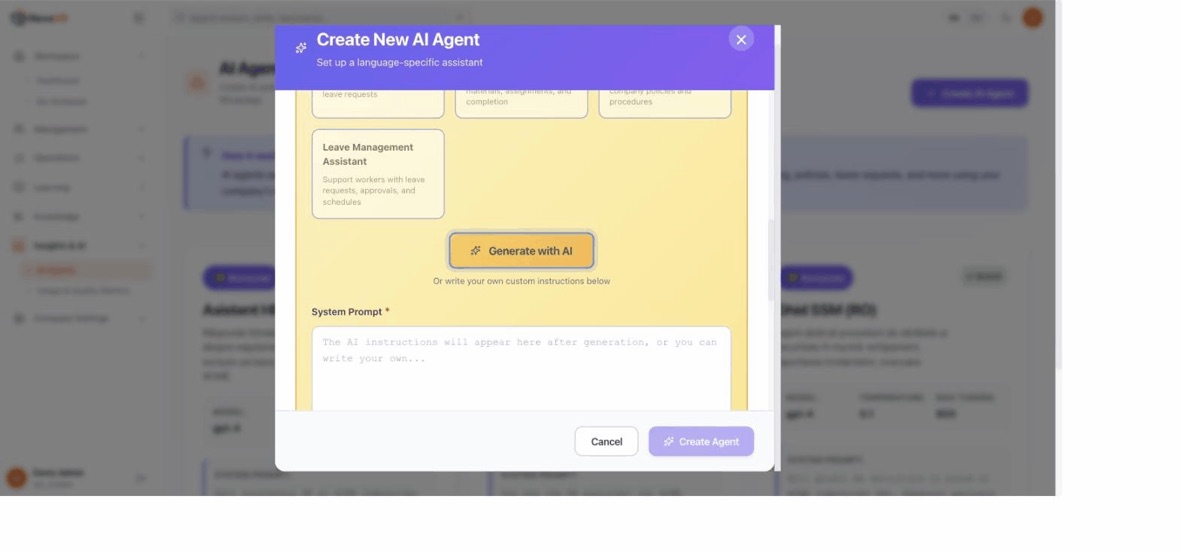
    Create AI Agent opens one dialog. One agent, one language.
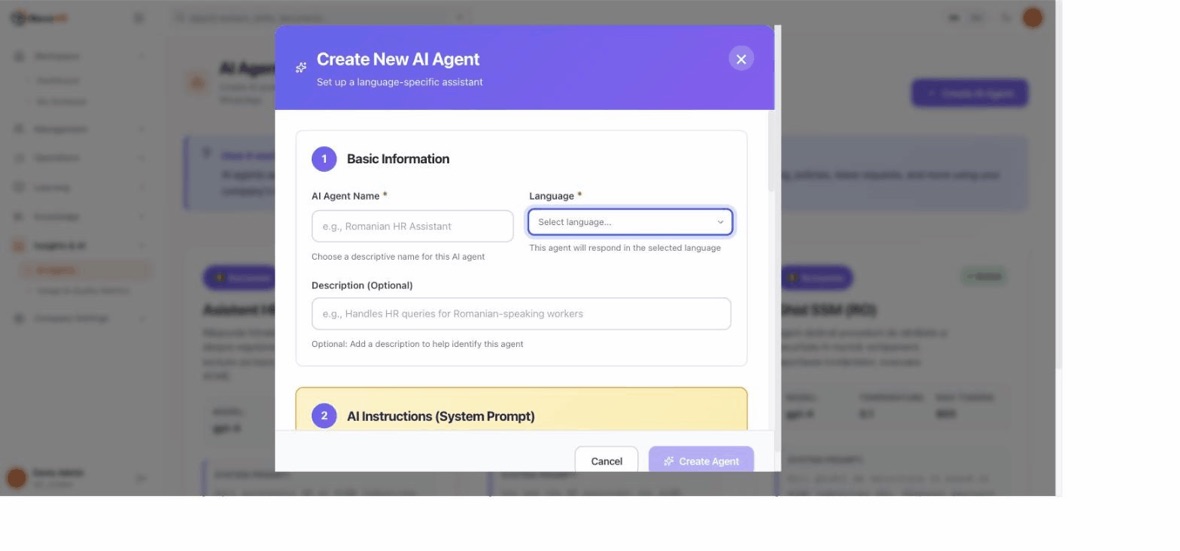
    Name and language first, and the order matters: the prompt helpers below stay disabled until a language is chosen.
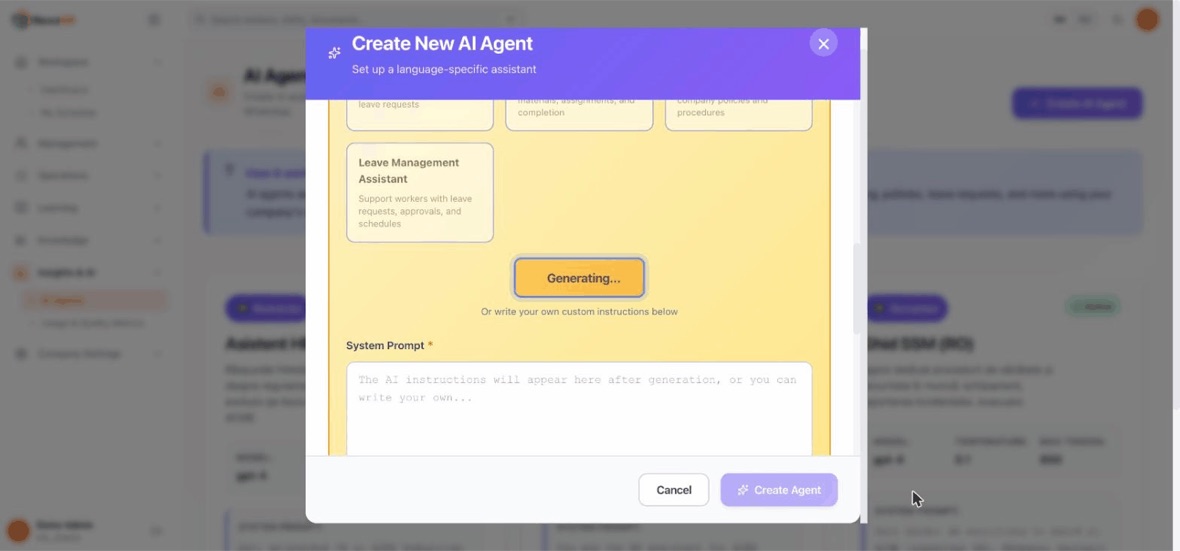
    Three purpose templates and a Generate with AI button. Worth knowing before you click: a template is not static text β€” picking one calls the model.
    So the button says Generating and you wait a few seconds. This is a billable call, small but real.
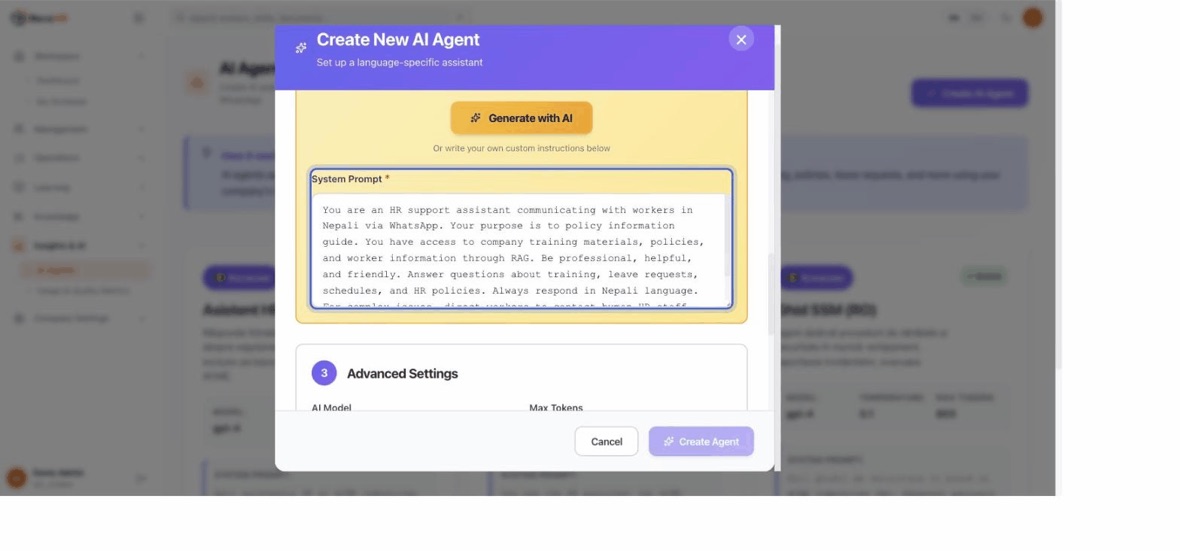
    Then read what came back before you keep it. This one produced "Your purpose is to policy information guide" β€” the template's name dropped into a sentence that does not parse. Rewrite it; the agent obeys this text.
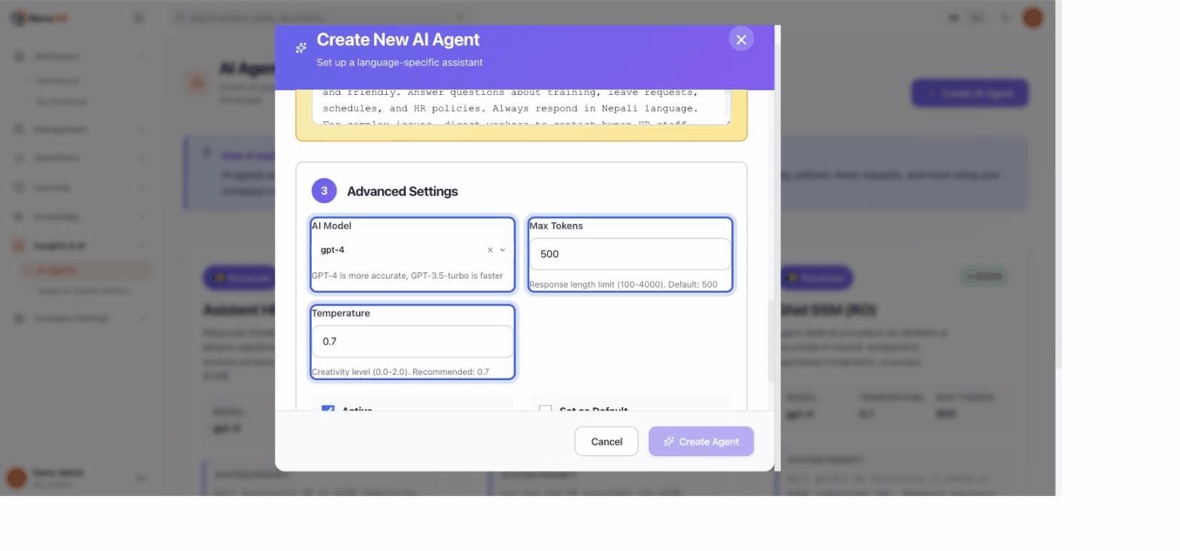
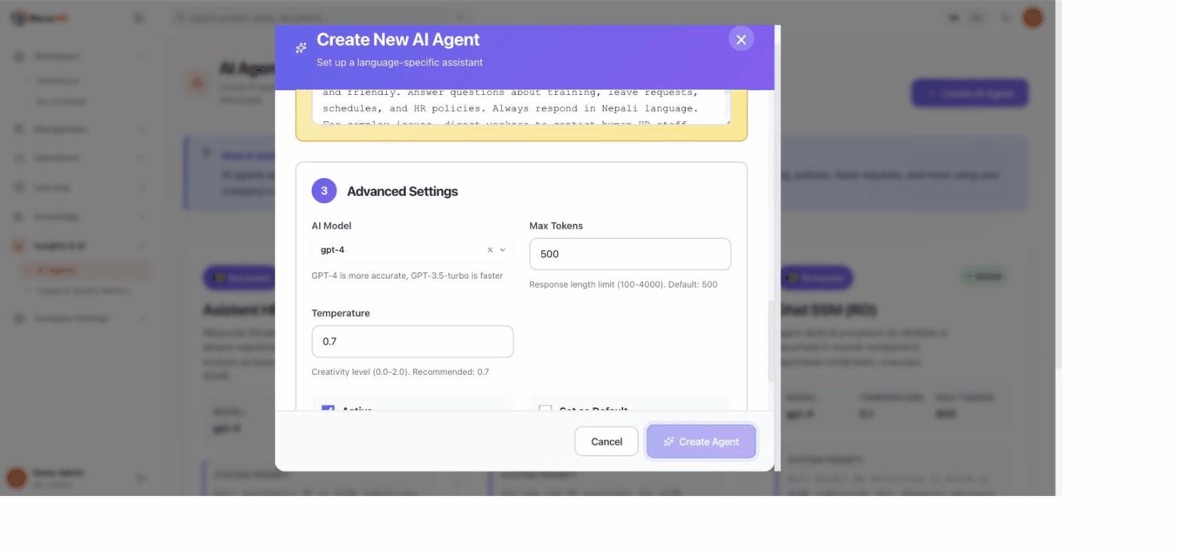
    Advanced settings: model, max tokens, and temperature. The 0.7 default is a general-purpose value. An assistant answering about leave entitlement should be consistent, not creative β€” 0.3 to 0.5 suits HR work.
    Create Agent saves it. From then on, every worker whose record says this language talks to this agent β€” so the language on the employee's record is what wires the two together.
    1. Have the prerequisites: an OpenAI key in Settings, and employees with preferred languages set.
    2. Create one agent per language: name, language, system prompt, max tokens, temperature and model.
    3. Use the prompt helpers β€” both need a language chosen first. Generate system prompt writes one from a plain-language description; purpose templates give you four starting points.
    4. Set the temperature low. An assistant answering questions about leave entitlement should be consistent, not creative: 0.3–0.5 suits HR work, and the 0.7 default is a general-purpose value.
    5. Assign from the employees list. Which agent replies is driven by the worker's preferred language, not by the order of this list.

    Watch out

    The assistant is not a scripted menu. It reads the worker's real records and acts on them β€” checks a leave balance, files a leave request, lists shifts, requests a shift change, answers from your documents, raises a complaint. What it can reach depends on what your plan includes.

    Back to chapters

    The other side

    16

    What your workers see

    Every other chapter describes what you see. This one describes what happens on the worker's phone. It has no screenshots and no video, because there is no application β€” there are conversations.

    1. Attendance: they never type to clock in. RevoHR prompts them shortly before the shift with Check in, I'm late and Can't make it. Check in asks them to share their location.
    2. Leave is a conversation, not a form. The assistant looks up their real balance and the real leave types you configured, and always confirms before submitting β€” nothing is filed from an ambiguous message.
    3. Schedule: β€œwhen do I work next?” returns published shifts only, for the next two weeks. They can also request a shift change, and the assistant offers only shifts that genuinely exist.
    4. Policy questions are answered from your document library, never from general knowledge, and the source document is named. If nothing relevant is found, the worker is told the topic is not covered and directed to HR.
    5. Complaints are deliberately two steps. The assistant summarises what it understood and asks for a separate YES within five minutes; saying no, or changing the subject, cancels it and the worker is reassured nothing was sent.
    6. Taking over yourself: messaging from the Chat tab silences the assistant for 30 minutes, extending each time they reply, so you and the bot never answer at once. It resumes automatically.

    Watch out

    Voice notes, photos and documents are not read β€” the worker is told to type instead. WhatsApp's Live Location is not the same as sharing a location, and RevoHR explains the difference. During a quiz the assistant is fully occupied, so a worker cannot request leave mid-training. Message templates are approved in English and Romanian only; other languages fall back to English for those specific templates, though the assistant's own replies stay in the worker's language.

    Back to chapters

    Licence

    17

    Read your subscription and usage

    One page shows your package, your contracted seats, your monthly price and your current usage. Company Settings β†’ Subscription, or Insights AI β†’ Usage and Quality Metrics; both open the same page.

    1:248 stepsEnglishSilent β€” the captions carry the narration.
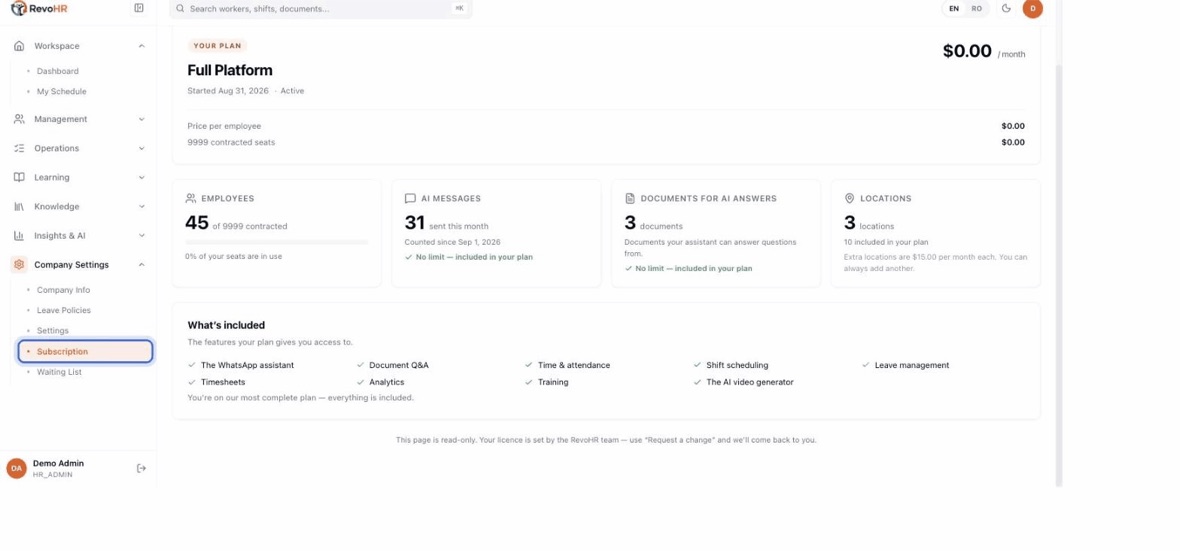
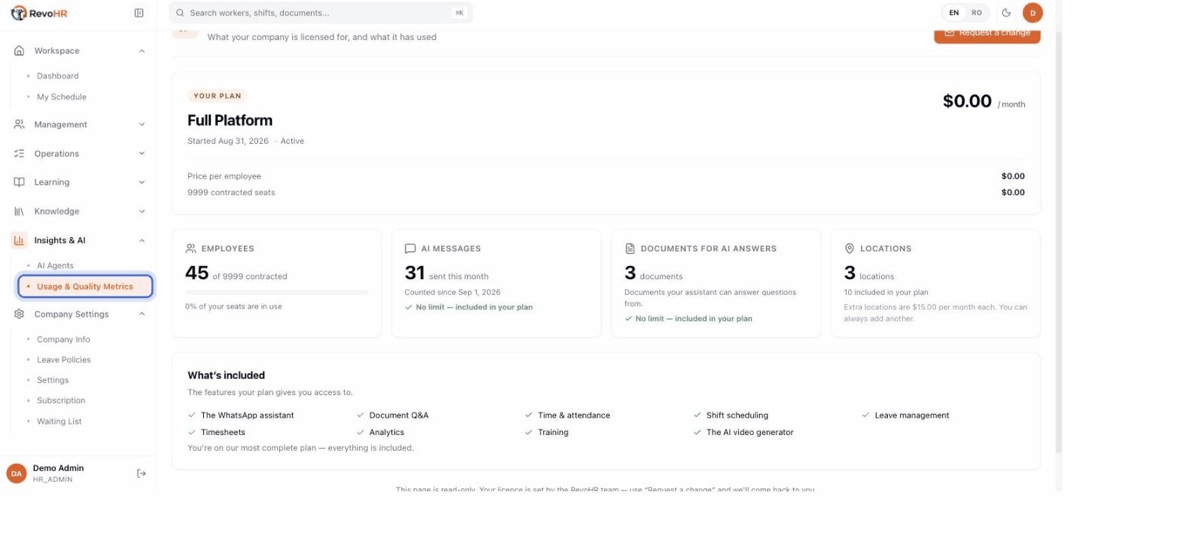
    Company Settings β†’ Subscription. One page for what you are licensed for and what you have used.
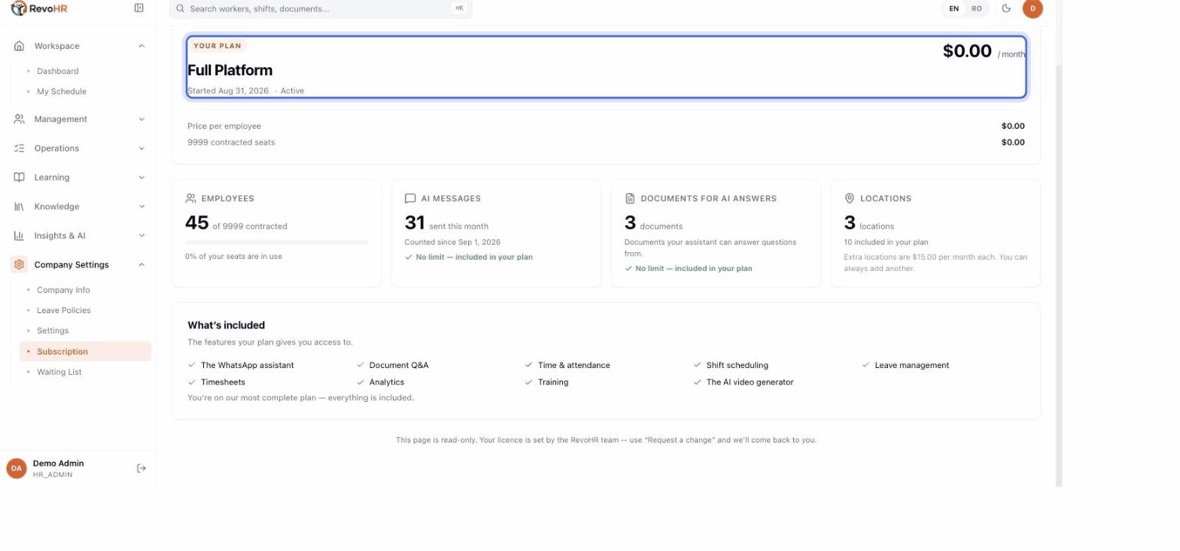
    The plan header: which package, since when, the monthly price and the price per employee. Everything below is measured against this.
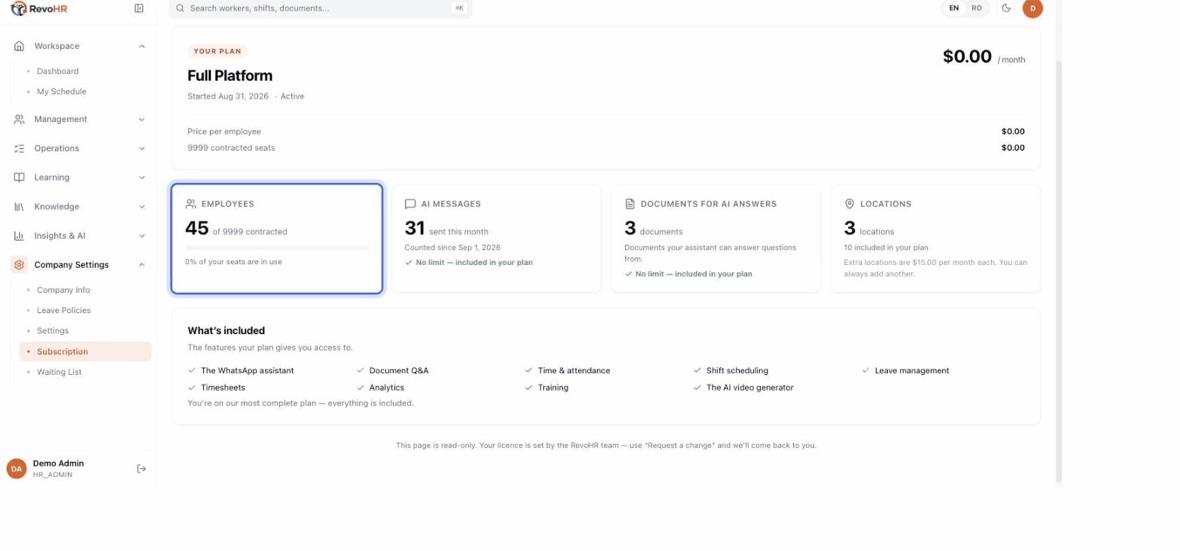
    Employees is the one measure with a bar, because seats are the one thing that can run out. Adding someone past your contracted seats is refused, with a message naming both numbers.
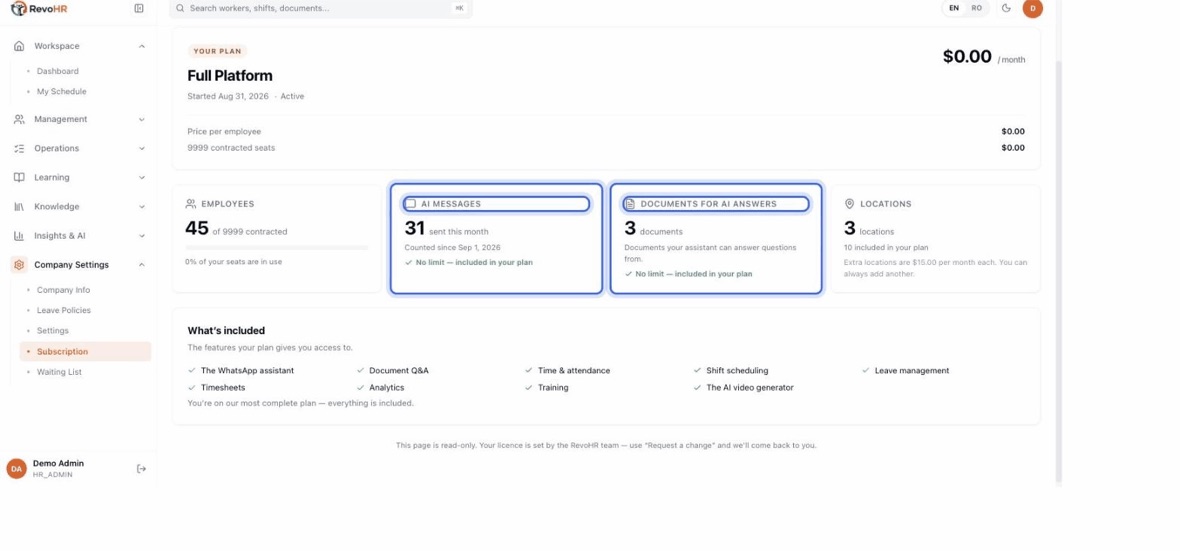
    AI messages and documents are plain numbers with no bar. That is deliberate: they are sold uncapped, and a bar would imply a ceiling that does not exist.
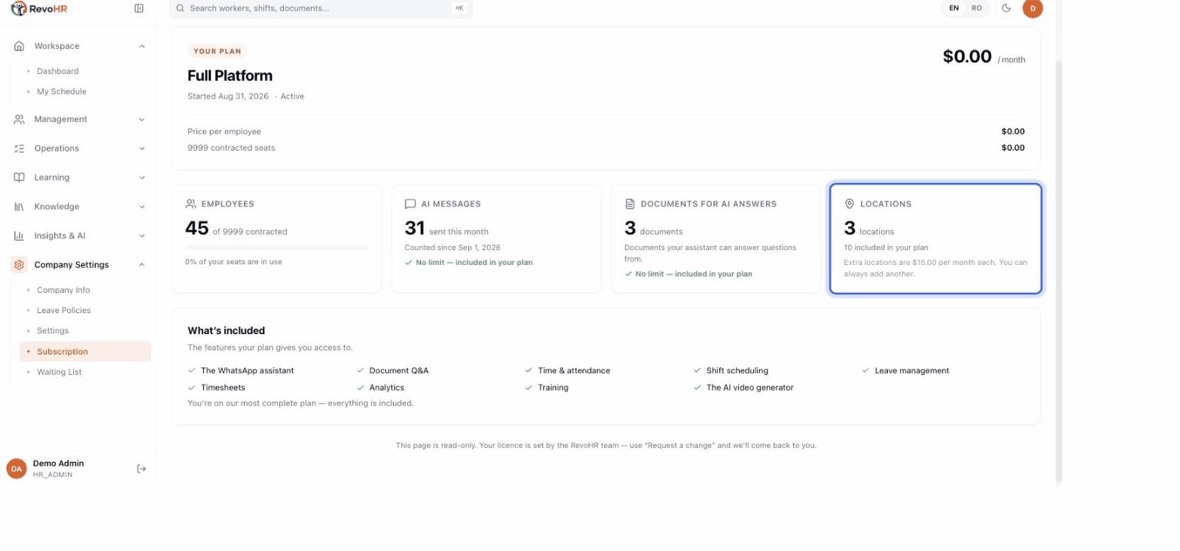
    Locations is an allowance, not a limit. Going over blocks nothing β€” extra sites are simply added to the invoice at the stated monthly rate.
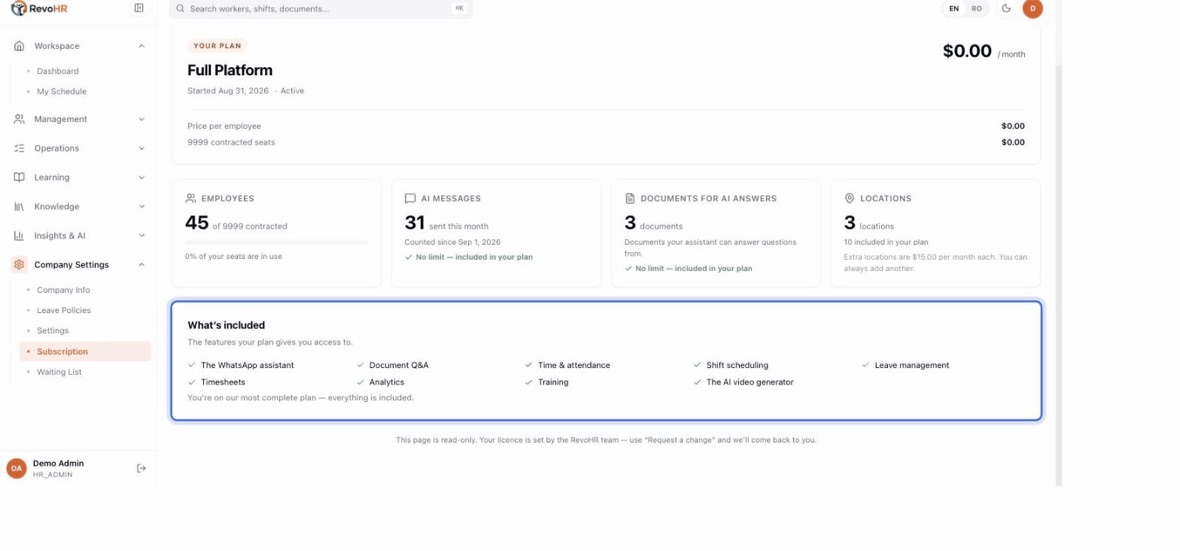
    What's included is the honest feature list for your package. If a menu item is missing from your sidebar, check here before assuming it is broken.
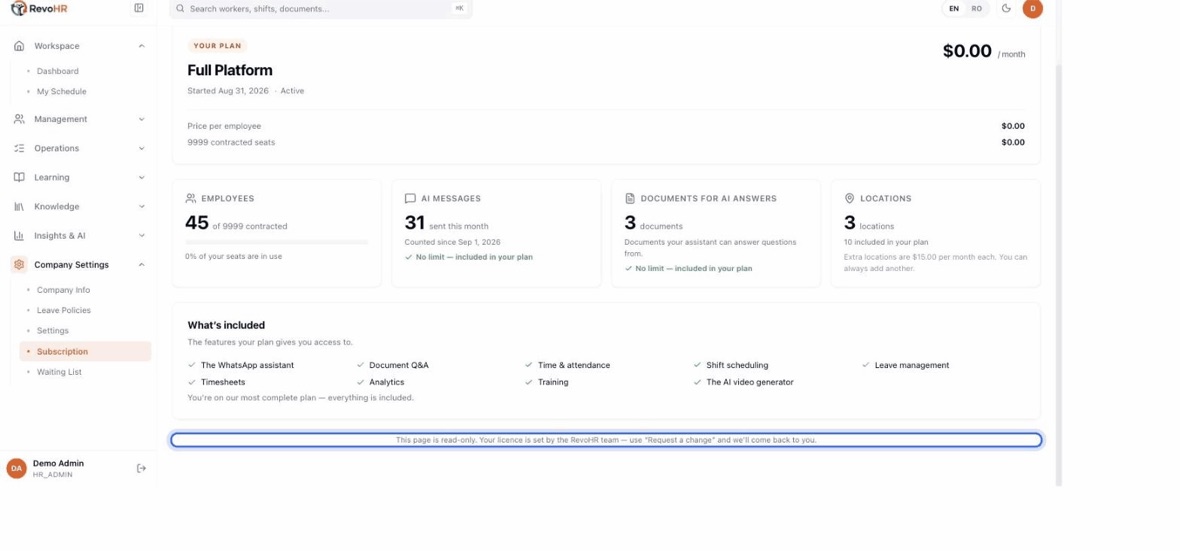
    The page is read-only by design. A licence carries negotiated terms, and a self-service change would discard them silently β€” so changes go through Request a change.
    Insights & AI β†’ Usage and Quality Metrics opens the same page. Two doors, one room β€” do not go looking for a second set of numbers.
    1. Read the four measures: employees as a bar against contracted seats, AI messages and documents as plain numbers, locations as an allowance plus any billable extras.
    2. Understand the missing bars. AI messages and documents are sold uncapped, so drawing a bar would imply a ceiling that does not exist. Seats are the one dimension that can be exhausted, so seats are the one with a bar.
    3. Request a change rather than editing. The page is read-only by design: once a licence carries negotiated terms, a self-service change would silently discard them with no way for you to know what you gave up.

    Watch out

    Going over your locations allowance blocks nothing β€” extra sites are added to the invoice. Adding an employee beyond your contracted seats is refused, with a message naming both numbers. That is the one hard limit in RevoHR, and you are warned in advance when scheduled future hires would take you over.

    Back to chapters

    How to use RevoHR

    Seventeen chapters, in the order you would actually do them: set the company up, run the rota, teach and answer, then see what your workers see. Every chapter has the screens, the steps, and β€” where there is a screen to record β€” a short silent video of the real interface.